I should have the parts. Though I'm not part number or serial number savy like David is.
Is the flywheel key still in the crank shaft? Is the end of the crank shaft good? Threads for the flywheel nut. Open up the points cover and make sure they are there too.
According to all the info I have, a standard A-47-11 flywheel should be fitted to s/n 063124.
There were some incompatible flywheel & starter-dogs for older engines (not a problem here as they must also be missing) and the earliest engines need a different flywheel, due to the crankcase casting differences.
We had a count on here a while back, I can't remember who had the most O&R tools at the time, I think we set the rule as counting different designs and not counting identical products with multiple brands, nor duplicates.
Problem is I haven't maintained my list, with all everything that has happened in the last year & a half, I lost several relatives and for a while hobbies got sidelined while we dealt with sorting & moving my Grandparents collection & everything else they filled the house with.
Pictures are indeed worth a 1000 words! Dave, what kind of camera are you using? Pictures are very sharp.Lighting is excellent .
My older pictures were from a old compact digital camera, I still use it occasionally, but mostly use my Sony phone these days, it takes quite good pictures when I manage to hold it steady . There is a window in the roof that gets good light during the day, but lighting can be very tricky in the evening, need to get round to adding some more lights above the workbench, I even have some I fluro units I salvaged from a relatives garage ready (I can't stand LED lighting, they only seem to be made in way too bright).
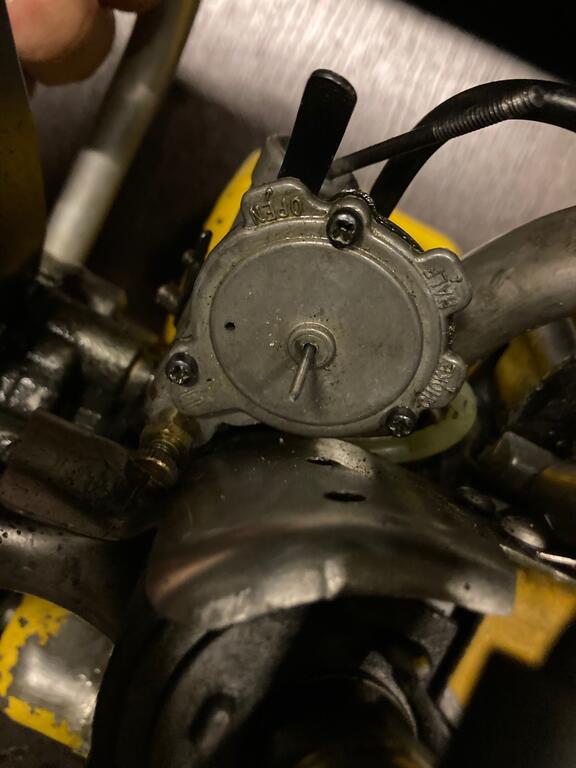
Its not possible to get fuel over the pump. The vent of this carburetor is a little rubber knob and i think this thing does not work.
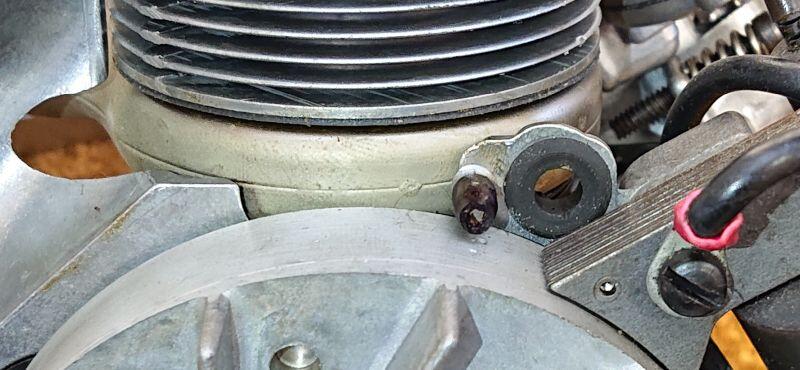
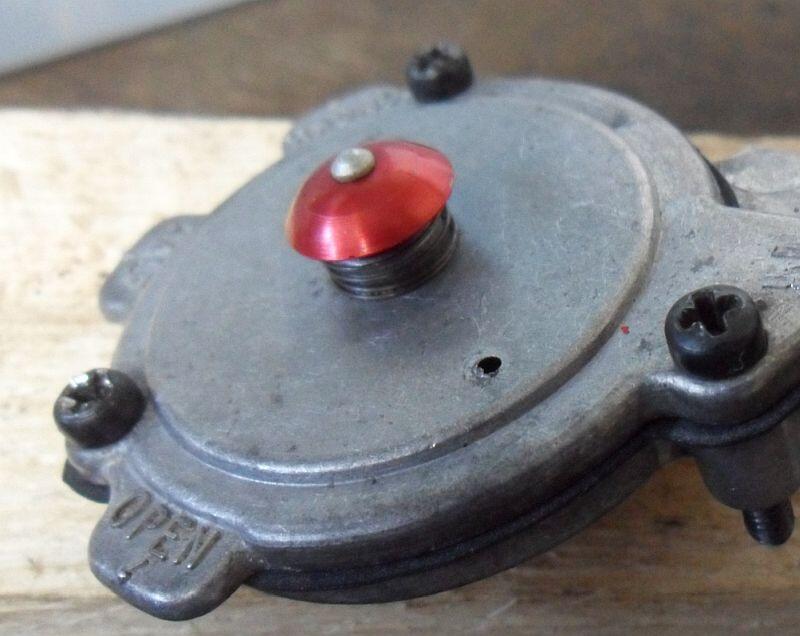
Having looked at one of the carbs with the primer button, I can tell you that the hole for the primer mechanism is larger than the hole that nail is fitted through.
I suspect your carb top is one of the later ones where they omitted the primer function for some unknown reason, we have seen these on a few later engines, for example this generator I have has the later blank carb top.
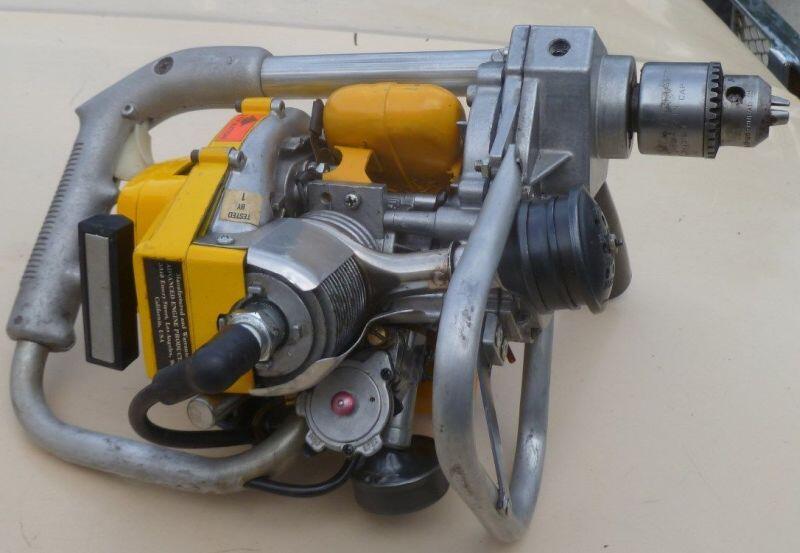
But oddly my 1978 Drillgine (AEP branded) does have the primer button, it has the same type 13B403 engine as your 1975 Drillgine.
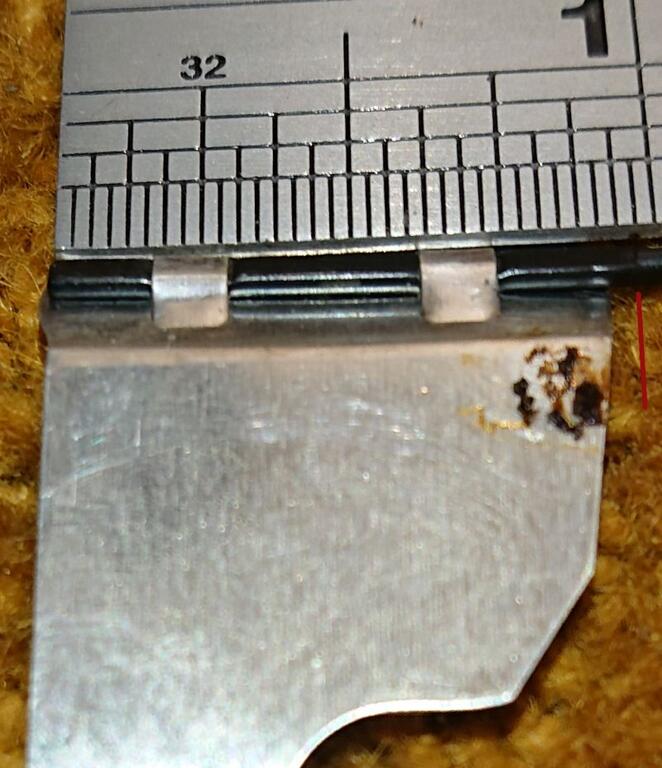
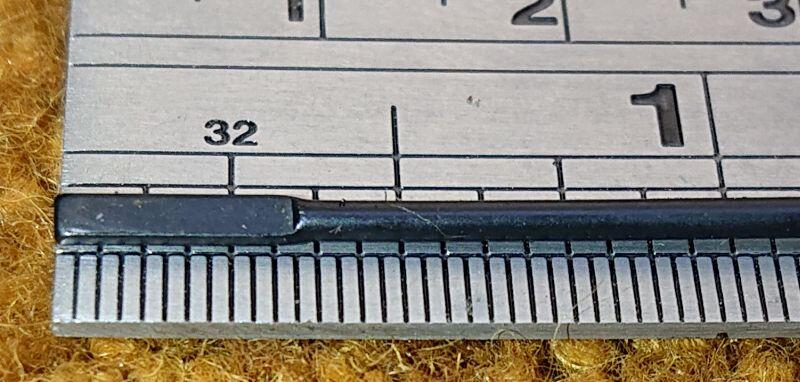
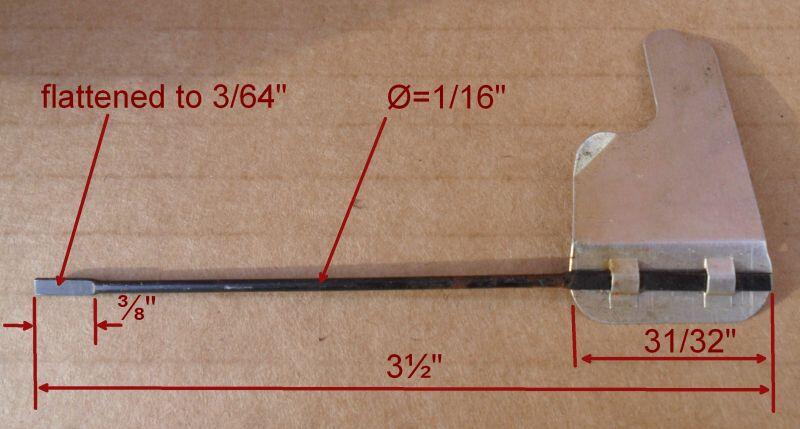
I've checked a second governor vane today, from s/n 015990, the length of the vane shaft is the same at 3½".
The flat at the vane end is the same at 31/32", note the pressed notches that line up with & hold the vane flag in position, I guess these might not be necessary with modern glue.
The other flattened end differs slightly in length, the one I measured the other day was 3/8", this one is 1/32" shorter, this doesn't make any difference as neither go all the way into the carb butterfly valve.
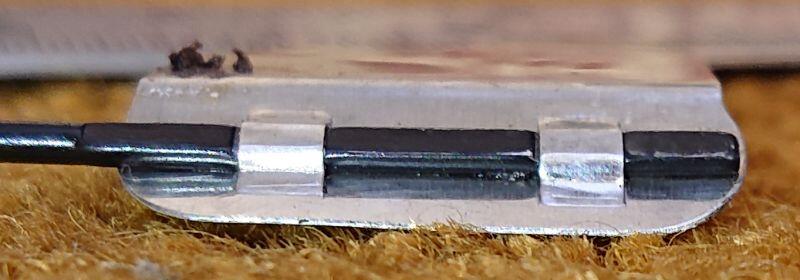
A couple more pictures, one showing the vane in place and the second the sleeved pin it rests against.
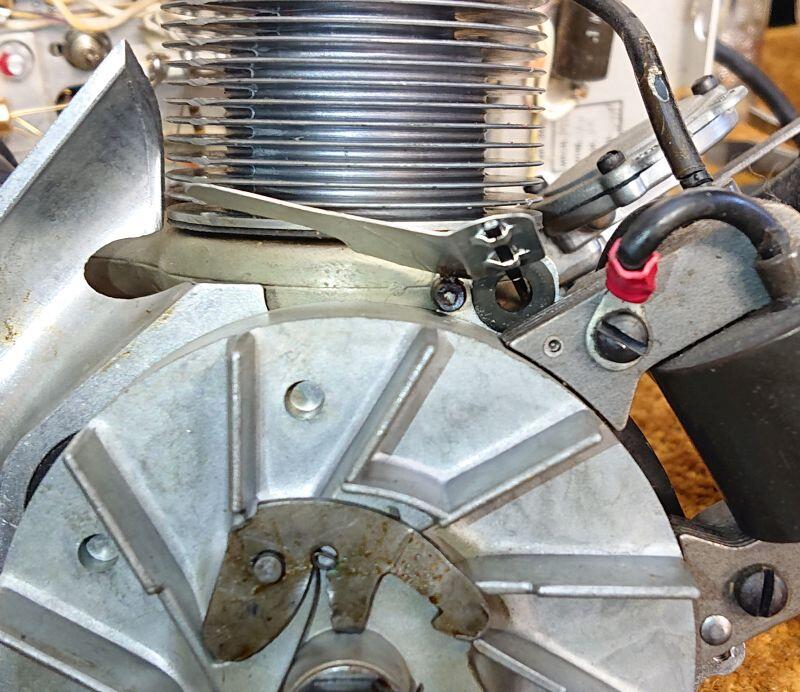
And finally a couple of pictures to show the shape of the butterfly valve lever, that the governor vane fits into.
I'm glad someone asked for the Type of that Polaris snowblower engine, I see the seller has added the picture showing the Type 135, unfortunately it's not what you want as it has the double reduction gearbox, not confirmed but probably 900 rpm (same goes for the Type 144 I have on my Polaris power head).
Note: engine Type 181 mentioned yesterday is the Chicken Power engine and the PTO sticks out the opposite side of the gearbox. Type 201 is also the same.
I'll try & find that type of governor vane to measure and have a look at engine s/n 015990 I have.
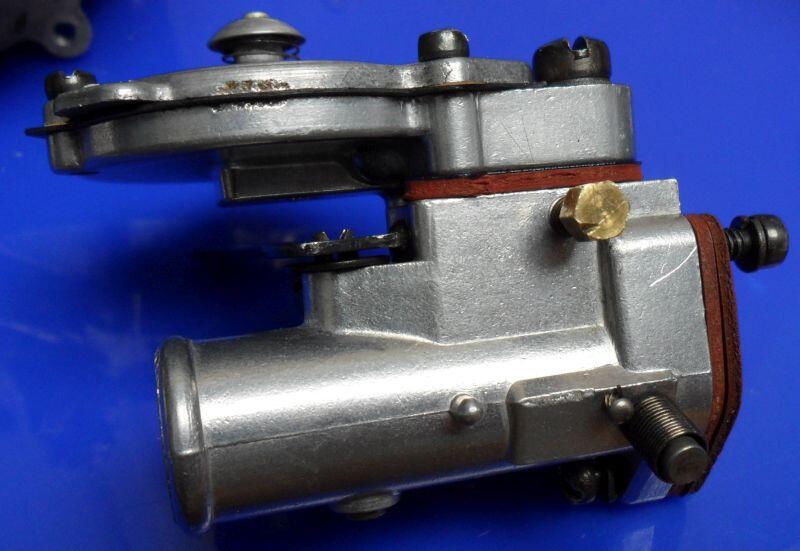
The bottom half of the carb was only offered as a complete assembly, the lever isn't intended to be removable.
It's possible one could be obtained from a carb with a damaged casting and reattached with careful soldering/brazing (to avoid melting the casting), but there isn't much left to attach to in your pictures.
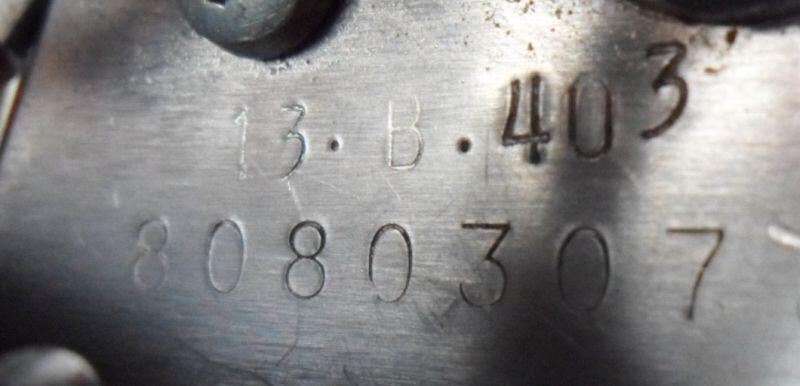
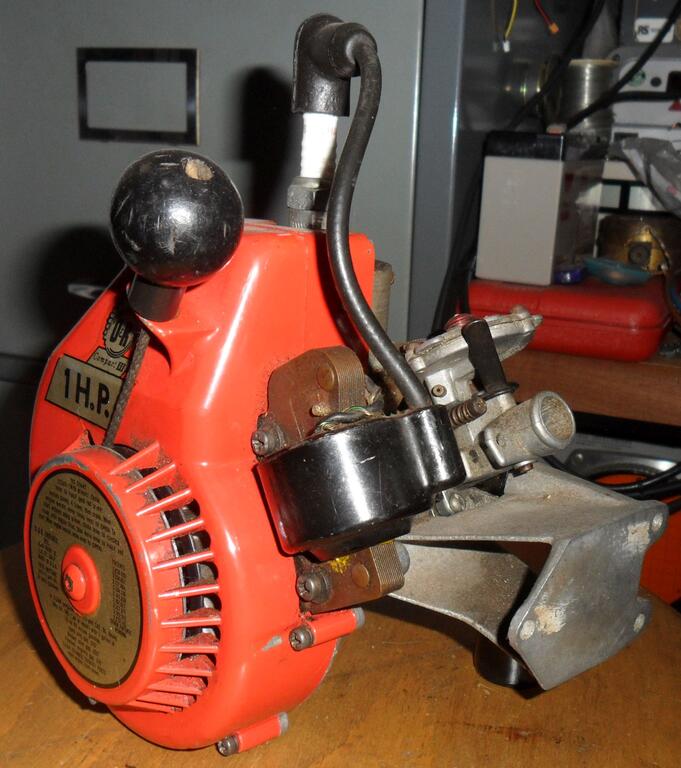
i have some carburetor problems with my drillgine of nov. 1975 no: 13B403 and 5110787.
Its not possible to get fuel over the pump. The vent of this carburetor is a little rubber knob and i think this thing does not work.
However the fuel goes just a little bit don and high inside the fueltube.
I dont like to put acarburetor of a newer machine on the drillgine.
So does someone maybe knows how to become parts für this carburetor, or a other carburetor?
I live in Germany
Thanks Jens
On 11/4/2021 at 10:29 PM, Wallfish said:
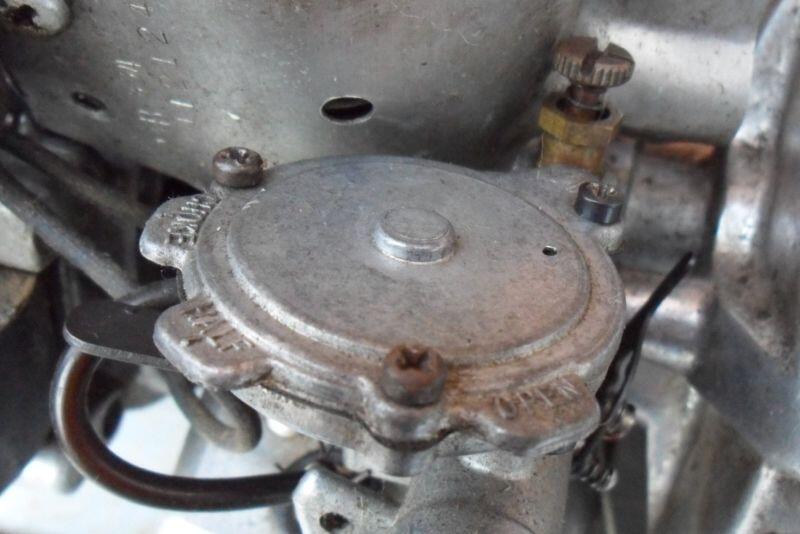
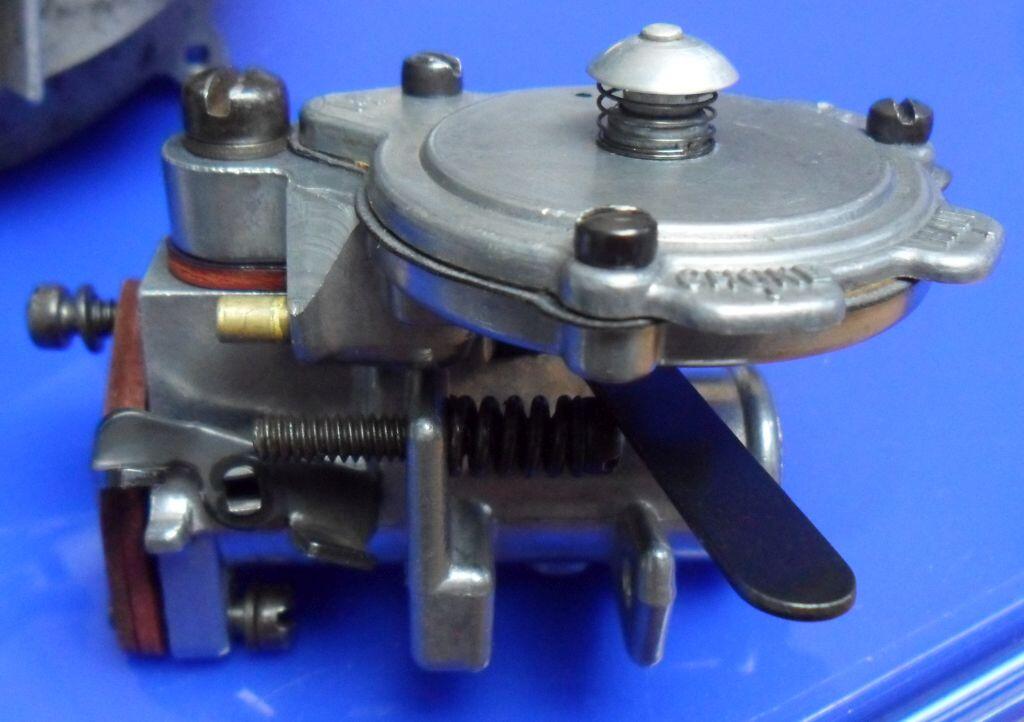
That's a newer style carb. They changed to the rubber stopper type arm on the end of the arm instead of the older ball bearing check valve type. Replacement arms for that type are difficult to find. Also, someone drilled out the original primer button which was on top of the cover for some reason ???
When the fuel just moves back and forth it's because the check valve which is a One Way valve (rubber) is not sealing.
It may be best or easiest to swap that entire diaphragm part with another style with the ball bearing valve. It will bolt right on as they are the same.
Maybe a small remote control inline check valve will also work but it must be designed for fuel
It's possible the primer mechanism fell off, they are only held together by the end being pressed together, onto the brass disc inside.
Maybe it can be repaired by making some parts to fit.
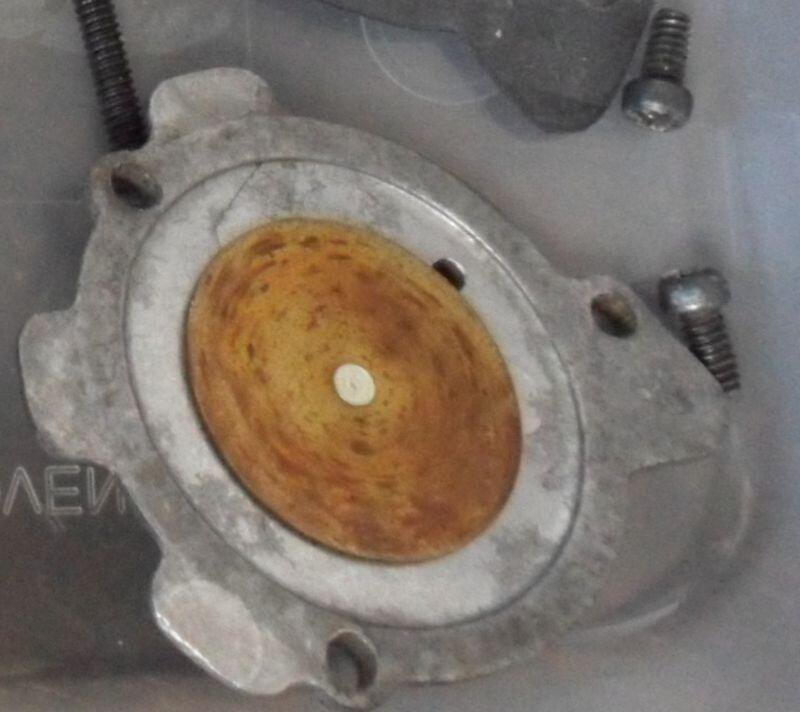
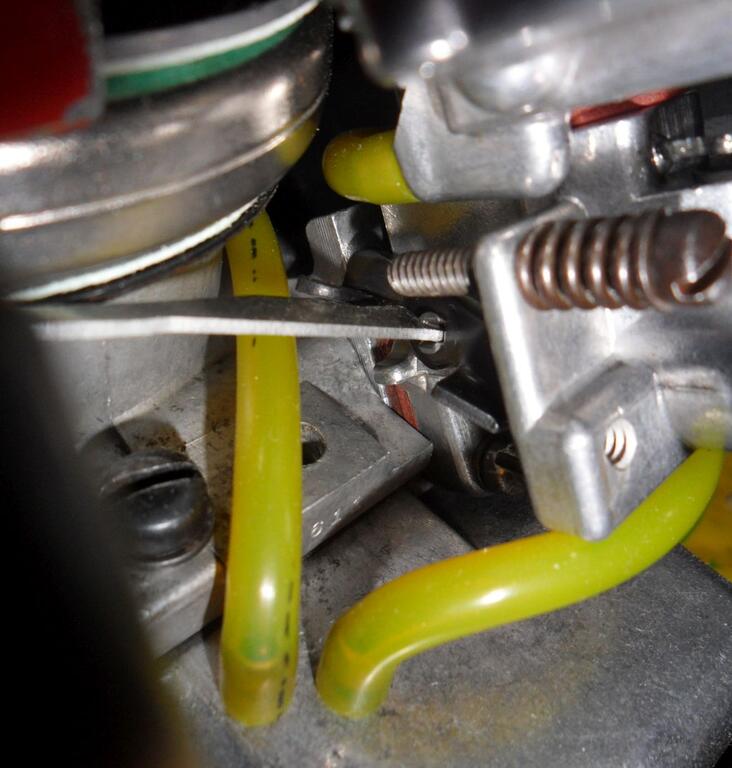
The diaphragm arm spring should be on top of the diaphragm arm, to hold the seal down, as shown below.
You probably also need to clean the filters in the fuel line & brass check valve (if fitted), clean the tank and fit new fuel lines.
As well as replace the diaphragm itself and fit new air filter foam.
I think that a good place to start is at the beginning of the Ohlsson And Rice blog. There is an excellent O&R Carb Repair Tutorial that I found very usueful. Also if you have access to You Tube , Mustie 1 has videos on Jan, 20, 2018 "will it run? antique gas powered drill"..It might be of help. It is a two part video.Search you tube as written inside of the quotation marks
John
It can't stand watching those videos, why they didn't do some research (or ask) on the correct way to take these engines apart I don't know.
Some-things you should not copy from that video;
They remove the flywheel by levering with screwdrivers, correct way is to loosen nut and hold flywheel and tap the nut/shaft with hammer to free the flywheel from the taper.
The use of flat nose pliers to reshape broken starter spring, great way to ensure a sharp bend that breaks easily, use round nose instead.
Ruins the later type fuel line check valve, why are they hammering it back with the carb assembled?
They couldn't even find a small spanner/nutspinner to undo the needle valve assembly from the carb, it's very easy to snap this part if overtightened.
We have since found out the little disc was glued to the diaphragm, in these later carbs
And the less said about "hand tool rescue" hitting the flywheel fins with a hammer the better and ruining an original tool by repainting it badly. I see it was a AEP branded Drillgine once too, this history is lost with the terrible paint job.
Neither video does anything to service & replace the dried out grease in the gearbox, it's most likely the engine shaft seals are bad too, some are non-serviceable in later production engines.
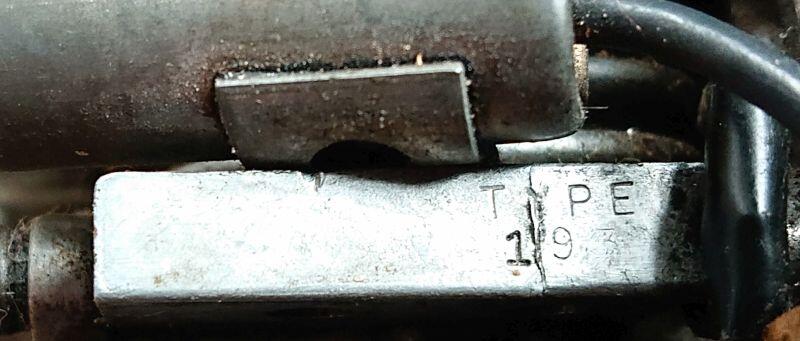
Please can you double check the engine type, as my information gives a Carbra (French) Hedge Clipper as having engine type 169, it should be a type 109 (C) for the Comet pump.
I did find the vane and a small broken spring from the starter dog assembly. The vane was bent.and the shaft from the vane to the carb was missing. The reason I was asking about carb inter-changeability is that the slot on the end of the throttle shaft... one piece has broken away. I'm not sure sure the connection from the vane assembly to the carbs throttle would remain in place and I may need to swap out cabs. I could take pictures but I am afraid they would show little. I will show a picture of the vane. The s/n of the engine is 016395 Type 169. I'll try for some pics tomorrow.
John
Some pictures of the type of governor vane for earlier engines such as your type 169, pictures were taken a while ago, need to measure one for the length of the missing shaft.
For reference the above vane belongs to this very early engine with no serial number.
Also found in my archived pictures from ebay, another picture from a Comet manual.
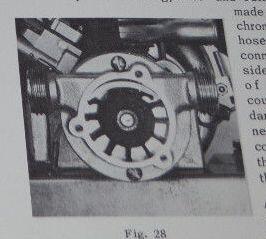
I believe I have only one of these impeller pumps (used on many variants of O&R pumps) that has an intact impeller, if only we could find something else that uses it, we have tried many times without success so far.
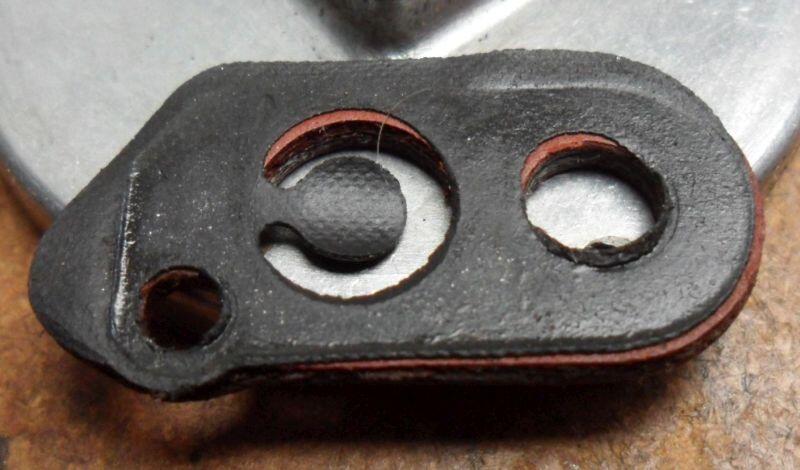
And given the age of your engine, it's highly likely that the carb could still have one of these perished rubber check valves, its is recommended to replace with the later mylar type, which carried the same part number (replicas are available if you haven't got one).
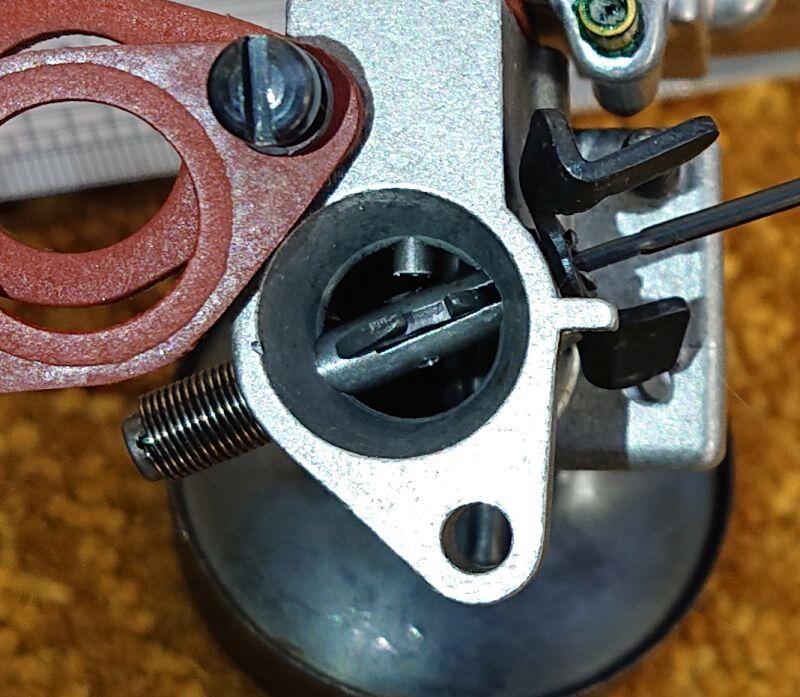
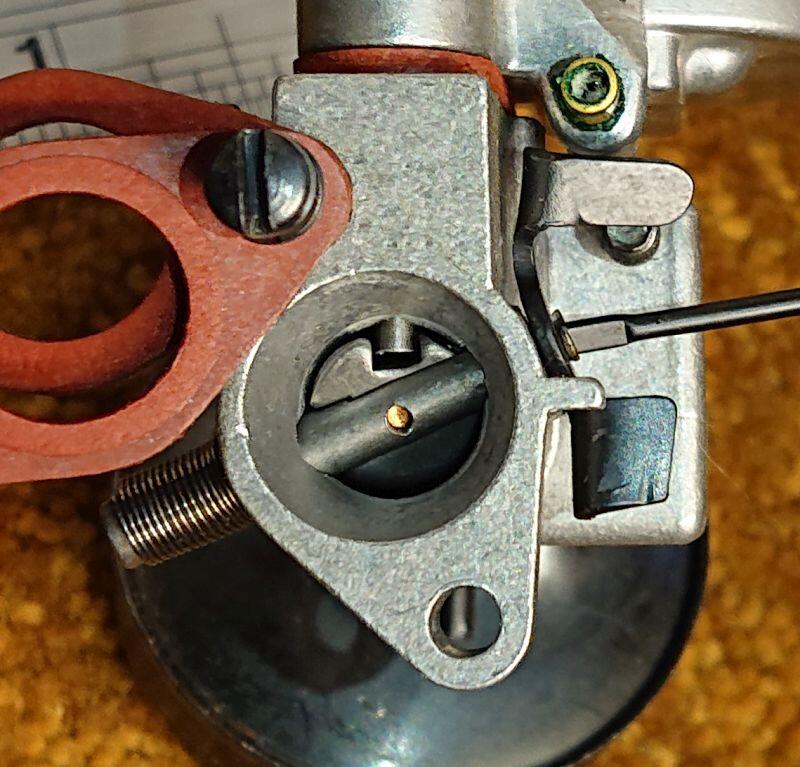
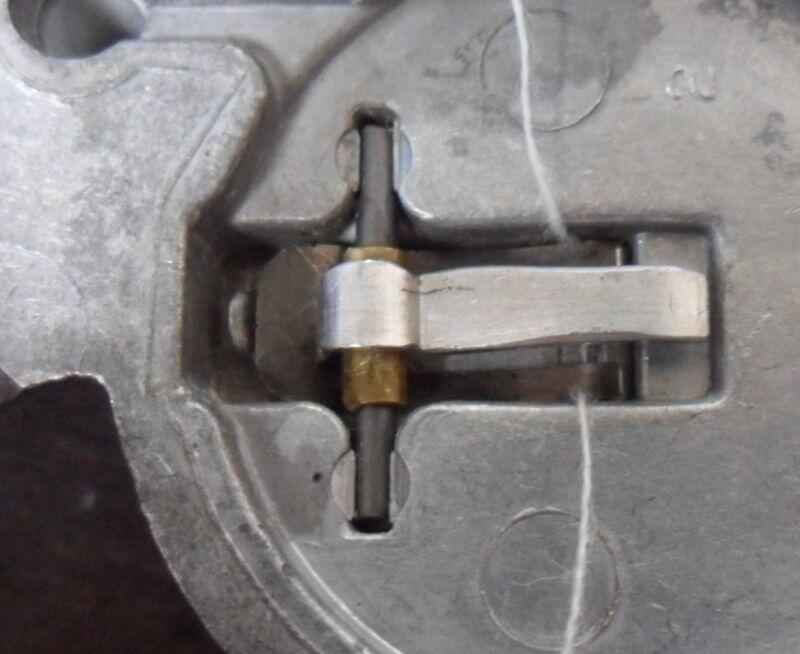
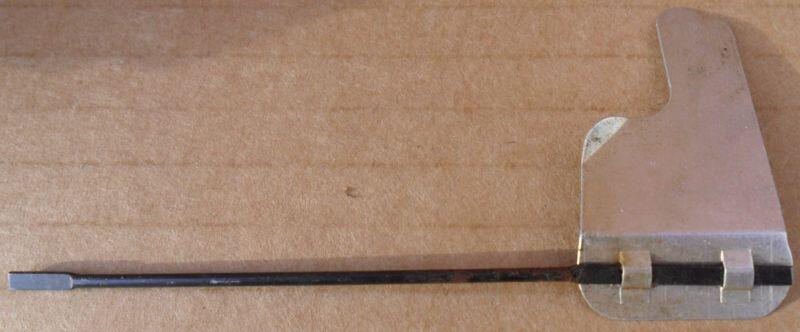
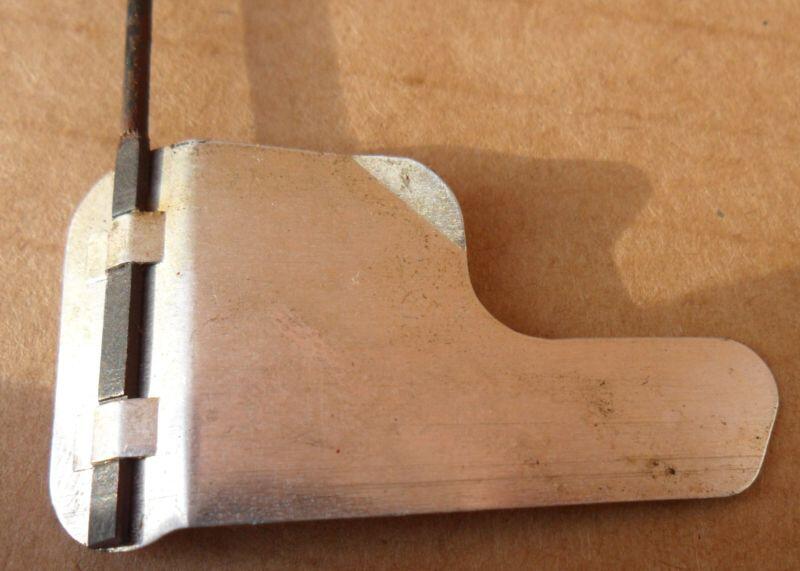
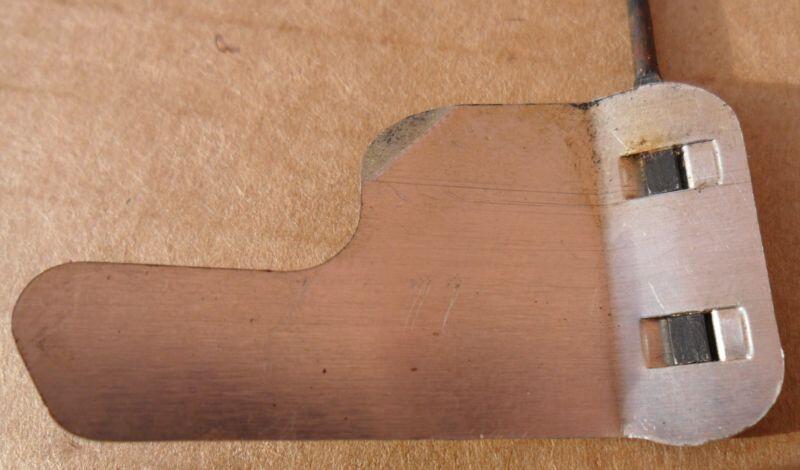
Some pictures of a carb showing the butterfly valve part that is missing from your carb, note some engines do not have the primer button (both early & certain types of late production).
Please either post some pictures of the engine or tell us the serial number and I can add some pictures of the most appropriate governor vane for your engine, as you mentioned you wanted to make one in the other thread.
Also I'm not sure why you would want to change the carb if it's running.
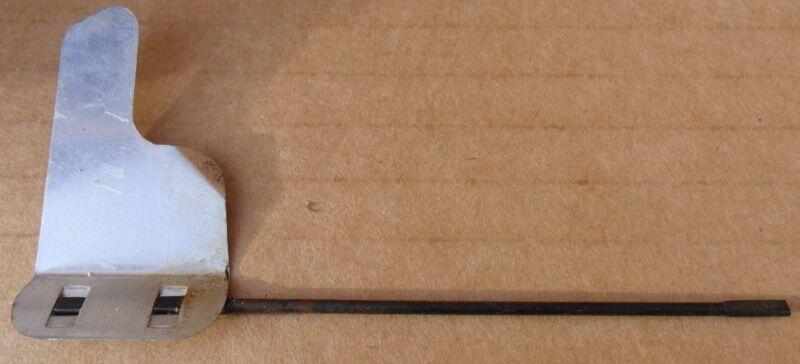
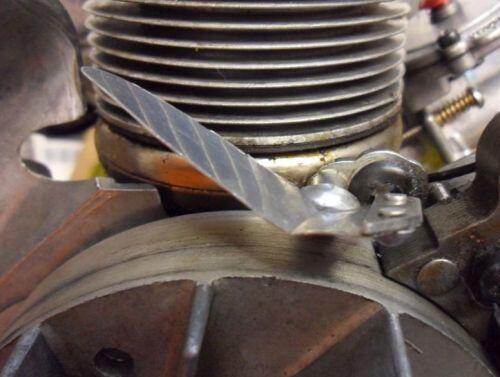
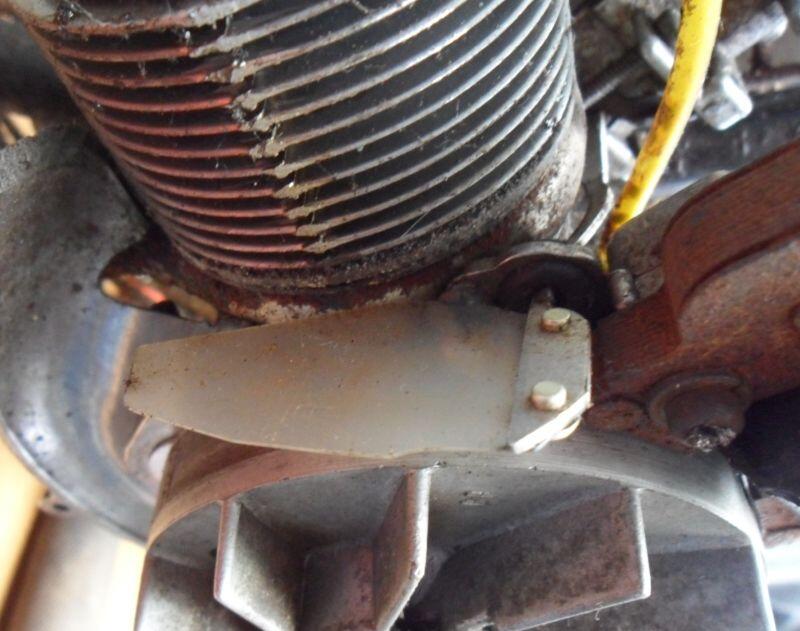
The governor vane should look something like these (design & materials vary depending on engine age), the vane is permanently attached to the vane shaft.
The governor vane shaft fits into the carb butterfly valve as shown.
It's a loose fit and if the vane has been bent or damaged it can rattle out when running, this also results in over-speeding, my first O&R did exactly this.
Possibly either the fuel line is cracked, or the carb needs cleaning, the small parts get gummed up with dried out oil.
A few on here have had the spring corroded away too.
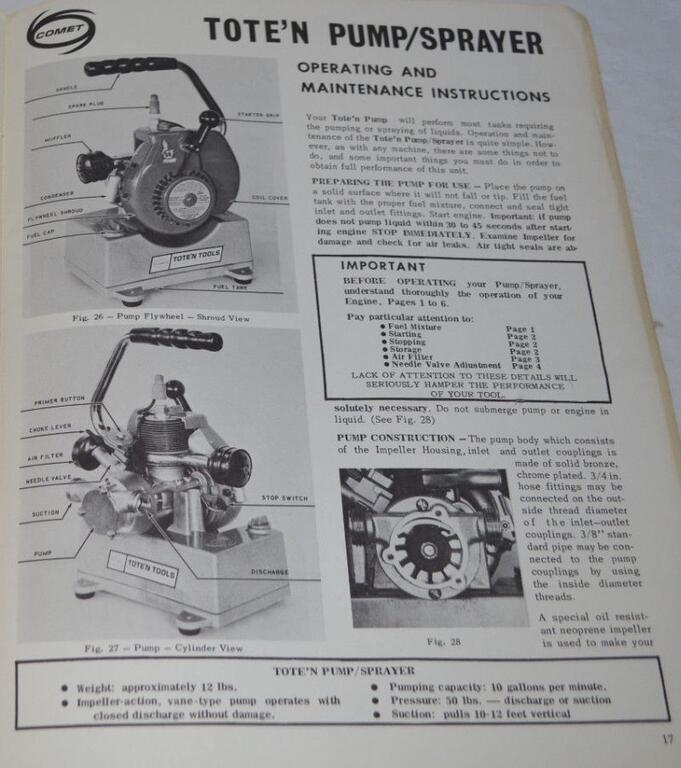
I don't have any literature for the Comet pump, in most of these small pumps the rubber impeller has failed, note: they should never be run dry, as this is the quickest way to ruin them.
I don't think I've added any Comet manuals to the sticky thread, but the engine diagrams are there.
These pictures from the Comet manual are not mine, they were uploaded by @neons a few years ago.
Hope they help, I do have some Comet literature, but not that manual AFAIK.
On 10/16/2021 at 11:26 PM, Wallfish said:
It's been a bit slow on the forum recently.
It's been a while since I've been on here, been quite busy since going back to work, also been helping my Dad sort & clear my Grandparents house, they both passed away earlier this year in care.
I've also had to rebuild my computer as the motherboard failed, new machine is much better & quicker, but just not got everything back on it, the Office disc has vanished, I was using that to create the pdf's.
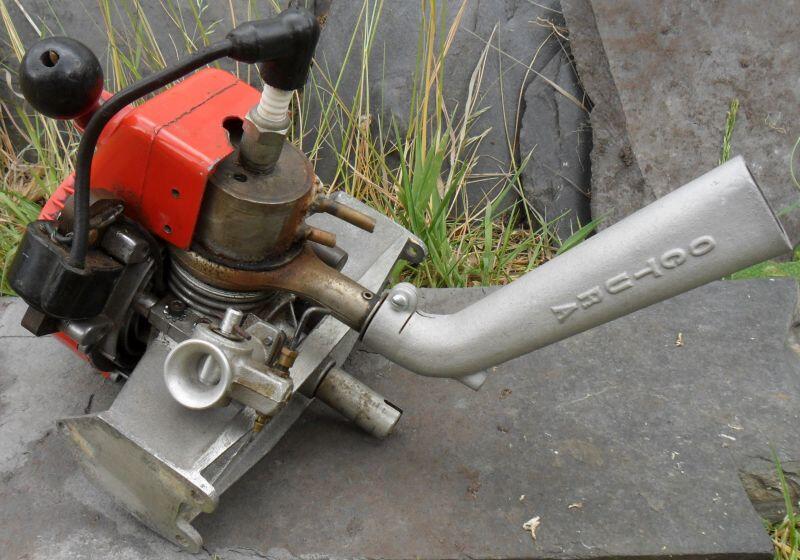
Nice to see another with the Octura mount & carb, the water-cooled cylinder with 10mm plug is original, O&R had a part no. for this one, possibly looks repaired where the tubes are attached.
The type 193 is a standard engine supplied by O&R for many uses, Octura bought them & would have supplied all the other parts.
I'm guessing it doesn't have the special Octura rotary valve, nor does mine & believe it or not, the serial number is only two numbers apart from your engine, someone lost the cooling baffles from mine (the plates with the serial/type decal).
Since acquiring mine I have added the Octura carb & an extra noisy open muffler.
I have one that I will be fixing the points on to get consistent runs out of, I got a reply about fuel ect from another site, I have listed the reply below. The whole points housing is very loose on the crank case and floats around while running.
Cheers
Andrew
Quote
Hi Andrew,
Looks like you are the proud owner of a fairly early model Ohlsson & Rice 60. The reason I say "fairly early" is due to the small exhaust port and the side port air intake. Possibly pre-war, but just as likely early post war.
The engine looks like it is complete. It still has needle valve and fuel tank, ignition points assembly, both prop washers, and prop nut. Looks like it even has the second terminal nut for attaching the points wire. The only parts you may need are a couple of longer crankcase screws to extend through the radial mount and also three more nuts to secure the engine to the firewall.
As far as help with wiring, coil, and fuel recommendations, I would suggest that you look at the Society of Antique Modelers web page.
Once you have opened the home page, scroll down the topics list on the left side of the page until you find the engines topic. Everything you ever wanted to know is there, plus the opportunity to ask questions.
I'm not too sure of name brands to suggest for the fuel and the oil that you will mix in with the fuel. In the states, a good choice is "Camp Fuel". Coleman fuel is the common name brand here. It's just low grade gasoline without alcohol. Warning: If you use any fuel that contains alcohol, you will ruin the plastic fuel tank. For oil, I use one of the synthetic oils sold at motorcycle shops for use in two-stroke motorcycles. The instructions for use with motorcycles usually suggests a 40 to 1 mix, but with the little model engines we typically use a mixture of 3 parts fuel to 1 part oil. On a well worn engine, some people even use 2:1.
I haven't searched, but the SAM site may even have a PDF of the Ohlsson instruction sheet.
Dick
Some good advice about fuel/gas in that, definitely don't use anything containing alcohol (aka ethanol), that will include most stuff sold by petrol/gas stations, over here in the UK they can put up to 10% ethanol in it now, which is very bad for any O&R engine, it ruins plastic parts, rubber seals & the diaphragms etc, it's also hygroscopic (attracts water from the air) and will lead to corrosion.
Non ethanol fuel/gas (non-oxy) can be found for use with garden machinery, but check the label to be sure.
Yes that is a fuel tank underneath, but I don't think it's Ohlsson supplied one. Some of these engines had a plastic fuel bowl under the carb needle valve (use of the wrong fuel will destroy these) and others had a metal tank that fitted behind the crankcase.
The Octura information I have mentions glow fuel containing castor oil. I can't really advise on the ratio as it would depend on the performance required. The introduction of in glow fuels caused some problems with Ohlsson engines and could cause catastrophic failure i.e. the con-rod bending in early engines, they changed to using steel con-rods which would then cause the head to be blown off instead.
If you interested in the history of the early Ohlsson model engines and the eventual problems when glow fuel was introduced, then the reprinted articles from 1966 in the 1999 Thermaleer newsletters are worth reading, see pages 12 to 13 of issue #59, pages 12 to 13 of issue #60 and pages 16 to 17 of issue #61, available as free downloads from here: http://www.sam600.com/old-site/b_thermaleer.htm
Unfortunately the original instructions are no help for the fuel mix, as they wanted to sell you pre-mixed fuels, which since O&R and the Cheminol Corp no longer exist isn't much use to anyone.
Definitely a glow plug then, the O&R instructions say to connect a 1.5V battery for starting only, but O&R sold their own plugs, will the Champion be different I don't know.
We still need to find out a suitable glow fuel mix, as they state to only use O&R No. 2 Fuel for glow engines.
Looks a very nice boat with an Ohlsson 60 engine fitted.
Can you clean the ceramic part of the plug up and let us know the type, it could be either a spark-plug or glow-plug. As I can't see any points assembly fitted (would be behind the flywheel) it is more likely to be a glow-plug.
Will have to see what fuel they recommended for these, it will also be a fuel/oil mix. I can't imagine the cooling fins working very well if you are going to run this engine on it's own.


 . There is a window in the roof that gets good light during the day, but lighting can be very tricky in the evening, need to get round to adding some more lights above the workbench, I even have some I fluro units I salvaged from a relatives garage ready (I can't stand LED lighting, they only seem to be made in way too bright).


")


.jpg.de740bf7299b72fc8ab47ed4c09fd2fca.jpg.347a6aebb4f4d3b21a875588904aa115.jpg)
.jpg.de740bf7299b72fc8ab47ed4c09fd2fcb.jpg.9e264f4c702724f400e6a84d011ae5fa.jpg)


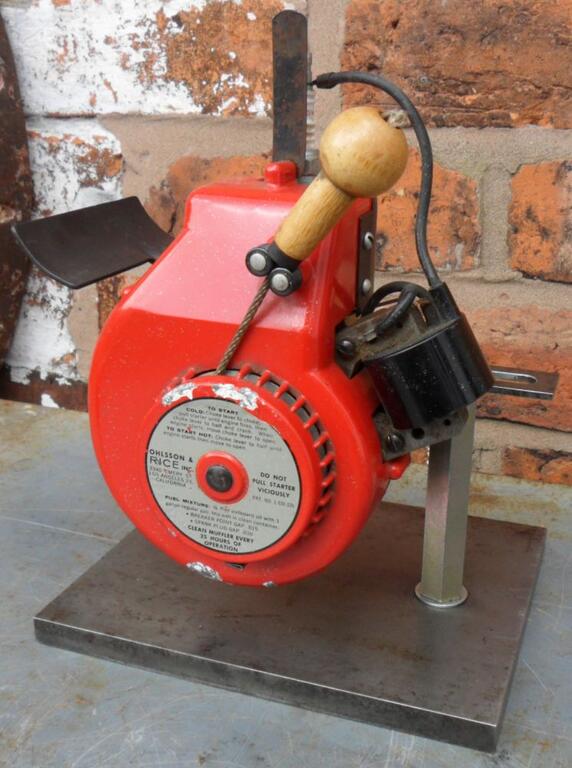
Kenco model 61 pump
in Ohlsson and Rice
Posted
According to all the info I have, a standard A-47-11 flywheel should be fitted to s/n 063124.
There were some incompatible flywheel & starter-dogs for older engines (not a problem here as they must also be missing) and the earliest engines need a different flywheel, due to the crankcase casting differences.
We had a count on here a while back, I can't remember who had the most O&R tools at the time, I think we set the rule as counting different designs and not counting identical products with multiple brands, nor duplicates.
Problem is I haven't maintained my list, with all everything that has happened in the last year & a half, I lost several relatives and for a while hobbies got sidelined while we dealt with sorting & moving my Grandparents collection & everything else they filled the house with.
David