| |
-
Did a little more to this engine yesterday..... New coil fitted, engine timed, blanked off 'kick start' bolt holes, cleaned and painted exhaust, fitted air shroud, tank brackets and tank....... Just needs the HT lead and the carb that I can't find!!!
-
-
Send it this way then Chris! All donations gratefully accepted! Lol
-
What to do with a 'free' weekend, a pile of Villiers MK12 bits and a can of paint?
Having restored several machines using Villiers engines over the last couple of years I have managed to collect 3 almost complete donor engines..... So as I was at loose end this weekend I set about sorting them out with a view to making one good engine out of all the bits! It's suprising what you can do in just a day, engines stripped, parts cleaned, degreased, old paint removed, de-rusted, etch primed, painted, gaskets made, parts reassembled...... I have a carb and exhaust, the only parts I haven't got is a working coil, 3 dud ones, tank brackets and an exhaust gasket! The coil is probably the most expensive part to buy for one of these engines, might have to wait a few weeks!
I'm probably going to make a stationary engine out of this one, mount it on a trolley and have it powering some sort of lighting.........
-
Problem rectified today, and the 2 wheels together showing the different pattern......
-
I noticed I had made a small mistake with the cleats on this wheel..... Hence why I didn't post the picture!!! Can you tell what it is?????
-
Also reassembled the big ploughing wheels....... These are flipping heavy cast lumps! The cleats are bolted on in a different pattern on each wheel. The wheel which runs on the unploughed ground has alternating cleats, in, out, in, out etc. The other wheel which runs the bottom of the furrow has the cleats all pointing on the same side, to prevent the edge of the furrow being torn up. Managed to refit the ratchets and chain drive sprockets too......
-
The 8" wheels had been drying for 3 days, so today I took them along with the new tyres to become reunited into one unit.......
New boots fitted!
-
Finally got the last of the bits back from the shot blasters, It's taken a while, but he was soon forgiven when I had to climb over several landrover chassis to get to my bits!! !
Anyways...... More metal means more painting! The big 20" ploughing wheels and the smaller 8" wheels have had 2 coats of the brush on and been left to dry.......
-
-
Put the decals from Titch on the fuel tank today, then ran the engine for the 1st time properly. Had it running for about 1/2 hour, will need a tune up once refitted to the gearbox and the throttle cable is refitted, but it runs well!
-
Have reassembled the handlebars, fitted the new grips and throttle cable.....
-
-
Yet more painting! Seems like a never ending task, with all the attachments etc........ At least there's only the gearbox left to do once I get it back from having new bronze bushes fitted!
-
Back on this project again now...... Jim has the gearbox and new bushes, so hopefully wont be too long before I can start putting the actual tractor back together........ In the meantime I've had to repaint the fuel tank!!! I had brush painted it about 6 to 8 weeks ago, once dry I put it indoors to cure and harden thoroughly in the airing cupboard. My paint supplier sells a 1K clear lacquer which is fuel resistant and I planned to lightly dust the clear over the brushed fuel tank to prevent fuel spill damage...... However when I applied the 1st light coat everything was fine, I left it 15-20 minutes and started to put a 2nd light coat and there was a bit of a reaction! The green blistered and peeled like latex, leaving the etch primer undamaged and exposed!!! So...... I had to start again, rather than risk problems again, I bought a can of 2K BS282 Forest Green. At least this is fuel resistant as it is! And there was enough in 1 can to paint several coats on 2 fuel tanks (1 spare) the air shroud inside and out, the tank brackets, the engine brackets, back plate and chain cover both sides and the handlebar swivel mount!
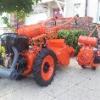
Here's some pictures of the Villiers MK12 engine with air shroud and fuel tank all refitted.......
-
Reminds me of a Trike!
Great job Gareth!
-
-
Cheers...... I already have my next project....... It's my unfinished previous one! Lol
-
-
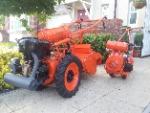
Another update on this one....... I needed to refit the clamp to secure the rotor cover to the drive tube, make a support bracket from the fuel tank down to the air cleaner and then make a new throttle cable. I also ordered some 4mm rubber sheet to make the soil/stone deflector......
Also wanted to say it runs too!!! Not exactly sure what I did, but I just went through everything again from the seals, to the timing, to the carb...... All seemed fine though, so when I added fuel again, and pulled the starter I wondered if it would ever start......? But it did on the 3rd pull..... Here's a little video of it running
And here's a photo of the almost finished machine..... I say almost, It's decided to leak a small amount of oil from the seal around the shaft with the blades on, new ones will be collected tomorrow!
-
I'd contact Titch at Machinery decals..... it might be with a member of his president forum???
-
Almost completed this little project, just have one problem I hope someone can help with....... The flippin thing won't start!!! Grrrrr!!!
To recap whats been done....... To try to eliminate these sort of problems I have replaced both worn crank bearings, fitted 2 new crank seals, resealed the joint between the 2 crank case halves. Made and fitted a new gasket with a smear of sealant between the crank case and barrel, replaced the seal on the crank case drain. It has a new spark plug, a new condensor and new points. The coil tested fine and there is a good strong spark. The points are just opening at 3/32nds before tdc and gapped to .018' The carb fitting is tight with no signs of an air leak there........ The carb itself is clean and has no leaks, however, I'm not sure how to set the float on the Amal 379. There is a notch on the float pin, but the float seems to sit really low when it's at that point, not really allowing much fuel into the bowl. I've tried different points on the pin but still no luck.........
Having spent the day trying to start it, i'm pretty close to taking the club hammer to it!
I've double checked everything........
H...... E...... L...... P......
-
Ordered up some 4mm rubber sheet to remake the soil flap at the rear of the rotor cover. Once cut and fitted, I placed the cover back on the machine....
-
Overhauled the drive and rotor unit at the front. Washed out the dirty oil and water in the parts washer..... Dried it out with the airline and refilled with EP free sae80 gear oil....... Then attached to rest of the machine.
-
New 3/4" handlebar grips and makers plate refitted.......
|
|