| |
-
There were a couple of small dents which I have filled and then etch primed the tank. Its been bush painted with the same enamel used on the rest of this machine. However as enamels are not fuel resistant, I have a 1k clear spray can which is fuel resistant that I am going to use, once the tank is completely dry and cured.
-
Your cracking on with this one Gareth!
-
Also made the spacer plate to lift the engine 8mm, this together with the 2mm clearance should give me about 10mm total and allow the new tyres enough room not to foul the engine air shroud!
-
New bushes arrived today, just need to get the shaft trued and the bushes id turned down a bit to fit the shaft and it can all go back together.........
-
Another update!!!
I am having some if these springs remanufactured...... They are the ratchet pawl springs and are fitted to the large ploughing wheels. If anyone has a Farmers Boy light tractor and require new springs then get in touch as I will have some spares!!!
-
Hi Richard, I have wondered about the hardness of the shaft itself.....? But...... then looking at the wear, I don't think it's got/had any hardness to it as a file removes some of the material with ease! My dad informs me that suprisingly, bronze will wear a steel shaft despite it being a softer material!!!
-
-
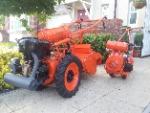
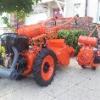
I took all the remaining parts to the shot blasters today..... Wheels were dismantled, cleats removed and straightened. The handlebars and remaining frame parts were also dropped off. Not sure when I will get them back though as his workshop had about 5 or 6 vintage bike frames and sets of wheels there, along with a whole inner wing and front bulkhead to a Willy's Jeep, the tunnel and floor and the rear bed section! there were also various alloy wheels and new massive hydraulic pump sections all awaiting his expert attention!
-
The fuel tank is in a pretty sorry state Gareth..... The cap area is pushed down at an angle and yesterday I discovered it has a new use....... Sieve! I might have a look and see if its salvageable at a later date and anyways I have the tank that you sent me, I've got that stripped and in etch primer, just needs painting! The air shroud is at the shot blasters and has a liberal coat of red oxide and a later darker green on top of the original paint!
-
The mystery deepens about the date of this machine........ If it's fitted with the original engine, and I have no reason to suspect it's not because the original paint is matching around the sump and where the engine bolts to the frame. Having checked the flywheel this evening it is dated either 49 or 51, the flywheel has both numbers stamped onto it......? I'm doubting the M49 number as according to The 70yrs of GM, the Series 2 Farmers Boy tractor didn't exist. However 51 is closest to the flywheel nut as Gareth suggested and M49 circled and stamped onto the face of one of the 'arms' of the flywheel. If it's 1951, it ties in with the MK12 engine being fitted to the light tractor, BUT 1951 was the 1st year the Series 2 was launched and with a machine number of M4694, it would suggest they made a lot of machines in that year! Unless of course the Series 2 machines carried on from the Series 1 machines........ Oh, if only the factory records were still in existence!!!
I've decided....... It's 1951!!!
-
Cheers Gareth......... I'll have a look tomorrow..........
-
Have also stripped all the old paint off the gearbox and found the brass I.D tag under all the paint......... M4694! I have no idea how many were made and exactly how old this one is??? The engine, if it's original, has a brass flywheel.......... I couldn't see any numbers on it, but then I didn't look too hard?
-
Here's the gearbox and the drive shaft, showing the 'wear' to the bronze and the actual shaft. One side has virtually worn right through the bronze......
-
It wont be getting sprayed at that price! I'm going wait until Jim has had a look at it, I think it will be trued and have bushes made to fit...... The shaft itself has a 6" chain gear just off centre on the shaft, with a woodruff key cut either end and a locating dowl hole each end too, so quite a lot of 'lathe' work involved!!!
-
Made some enquiries today with regards to 'metal spraying' to build up the worn sections of the shaft so it can be machined back to 1" diameter....... Hmmmm, £350 plus the VAT........ I think that'll be a 'no' then!
-
Also cracked on and into the gearbox this afternoon...... Quite clean internally, a little sludge, but overall not too bad. The bronze bushes on the drive axle are quite badly worn as well as the axle itself........ Damn!!! Axle was originally 1" diameter, now measures 0.985 at the most worn point. Bushes should be 1.125 o.d x 1.0 i.d x 1" Jim Beacon is going to help me with this issue! Maybe turn the shaft down and make bushes to fit? Will then need to make some spacers to make the wheels fit again!!!
In the meantime will strip the handlebars down, dismantle the ploughing wheels and get them to the shot blasters.
Here's the gearbox once opened up.........
-
That he has, most definitely! But its now painted!!!
-
Thanks Alan! What else can I do with my 3 rest days???
-
Received a call from the steel fabricator today, saying the rotor cover was ready for collection...... Very pleased with the result!!! 3mm folded and cut to my exact cardboard template and the hinge tube welded on. It fits perfectly..... just needs painting!
-
Engine now complete, timed, points set, cylinder head refitted and flywheel tightened.......... Time to give it a try???
Here's a short video of the 1st time running........
-
Put the ignition system back together and refitted the back plate, refurbished the carburettor, fitted the new air filter and then the exhaust. just the flywheel timing and the cylinder head left to do and it should be a runner?
-
-
The gearbox will be the biggest test Chris, the bronze bushes on the main drive axle are shot....... there's about 3-4mm play each side!!! Its ready to strip down, just building up the courage to tackle it.........
-
Well I cannibalised the spare MK12 today to recover the governor assembly, am pleased to say its exactly the same! Have also removed all the old paint and then reassembled the engine. I then etch primed it and once dry gave it a coat of top coat.......
-
I made a start on the Villiers Mk12 today, I noticed the governor had been broken off where the spring for the throttle connects. Whilst this didn't really worry me that much as I had the engine running like it. However, after removing the sump this afternoon I was greeted by some loose parts sat in the bottom of the engine! It would appear that the governor had possibly been snapped at some point whilst the engine was running, this then allowed the engine to 'run away' causing the governor gear and counterweights to self destruct! The brass counterweights are bent and twisted on the pivots and the 2 centre pins are bent over to about 20 degrees......... Thankfully the only damage these loose bits have caused is some very light scoring to the crank lobes. The crank and all other internals are perfectly good to use again.
It's a good job Alan and Chris persuaded me to take the spare MK12 sat at Johns! At least I have a source of spares!!!
|
|