| |
-
Made a start putting the plough back together 2 days ago....... I needed some countersunk 'one nib' bolts for the plough shear to be refitted, so whilst waiting for them to arrive I got this far.
-
Most the green bits are now............. green?
-
Gradually making a bit more progress with the attachments........ Most the green bit are now painted and have started on the red/orange parts. I forgot to take the 'sample' to match the colour..... Ooops! However, I took a gamble and chose what I thought was a close match......... Not a bad guess, eh?
-
Thanks Guys! So I think i'll leave it as is and let the 'ground' work its magic!
-
I'm after a bit of advice on the plough's mold board? It's been shot blasted to remove the rust, however it is more 'pitted' than I first thought. I have attempted to remove some of this pitting with a flap disc, ground in the direction of the ploughs travel. what should I do with it? Fill the pitting with weld/filler/any other suggestion? Help and advice greatly received. Here is the board following the flap disc treatment
-
All the attachment parts are now back from the blasters. So today I made a start on the painting....... This one is being brush painted, and I am most impressed by the paint my supplier has sold me. It covers in one coat. It's quite 'thick' in the tin, once brushed on it seems to thin and flatten really nicely, leaving no visible brush marks. Here are a few pictures of the collected parts, some original paint colour and the start of the painting marathon!
-
Alan, you and the Showman could 'sell ice to eskimo's!!!'
It was only the fear of spending a cold winter in the shed once the misses found out that kept my resolve strong!
-
Have now also sourced some replacement missing parts from the actual tractor..... The fuel tank whilst present is badly damaged around the filler area, causing the cap to not seat and seal. A new tank was kindly donated by Gareth, S1G...... I was also missing 3 of the ratchet pawls on the large cast ploughing wheels. Alan kindly alerted me to possible replacements at John's place. So a trip down to Cranleigh was planned and 4 replacements and a spare engine found their way into the boot of the car. There would have been a lot more too, as Alan and Mr Showman seemed determined that I should leave with my front wheels in the air!!!
The ratchet pawls were pretty rusted..... they needed a lot of heat and some persuasion from the hammer to come apart. Once in bits I cleaned them up with a file and the wire wheel.......
-
Then set about looking at the 'wobbly' mower wheels. It was obvious that the spindles had worn quite badly from 19mm(3/4') to about 14mm in places. I spoke to my welder as they are cast, his suggestion was to replace them as welding and then grinding back would significantly weaken the original cast. So a 19mm(3/4') drill bit was sourced along with a short length of 3/4' solid steel bar. Spindles cut off, and some careful measuring to work out the centres, several changes of gradually larger drill bits, the leg of the wheel carriers were eventually ready for the replacement spindles. I heated the casting to allow the cold replacement spindles to virtually drop into the new holes. Once cooled they are a very secure snug fit! A hole was then drilled for the retaining split pin.......
-
Haven't really made a lot of progress yet, but have done a few bits 'n' pieces. Decided to start with the attachments on this machine. They were all broken down to component parts, boxed up and sent off to the shot blasters. He is coating all except the mold board with an etch/epoxy primer sealer once blasted.
-
Hi Richard........ its not original paintwork i'm afraid....... its had a brush makeover at some point in its life!
-
That would be great Alan! Thanks!!!
-
My plans for this machine are to strip it all down and get it shot blasted. I will then repaint it using a brush on paint. I'm hoping to use this one to plough with and use the various attachments at working events, a high quality finish would likely get damaged during transit and use...... I have already had the head off the engine, decoked and cleaned the valves. cleaned and reset the points so the engine now runs. The engine needs some attention to the carb, fuel tank and a replacement air filter and throttle/governor cable. The gearbox and the drive axle in particular needs some new bronze bushes fitting as there is about 3mm of play in the shaft! The large cast wheels are missing a couple of ratchet pawls and springs. So some bits will either need to be remade or 2nd hand ones sourced. If anyone knows of a machine breaking which may have some spares, please contact me?
-
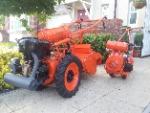
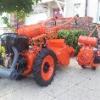
Whilst at the Autumn Tractor World show Jim Beacon approached me and alerted me to another Farmer's Boy for sale...... The words "with attachments" kinda set my ears on high alert as I have been looking for one of these for some time. Jim was unsure which model it was and I assumed it was another Minor with bits? So I agreed to give it a new home.......... Imagine my delight when Jim messaged me to say it was the earlier Light Tractor model with the cast gearbox! 2 weekends ago it was delivered and I am really pleased with my latest purchase.
Here it is as delivered, with the large cast wheels for ploughing fitted....... and its attachments.
I have fitted the smaller rubber wheel and tyres to make it somewhat easier to move around!
-
-
Went to see the Ploughmen and machines this morning. Various methods from Horses, Steam Plough/Frankenstein Engine and Tractors of all ages........
Here are some pictures and a video......
Frankensteins Monster!!!
-
What Gareth forgot to mention was his 1st Prize for his superbly restored very early, 1941 Rotary Hoes Ltd, RotehO. Otherwise known as a Series 1 Gem. This particular G206 machine is the oldest found to date and was 105th machine off the production line. Side by side with my later Series 1, G1384 machine which was 'runner-up' they showed the evolution of early models of this well known rotavator. Here they are, wearing their rosettes!
-
A BIG Thank you to all who travelled to Newbury for this show! As Gareth said its the 1st year so hopefully it will be repeated and continue to grow...........
Here are my pictures.........
-
-
-
I used a couple of pictures found online to send along with the carefully removed old decals for reproduction. Titch @ Machinery Decals has done it again! perfectly recreated decals to adorn both these machines....... Here they are wearing their new clothes! The Mustang's bar decal has proved a little more difficult, however it is being worked on!
-
Once the paint had hardened I reassembled the machines and sent Titch the details for the decals to be reproduced....... I then hand painted the raised ORLine logo.
Here is the Chainsaw and Hedge trimmer all back together with the new paintwork!
-
Both machines were stripped down, had the old paint removed, a coat of etch primer and the several light coats of colour matched paint applied....... The fuel tank on the hedgetrimmer needed a bit of work!
-
I have finally got around to restoring the 2 machines that came from Wallfish in a deal we did some time ago....... Both these machines, along with my O&R engine and Paul Mackellow's collection will be displayed at the Autumn Tractor World show in October. Here's a reminder of the 'before' condition, not that bad really, but my OCD dictated that I should restore them with a new coat of paint and some of Titch's fine artwork!
-
Hey! You Hijacked my video!!! Lol
|
|