| |
-
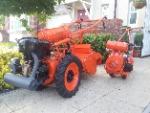
Here's both the Farmers Boy's side by side...... a before and after....... And a short video of them both running.
https://youtu.be/yNyyi6-ngWU
-
Spent the last week or so stripping down, cleaning, inspecting and reassembling the good bits of the two donor machines into one good working machine. This will be my 1st 'oily rag' restoration. I had already sorted an engine last year, just leaving a gearbox, frame and rotors to sort. Have now gotten this machine back together and fully working. here are just a couple of pictures of the good gearbox and an almost finished machine,
-
-
'Titch' at machinery decals has also been hard at work too. He has recreated the decals from photographs I provided, of the remains of decals found on the machine. He has done a fantastic job as usual! Here are the pictures of the fully 'clothed' finished machine..........
-
It's been a while but I have finally got around to making the new cables for the restored Farmers Boy, the only one I felt was beyond my expertise was the 'governor throttle' cable, this was sourced from George at Villiersparts along with a new throttle lever. The other two I made up for the very first time from parts ordered from 'feked.com' Even made my own 'crucible' pot out of an old wheel brace for melting the lead in. New cables fitted and a correct length belt too!
-
Good to see you finishing the Gem projects Gareth! Would love another big project but space is my problem and prices for storage are outragious!!!
-
Its good to see you back in the 'orange' Gareth
-
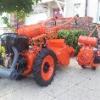
Made a start on machine number 2! This one will be left in its working clothes......... as hard as it is for me not to strip it back and paint it!!!
I'm determined to have at least one machine I can actually get dirty..........
So, this one has had the engine stripped down, checked for any faults and rebuilt. I have been luckier with this one as the engine is internally very good. Its obviously had some work in the past as its fitted with a +40 piston and rings, the oil was clean and no water!!! I have only had to buy a new carb gasket and a spark plug to have it running, so its been a very cheap overhaul.
See, not painted!!!
-
Also been doing a little digging into the company which started making these machines. The Raven Engineering Co Ltd were in fact quite a small operation. Running their offices from what would appear to have been a residential property, and the works from a nearby small workshop. Here is a copy of the email I received yesterday......
Dear Darren
Thank you for your intriguing query sent in via the website. To be honest, I had never come across Raven Engineering until now. However, I found the following entry in the 1956 Outer London (West Middlesex) Phone Book.
These two locations are close to each other at their back entrances (see attached map). As you can see from the attached, the 11 St John's Road premises are residential although I guess Raven were using them as offices (and hence the two phone numbers?). You'll see that a work/live Unit has been squeezed in next door at 11b and there was a very small single story workshop there before, maybe when Raven were there too.
29 High Street (also attached) has had a very varied history: airplane propellers in WW1, parts for cockpit of the Kingston-built Hawker Hurricane in WW2, Celestion Ditton speakers between the two and more recently some of the scenery for the film Alien. But I haven't come across any other Raven Engineering stuff I'm afraid.
Best regards
Ray
Ray Elmittauthor of Hampton Wick: Brick by Brick and other books
available now at:
http://www.hamptonwickhistory.org.uk/HamptonWickHistory/Publications.html
He also sent me some photographs of the relevant buildings and a small map showing the location, plus the phone book entry.
-
Thanks Triumph66
Well, after having no luck yesterday getting it to run, I sought some advice and tinkered a bit more this afternoon...... and....... You can watch for yourself!!!
https://youtu.be/HBl6OJdt_-8
-
Thanks Nigel..... Just need it to run now and a few of Titch's decals!
-
Thanks Chris! Will be unusual for me not to restore something........ But seeing guys and gals actually getting in the dirt
and playing with their machines has me curious? Gotta give it a go! I will be checking all is in fine fettle beforehand, hence
the engine being off the 2nd machine, don't want any unreliability do we??? (no mentions of the Gem and Bantam at
Ardingly..........)
Anyways here are a couple of daylight piccies....
-
Thanks! I'll use it around the show circuits...... I do have another one which I'm thinking about leaving in its working clothes and working?
-
Almost done....... One or two little bits left to finish, painting the nut and bolt heads, replacing the cork on the fuel tap, handlebar grips, decals, oh and some oil for the gearboxes. Have ordered a litre of sae140 as specified, EP free of course!
Will get a better picture when this flippin rain stops!
-
This machine was missing its depth skid when collected, so using photographs of other machines and some measurements taken at our 'meet n greet' I have reproduced one. This is it 'mocked up' on the bench, painted and then fitted.
-
Also made a minor change to the Spark plug cap, The insulated rubber was fouling the fuel tank. The cap has been removed and the metal connector with hole fitted, Also took the brass stop tab from the donor machines engine and fitted it to this one,
-
Also found one of the rotor blades was snapped off. Decided to have a go at replicating a replacement. Firstly, I welded together two narrow straight blades from an old set of mountfield rotors. I used a flap disc to clean up the welds, I then scored around an original blade and roughly cut out the new blade. I then formed the curved mounting part and finished the welding. Once cleaned up I drilled the mounting holes and fitted the blades. Think it turned out quite good?
-
Here is the original clutch lever from this machine, its seized with rust and pretty rough......
I took a couple of pictures in the daylight today, the paint doesn't look too bright under natural light
-
-
Got on well again today, Tyres cleaned and refitted to the wheels, wheels refitted. I then stripped and primed the rotor drive case, gave it a couple of coats of colour and left to dry whilst cleaning nuts and bolts. Gave it a coat or 3 of clear. Refitted the handlebars and mounted the engine, once the drive case was dry I refitted that too.
Wont be able to do much tomorrow........ Have both the kids for the day, joy!!!
-
Yes, Richard, I was aware......and shocked by the price, I was at Isfield meet n greet and Paul, Jim and and somebody else said they had some, hence the ask! Thanks Paul! Im starting to wonder if there is a machine that you 'dont' have literature for!!! Thanks Triumph66, The whole process uses really good products, not cheap, but great quality........ Most are surprised when they find out its 'rattle cans'
-
Quite a bit of progress today, the gearbox is reassembled, brackets reattached awaiting its wheels! A few pictures of where I'm up to........
-
Cheers guys, and thanks Paul! Paul? Do you happen to have one of those locking clutch levers that we spoke about at Isfield? One that you would be willing to part with???
-
I then stripped the engine back to a point where I could respray it to the correct colour. Before painting and to ensure a good adhesion I lightly 'scotch bright' the surface and then began the process again. Here's the engine now in the correct colour.
Fuel tank was next.......I do like the finish with these ProXL products!
Refitted the cowling once dry and the various bits removed for painting back on the Villiers.
-
The Insomnia is back!
So I thought i'd show you what I have done with the 1st of my days off. I haven't been happy with the flat colour supplied by the paint shop, so took some bits from the 2nd machine along and trawled through their colour chips until we found what we think is the perfect colour match to the original metallic finish. Its odd how when these machines were made they were able to mix a metallic paint which had a gloss finish to it, yet today it has to be a 2 stage, base colour and clear coat process!
The bits were given several light coats of the base and left for around 2 hours to dry. I then activated the 2K clear and sprayed light coats over the base colour.
.
|
|