| |
-
Yes, most probably...... I could do the calculations...... but my brain hurts!
I will have to measure the circumferences and see what the difference is for every revolution of the wheel!
I think the clearance issue might possibly resolve itself? Those tyres have been on a shelf for a while and they were quite flat, pushing the centre of the tread upwards....... Hoping that if I get them warm and leave them inflated they will relax a bit???
-
Sat the engine back on and refitted a wheel and tyre to check for clearance issues........ It's close, really really close! about 2mm close!!!!!!
I think I will make up a spacer plate and lift the engine by 5mm, there is enough slack in the chain and plenty of room in the chain case to allow for a 5 mm lift. if that doesn't work then maybe make up some wheel spacers and move them out by 10mm or so?
Of course the 'bodge' would be to dent the cowling in a little...... I won't be doing that!
-
Also had a delivery of tyres and tubes today........... Had to fit one to see if there would be any clearance issues.............
Erm????? They are quite a bit bigger!!!
-
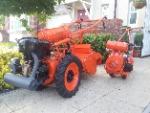
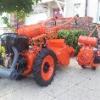
Started the strip down of the actual tractor today...... it's now just a gearbox and a pile of bits!
-
Yes Paul.......... £49 each for a 3.00x8 plus tube, plus shipping, plus VAT........ around £150
-
I want to keep this project as close to original spec as possible. Unfortunately the 2.25x8 tractive tyres became obsolete quite a few years ago. A lot of internet time has been spent looking at the USA and China for alternatives........ So, after a long conversation with Bigtyres.co.uk this morning have decided to order a pair of 3.50x8 tyres. These are the closest we could find for sensible money at £18 each plus £15 a side for innertubes. There was another option available with 3.00x8 tyres through Allterraintyres, but at £49 per tyre, plus tube, plus delivery and VAT........... almost £150😲😲😲.......
I've decided the cheaper option will have to do!!! Hoping there won't be a clearance issue? There is a little room to play with, the tyres are roughly 1.25' wider overall, if I have to make a wheel spacer then so be it!!!
-
The wheel and tyre combo shown with the rotavator attachment is I think an adaption to fit something bigger???
-
Hmmm? Do you think they will fit ok? 2.25 to 4.00 is quite a big jump? Mine are a bit smaller than those shown above..... This is mine at the mo, they are shot! Splits right through to the tubes and crumbly!!!
-
Can anyone help me with tyre advice........? This machine has 2.25x8 tyres fitted with the standard tractive tread pattern. All I can find in this size is something like those fitted to 'sack trucks'! Smooth almost NO tread! The closest I can find is 3.00x8 tractive...... my question is will they fit? My other concern is at £49each..... they are more expensive than the tyres on my Gem!!!!
-
Have gotten the Tool frame back together whilst waiting on the steel for the rotor cover......
-
Have moved on to the rotovator attachment now......... had to replace the felt seals on the rotovator shaft with a modern nitrile equivalent, also needed a blank to protect the shaft end and bronze bushes. Next on the to do list was the remanufacturing of the rotor cover. This was missing and my only resource were a couple of photos screenshots from youtube! I have made a cardboard template 1st, and will get the steel cut tomorrow for this......
-
Thanks Chris, Have managed to secure 9 spares from Alan!
-
It's not that close to being finished....... The attachments might be, but not even started on the actual tractor yet!!!
-
I think I might need to sell something first! 😢😭
-
I have NO idea!
I can pay for the postage? I would probably only want 6 or 9 blades?
-
Just been out and measured the blades........ A perfect match!!!
-
Oooooooo! That looks promising!!!! Im off to the garage now armed with a tape measure!!!
-
You really have your work cut out there! Scrap value currently around 14p/kg!
-
Thanks guys...... an avenue to investigate!
-
The blades were quite badly chipped and rusted. I ground the cutting blades back to good metal and then chamfered a new cutting edge. Not sure if there is a supplier of replacement blades for this machine? I think they are very similar to those fitted Allen Scythes etc...... will need to measure them, the hole spacing and do some research! Once rust free I did skim a small amount of filler onto the blades, just to fill some of the pitting. Once sanded, primed, painted and dry, I refitted them to the freshly painted disc. I was then finally able to finish reassembling the mower attachment....... (Apologies for the pictures being sideways...... seems a bit random as the 2nd one is the right way but the 3rd, despite many efforts is annoyingly sideways!)
-
-
Have been gradually putting all the attachments back together, in between shifts at work....... The transport wheel is done, the plough just needs the nib bolts grinding back, the mower is awaiting the blades to be refitted to the disc and the safety guards refitting to the drive tube. One of the guards was made out of a bit of old can of some sorts. (bottom pic far left) Very thin and flimsy....... so, having made a cardboard template, cut out the steel and curved it to shape and then welded it together. I ended up with a 2nd slightly bigger safety guard to prevent things from getting to the top of the drive shaft too! (bottom pic far right) I've not started reassembly of the tool frame or the rotavator yet.
-
-
Thanks! I hope so? Was a bit worried when it came back from the blasters with all the pitting!
Thanks!
-
'One nib' countersunk bolts arrived today! Didn't have much time this morning before I had to go get ready for work Today was widely reported to be the busiest day of the Christmas period with a supposed 12 million vehicles travelling 20 miles or more! Thankfully my area of responsibility wasn't too bad, and nothing major happened to interrupt Christmas travel!
Anyways....... half an hour was spent fitting the plough shear. Plough is just needing the washers and securing pins refitting to the hitch.
|
|