
kd5byb
-
Content Count
12 -
Joined
-
Last visited
About kd5byb

|


-
-
Very neat unit! The decal saying to "Use only Uni-Pak Silicone Oil" is very interesting to me. I never knew that silicone oils were appropriate for 2-cycle engine use. I wonder what the benefit was of silicone oil in this application? thanks, ben
-
Thanks much for the nice comments. It's a neat little unit. If I remember right, the AC frequency generated was about 120 Hz per my Kill-a-Watt meter. However, it is quite possible that that was simply the full-scale indication of the Kill-a-Watt and not the true frequency. If I get a chance I need to figure out a better setup to measure the frequency of the unit. thanks much, ben
-
-
Thanks much! I'm pretty happy with the little generator. Looks nice, runs nice. thanks, ben
-
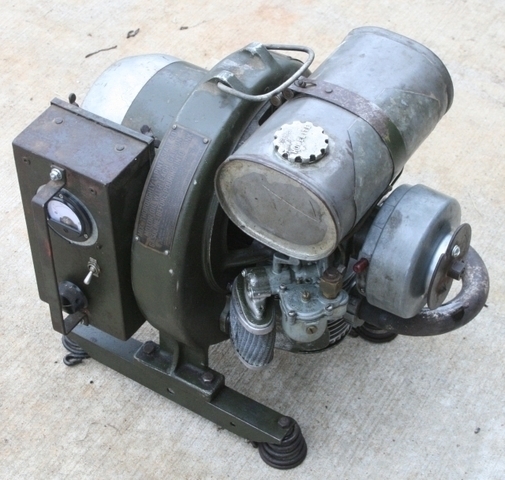
Good afternoon all, I check the governor this morning - it's working fine and not hanging up. Seems like 140 or so VAC is normal for these without a load. With a 60 watt light bulb (the old filament kind) it settled down to 125 VAC. Pretty cool little machine. Runs really nicely and isn't as loud as I thought it would be. Finally got some photos taken of it this morning as well. thanks much, ben
-
-
Good evening all, My replacement fuel line arrived today, so I reassembled the Tiny Tiger generator. It started right up and after some carb tweaking, ran nicely and made power. One problem at the moment, voltage output on it is around 150 VAC without any load on it, like the engine is running too fast. The butterfly appears to be fully closed, but I'm not sure as my garage isn't very well lit. Tomorrow I'll start it up and get in there with a flashlight. thanks much, ben
-
Thanks for the tip! When I blow air in, I get a tiny little bit of air through it before I hit the primer button. After pushing the button - lots more air. No air at all can be sucked back out. Seems like it isn't perfect...but I'm not sure what part might be leaking. Diaphragm is nice and supple, the little flapper valve material seemed nice and supple too. Thoughts? thanks, ben
-
Good evening all Made a new fuel pickup tube last night out of a 1/4" bolt and a piece of very fine stainless steel screen. Drilled a 1/8" hole thru the bolt. Used a 3/8" drill bit to make a cone depression in the head of the bolt to increase the surface area. Formed the screen around the head and secured with some tinned copper bus wire. Soldered the bolt onto the pickup tube. Setting the right depth was tricky, as the bottom cover of the fuel tank sits deeper than it appears! This evening...I took the carburetor off and took it apart. Fortunately, the diaphragm was nice and supple. The fuel line was totally plugged and took a bit of soaking to clean out the fuel inlet pipe and the diaphragm ball. All clean now. I did not take the diaphragm arm off as getting it back on looked rather tricky in the rebuild instructions. Got some new fuel line on the way arriving Friday, so should have everything back together and ready to run this weekend. thanks, ben
-
Hi John, Well...turned out that the fuel filter decided to disintegrate. I'd pour rinse water in...and black water and bits of rubber goo would come out. So I decided to pull the bottom off of the tank. Looking at the seam, it seemed that it was held in place by epoxy. I carefully heated the bottom of the tank with a heat gun while tapping from the inside via the fuel neck with the blunt end of a big chisel. After about 5 minutes of even heating, the bottom came right off. The fuel filter is unrecoverable - the rubber is a sticky mess, but at least it pulled off the fuel pipe easily. Now to fashion a replacement fuel filter. I do have some very fine screen bought for such an occasion. thanks, ben
-
Good evening once more all, Looks like I may have given up on the fuel filter a little early. After soaking for the past few hours, I can get fuel through the fuel filter. Now to let it soak overnight. thanks much, ben
-
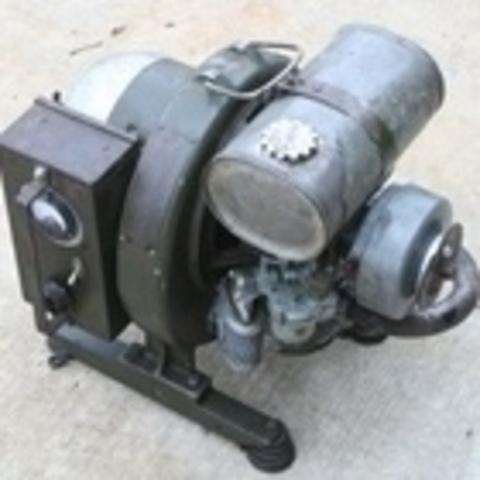
Good evening all, The US Postal Service dropped off the Tiny Tiger generator while I was at work today. Overall, it is in reasonably nice shape. One ding on the blower housing from poor packing during shipment, but nothing bad. Turns over fine and has a strong blue spark which made me smile. It uses a 10mm spark plug, which is the tiniest, cutest little spark plug I've ever seen. (Champion UY-6) That's the good news. The bad news: The inside of the fuel tank is just plumb nasty! Whatever fuel was in there has turned into varnish. Got the tank soaking to get the varnish out which will take a while, I'm sure. I'm uncertain as to the internals of the tank. Two tubes on the tank are for air and are clear without obstructions...the tube that goes to the fuel pickup is filled with varnish. I can stick a wire in maybe 15 millimeters, but that's it. There seems to be a good bit of resistance, so I didn't force it. The manual shared here states "tank mount assembly (with integral filter)." With the amount of varnish in this tank...I don't have a lot of hope for the successful recovery of that "integral filter." It looks like the fuel tank bottom is a separate piece from the rest of the tank, uncertain if its easily removable or not. Curious what y'all have done in similar situations. I'll get some photos taken of it this weekend. thanks much, ben