

rotoscytheben
-
Content Count
240 -
Joined
-
Last visited
-
Days Won
6
Reputation Activity
-

 rotoscytheben reacted to pmackellow in Farmfitters Multi Gardner
More progress over the weekend...
Multigardner 3 has been painted and fitted to the graveyard mower chassis, and a new addition is this mower... although badged as a Norlett it is identical to the Farmfitters Rapier mower that was also offered as an attachment for the Multigardner...
I have another use for the B&S engine thats on it so nothing is going to waste...
-
 rotoscytheben got a reaction from Ian in a few recent finds
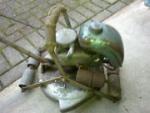
hi all here are a few pics of machines ive collected recently
the first machine is a ransomes 14" mower not sure of model and im in need of a grassbox for this
second is the trusty nash boadicea
and third is a jobber motorised garden fork minus the fork
-
rotoscytheben reacted to Ian in Project "Why Not"
Thingy works for me
Same to you Norm
Thanks mate.. Practice is by far the best way to get better at welding.. I'm getting there
Despite being busy with Why Not for the past couple of day's I've not a great deal to show for it..
Have a better photo of the steering column and the UJ's.
A new more sporty steering wheel has been fitted.. Don't worry, the badge in the center will be going and replaced with something more in keeping
What has been taking a lot of time was cleaning all the rust and old paint off the rear wheels so I could fit the new bigger tyres.. I think it's one of those jobs we all hate, but it's worth the effort
I've no idea what this came from, Nigel had had it for many years.. But it does make a great gear shift lever.. Just got to work out how/where to mount it and figure out a linkage..
-
rotoscytheben reacted to Ian in Project "Why Not"
Thanks Iain, yep firing her up is a real mojo booster, it's good to hear life in her though after firing her up I can't hear much
I expect your wife was saying "What the hell is that noise"? Or something along those lines
It certainly was a great day, thanks again for all your help mate :thumbs;
I don't think it really sunk in until I started to edit the video.. Then the manic grin broke out
More like William Wollard which is better than being the first ever Top Gear presenter
Well, after getting distracted by a lathe, moving the workshop about, a random tree and making lot's of noise Thursday, I'm finally cracking on with the front brakes again and get the calipers mounted..
Add a bit of metal, that bit under my finger..
Throw in a couple of triangles to put some strength back, here's one of em.
Garnish with a couple of long bolts including having to drill through the kingpin pivot spindle thingy!
Tack welded together.
A fully welded up caliper bracket.. I think don't think it will fall apart in a hurry
One bolted on caliper, one to go..
Yes I will be cleaning up the welds at some point.. And yes the wheel does still fit
-
rotoscytheben reacted to Ian in Project "Why Not"
Evening all, well after the shock of finding a fully grown tree outside my workshop when I arrived!
I started to sort out this mess of wiring..
And by the end of the day, the Beast has awakened
-
 rotoscytheben got a reaction from nigel in a few recent finds
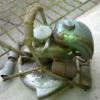
hi all here are a few pics of machines ive collected recently
the first machine is a ransomes 14" mower not sure of model and im in need of a grassbox for this
second is the trusty nash boadicea
and third is a jobber motorised garden fork minus the fork
-
rotoscytheben got a reaction from Ian in Project "Why Not"
WOW ian this is amazing you have really nailed it with this one it is a real machine of quality i will be dropping by soon to see it and you of coarse
-
rotoscytheben got a reaction from nigel in Project "Why Not"
WOW ian this is amazing you have really nailed it with this one it is a real machine of quality i will be dropping by soon to see it and you of coarse
-
rotoscytheben reacted to nigel in Project "Why Not"
it was a pleasure to help ian, and i dont know which one of us had the biggest smile on there face when we rolled it out into the sunlight, i can honestly say people just dont understand the work that goes into projects like this, and you hav"nt taken any short cuts this machine will be stunning when finished
-
rotoscytheben reacted to Ian in Project "Why Not"
Me too
Good progress has been made made today, both steel blocks have been bored out to take the lengths of steel that pivot in the rose joints..
Jumping slightly forward here as I forgot to take photo's of all the stages..
Both pivot thingys have been drilled and a thread tapped to keep the rose joints in position, and both pivot thingys were press fitted into the block.. a nice tight fit they were too
You may of also noted from the above photo that the whole thing has been put in the lathe so I can cut a few tapers... If your wondering it span quite straight only a 1mm out of true.. Quite chuffed with that
Stub axle installed, another tight pressure fit.. I still need to weld it all together, and yes the bearing will be coming off before the hot sparks fly..
I'm rather happy with how this front end lark is coming together
-
-
rotoscytheben reacted to Ian in Project "Why Not"
My eye's are a bit sore today, which is always a sign I've been doing lot's of welding!! And yes I did use a mask
Starting with something small patch at the front..
Chopped..
And patched back up.. Only a bit longer..
Rear panels mostly tacked in place... I was standing on the GT 14+2's seat to get this high up photo
Mostly welded up and hit with red oxide to get it all one colour.. When I first put the pan back on I wasn't sure I liked the shape or not.. Maybe the "dropped" bit's should of gone down at an angle? Maybe the top of the drops should have more curve?
Anyway, with a seat plonked on and a couple of exhausts sticking it looks a little better.. What do you guy's think?
-
rotoscytheben reacted to Ian in Project "Why Not"
Thanks Iain... My plan to get the back looking right? See below
Ta muchly Andrew.. An armchair is an interesting thought, but there isn't the space.. The photo's make things look wider than they are..
This morning started with some cardboard templates to try and work out what would look right..
But before I could turn the cardboard into steel I need to A... Make the center bit first.. And B.. Find some steel to make it out of!
Treasures from the scrap pile
Adding a curve to the center bit.. Yes that is a broom handle I'm about to fold the metal around
As it turned out the curve was a tad too tight so it was reshaped around a scaffold pole..
As Nigel (thanks mate ) has a bead rolling machine I thought I'd put it to good use and roll the traditional Wh swage line in the back..
And now the part which ties the arches and center section together... I need to tweak the shape a little and add the swage line tomorrow, then it can be welded in...
I have to say I'm quite chuffed about how the back end has come together
A view from underneath.. The flanges will be staying as they will add a handy bit of strength to things once they are plug welded together. The flange will also be used for mounting the fender pan, keeping the mounting bolts nicely hidden away..
-
rotoscytheben reacted to Ian in Project "Why Not"
So today I decided I'd have a look at the fender pan and seat mounting...
There is only one way to work out where the seat will go....
Yep, that feels about right
This is the start of the seat/fender pan mounting frame, I do need to add more but I need the fender pan to fit first so I can work out what's what..
Hhmm... The fender pan needs a bit of work to make it fit.. It need to be wider and the bit the seat bolts onto need to be about 6 inches lower!!
Let's tackle the widening bit first..
The original fender pan was very rotten in the middle and at the back, but I kept the "arches" parts should they come in handy one day
A 2 1/4 section was sliced from the spares arch and plonked roughly in place.. Due to fender pans having lot's of different curves and contours a few tweaks will be needed
A bit of cutting and welding later and the fender pan was wider one side with matching curves up top.. Oo-er missus
The front and back don't quite line up, but I can't work that bit out until the center of the fender pan is in place..
You can see how much wider it is compared to the left side.
And that Gent's is this build up to date other than.......
A video
-
rotoscytheben reacted to Ian in Project "Why Not"
Hi Andrew, yes maybe about half way now... Once I have tacked the last of the hard/big stuff which is the front end steering and brakes, the rest should be fairly easy to sort...
But there is a lot of "easy stuff" to get done
-
rotoscytheben reacted to Ian in Project "Why Not"
Thanks Andrew, there isn't much planning going on, but plenty of thinking does happen I don't think I'm working at a fast pace.. I would like to get more done faster than I am doing but my brain and body can only handle so much!
After lot's of turning the lump of green painted steel in the lathe in my last update turned into this spacer/brake hub thingy..
Next up in the lathe was a stripped down wheel hub..
Notched..
The spacer/brake hub thingy is a perfect fit
And now for the brake disc starting with this 5 inch square of 5mm thick steel... I've no idea what the coating is or what they do during the manufacturing process but this steel is very hard stuff which is quite handy for a brake disc, but it makes it a right pig to turn on the lathe!
Getting there..
Almost there...
Spacer thingy and disc..
It all fit's inside the wheel... Just
A hint of things to come... I can't do anymore brake or steering work until some carbide cutting tips and some rather hefty rose joints turn up.. It will be nice to get away from the lathe for a while anyway
-
rotoscytheben reacted to Ian in Project "Why Not"
Thanks Mark.
Were never too old to learn Chris
Thanks Richard.. It's all guess work really
An update for you chaps..
Both front wheels are now re centered and fully welded up... Here's the second wheel.
And now onto something new for me.. Making a front end that is not only strong, handles and steers well, but also has brakes..
As you will of seen in my last update I toyed with the brakes idea, yesterday was the day to see if I could make it work..
But rather than cutting and turning steel I made a fake brake disc from scrap ally just to see what could be made to fit.. The disc is 5" diameter and 4mm thick..
Time to dig out a bit of history.. One of the twin caliper mounting plates..
And the "Stig Double pumper" both of which were part of my 6X6's ill fated brake steer system..
It's a tight, but a Qwakasaki Gpz305 caliper will just about fit in the wheel rim..
Even better is I can get the steering pivot points rather close to the wheel, the bottom one might even fit inside the wheel which will make for better steering
If you think of this wheel as the left side with the caliper at the rear inside and the ruler being the pivot point you will get the idea..
So now I know my brake idea can be made to fit I need a way of mounting the brake disc to the inside of the wheel hub...
Lot's of measuring and scribbling later, a plan...
Off cut's of steel are always handy to have about the place
The start of the first wheel hub brake adapter thingy.... And this Gent's brings the build up to date..
-
 rotoscytheben got a reaction from Triumph66 in mountfield emblem electric rotary mower
well after quite a while in bits this is finally back together although not in bare polished look as i had initially intended due to pitting of the alloy, i dont think it would have looked as good as i would have liked
so ive gone for original mountfield red and a bit of black and white here and there
here are a few pics
once the handles have been done i will update with finished pics
-
 rotoscytheben got a reaction from pmackellow in mountfield emblem electric rotary mower
well after quite a while in bits this is finally back together although not in bare polished look as i had initially intended due to pitting of the alloy, i dont think it would have looked as good as i would have liked
so ive gone for original mountfield red and a bit of black and white here and there
here are a few pics
once the handles have been done i will update with finished pics
-
rotoscytheben got a reaction from pmackellow in mountfield emblem electric rotary mower
im affraid your wrong angus here is the spec plate for the emblem!!!!
-
 rotoscytheben got a reaction from Stormin in mountfield emblem electric rotary mower
well after quite a while in bits this is finally back together although not in bare polished look as i had initially intended due to pitting of the alloy, i dont think it would have looked as good as i would have liked
so ive gone for original mountfield red and a bit of black and white here and there
here are a few pics
once the handles have been done i will update with finished pics
-
 rotoscytheben got a reaction from the showman in mountfield emblem electric rotary mower
well after quite a while in bits this is finally back together although not in bare polished look as i had initially intended due to pitting of the alloy, i dont think it would have looked as good as i would have liked
so ive gone for original mountfield red and a bit of black and white here and there
here are a few pics
once the handles have been done i will update with finished pics
-
 rotoscytheben got a reaction from S1g in mountfield emblem electric rotary mower
well after quite a while in bits this is finally back together although not in bare polished look as i had initially intended due to pitting of the alloy, i dont think it would have looked as good as i would have liked
so ive gone for original mountfield red and a bit of black and white here and there
here are a few pics
once the handles have been done i will update with finished pics
-
rotoscytheben got a reaction from nigel in mountfield emblem electric rotary mower
well after quite a while in bits this is finally back together although not in bare polished look as i had initially intended due to pitting of the alloy, i dont think it would have looked as good as i would have liked
so ive gone for original mountfield red and a bit of black and white here and there
here are a few pics
once the handles have been done i will update with finished pics
-
rotoscytheben reacted to Ian in BOLENS RIDEAMATIC
Very nice, I can't wait to see it later this morning... Don't worry Andrew, I won't be measuring it up to see how big and engine could be made to fit