| |
-
-
Pretty cool setup Norm, them billy goats look handy!
-
Thats the plan Norm, another 12 weeks to work on it yet
It wasn't too bad, its all fixed and primed now and looks good as new, plus its original
Haha, you say that but we've got plenty of new steel here , I could've made one but i'd like to keep as much original as possible.
Next job on the resto was to tackle the gearbox which didn't work
There was holes drilled in the axle ends.
Mangled input shaft
To make the axles on the diff useable we flipped them around, first we welded the holes, turned them down and cut new keyways.
one of the bushes was worn so we machined a new one and fit it.
To turn the input shaft down we had to use a bit of ingenuity, we clamped it in a taper lock and turned it down so I can use a taper lock pulley on it. The jig worked a treat.
Next everything was cleaned of rust.
New gaskets were made.
We welded up surplus holes. The gearbox is now back together, primed and works as good as new
-
Thanks, it's taking some work but I love a challenge! It certainly will be saved from the scrap heap.
It worked very well!
-
First i started to strip the tractor down, there were many modifications which needed to be rectified. There were some splined hubs which had been made to fit, they were first to go and they revealed the state of the axles, very rusty and holes drilled in them.
Next I cut off the front axle which has been welded on.
Next we welded the chassis back how its meant to be and welded up the extra holes.
the hood stand required some straightening, some ingenuity was needed.
-
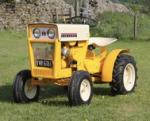
I've finally got around to creating a thread for the restoration of my RJ I have been working on.
Many thanks to Chris for sourcing the engine, we're working on getting it going, also thanks to Ian for helping me out with the measurements of the front axle and lastly thanks to Chris (showman) for letting me take measurements from his RJ at Newby hall!
Heres some photos of the RJ before I started
-
Happy Birthday Chris, have a good day
-
Sure will, see you there!
-
Good photos! wish I could've gone
-
Thanks for having a look, I don't know what he's going to do.
Unfortunately I won't be able to attend as I am still at university and have an exam on the Thursday but I will be at Newby hall on the Friday as will my friend so if you could give them to me then that would be awesome!
Really appreciate it Paul
-
Thanks Paul! Have a safe journey
-
Yup I was just intrigued. He could really do with a manual but i'm not sure whether they made an in depth one.
Harry, does the manual have any exploded views or images that may help him with the reassembly. Thanks
-
I guess the red is from someone painting it. The greyish colour could have been a primer but who knows.
-
It sure is! I wish him luck.
hmm maybe Paul can shed some light.
-
Yes it doesn't look the best!
Definitely a puzzle and they are both clueless with this tractor as am I!
-
@pmackellow do you know what colour it should've been originally.
As you can see its in a sorry state but he is hoping to put it back together for his friend. It was his friends dad who took it apart many years ago and his son would now like to reassemble it.
-
-
Thanks for your replies, he's just sent me some photos which ill post. Its a 7hp engine so does that make it the 3 speed Colt version?
-
Hi, i'll get some pictures up shortly, I have a friend who has a Martin Markham in pieces. The previous owner took it to bits and now my friend is trying to put it back together but it needs some transmission work etc. Does anyone know if they had manuals with exploded diagrams on? Any help would be appreciated.
Thanks Ewan
-
-
haha how did he manage that
-
Nice variation of exhibits there! I recognise that Wheel Horse in the last photo.
-
I keep looking at anvils but they seem to be expensive, yes i've got an air bed pump thats rigged up to it, works well in my opinion
-
Cheers Norm, I don't know how it'll perform on wood consumption, its only small but it certainly got hot on the test run! Bring it along
-
Thanks My mum has already commissioned some, quite a challenge to make without a proper anvil.
|
|