
Leaderboard


Popular Content
Showing content with the highest reputation on 09/22/2017 in all areas
-
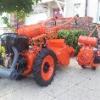
4 pointsDecided to have a go at fitting the large plough wheels and the plough...... I have to say its flippin heavy, lifting the machine onto the offset ploughing axle! It's quite a beast once assembled!!!
-
1 pointIt's a ford, what do you expect. Best thing I ever did was to get rid of mine. Lol. In all seriousness though, that machine looks awesome. I'd be very surprised if you don't get first place at Newbury. You certainly deserve it with all the time and work you've put into this.
-
1 pointThat looks on fantastic machine now. I bet your well chuffed.
-
1 pointFitted the Rotavator too, here's the pictures...... and took it for a drive....... https://youtu.be/kyUjDB3ISJ8
-
1 pointToday was my 1st full day on the reassembly, and I was able to get lots of little jobs done. The pulley on the scythe mower was not a good fit to the rotary shaft and had a small wobble. I made a sleeve from some steel tube, slotted it to allow it to clamp tight. Drilled a hole for the clamp bolt and refitted pulley. Pleased to say the 'fix' worked. Next on the list was to measure for a chain to drive the Rotavator attachment and fit it. Also needed to replace a grub screw on the engine pulley which was chewed up before restoration...... Fitted the tool frame and Hoes 2 days ago, here's the picture of that......
-
1 pointThe footrests were another item I had a few attempts at before finishing up with something that looked right in comparison with the rest of the build. One pair looked too long and narrow, another try ended up with the fold overs not being deep enough. Fairly quick to mark out and make so not too much hair pulled out. Again, made from the scrap 1mm alloy panels. The first attempts found a use elsewhere after being cut up. How to make the fenders. ? Simply bending up on the brake press wasn't thought viable due to the curves at each end, although I now think it could have been done with a bit of NON press work included. Also the corners would need alloy welding etc. Another possibility was making a plug and moulding in fiber glass. I decided to make these using built up layers of plasticard sheet reinforced with alloy. I already had a good stock of this plasticard. This resulted in very strong fenders. The plastic, welded together with liquid polystyrene cement, was thick enough to sand the curves on ends and sides. The alloy inserts were a very tight fit after making a few short trial sections to get the bends in the correct place. Also bolted at the corners although they wouldn't come out easily. The top of each footrest slides into the slot at the front of the fenders and will be bolted in place when finished.