| |
-
Not had much time this week. But have managed to move things along a bit. The fuel tank has been stripped, repaired and primed. The gearbox is now stripped down, cleaned, de-burred the gears and the outer case is now in primer ready for its top coat. The rest of metal work is at the blasters. Have even managed to order the steel tube and a decent tube bender to reproduce the 'missing' handle bars, couldn't believe what a local company were asking just to supply and bend a bit of tubing!
-
-
Hi Phil, Could you get a close up of the handlebars please? As I say, mine are missing and I'm gonna make some new ones......... Ordered 3m of 1" diameter tubing today, just need to find a way of bending it!
Thanks Ian, Am going to try to get it done in time to bring to Isfield......... Have 18 days and counting!
-
Thanks! I really did think the engine was beyond saving when opened up. However Gareth persuaded me to give it a go..... Its suprising how bad these little engines can be and yet still be bought back from the brink. 'They sure dont make 'em like they used too!'
Just hope the rest of the machine can be rescued!
-
Cheers! Get the tank done and then make a start on the rest of the machine.
-
Refitted the cowling, then the carb........ Washed the fuel tank out. will remove all the old paint tomorrow afternoon........
-
Had the afternoon in the garage today, carb cleaned and rebuilt. The bits arrived from Gareth arrived too, Cheers G!
Also got the engine timed, flywheel tightened etc....... Guess what.............. It runs too!!!! Wanna see?
https://youtu.be/PeetRoIOQmI
-
Cheers Gareth! This green is what was beneath the brushed on dark green. No progress today after this mornings excitement. Im back to work tomorrow, so wont be much progress for the next week!
-
Also sorted the air shroud, stripped all the old paint using a heavy duty paint stripper, then a wire wheel. A couple of coats of etch, then some colour........
The "rat" look or not???
NOT!
-
Managed to get a few more hours in on this machine today. The exhaust had my attention today, It was holed in several places but was generally sound, so I decided to weld up the holes, or rather chase them around........ Eventually got it all plugged up and looking half decent on the outside. I then set about replacing the missing 'pipe part. Not sure if it was meant to be down swept or what? But it will be fine like this..... A few coats of VHT paint and its one more thing ticked off the long list!
-
Have tested the coil, both primary and secondary are good! Fingers crossed...........
-
Cheers Norm! Just hope it runs???
-
Was pleasantly surprised to find the 'postie' delivered the bits from Meetens today, So an afternoon wielding spanners was had. To say it wasn't a challenge would be a lie. The rings supplied were +20 and needed filing and gapping, never done this before, something new to add to the resume! The sump gasket was of a later style and didn't fit, So I cut a new one...... Then I discovered an oversight from the valve seat re-cutting. Once the tappets and valves were refitted the valves didn't close properly? I ground the required amount from the valve stem to give the correct fitment and clearances, pleased to say it all went back together ok after that. The engine is almost done, just needs the flywheel and timing finishing, the carb overhauled and perhaps a squirt of fuel to test fire it...........
-
Thanks Ian, Not much point sitting idle when I have time on my hands! I must admit I thought it was a gonna when I opened it up...... Its suprised me how good it was beneath all the jellified crud and rust!
-
Here's the recut valve seat and the reground valves, The exhaust valve now sits a little lower in the seat due to the amount of material needed to be removed to get a un-pitted seat. The valve should be ok and not burn up!
Here's the block, cylinder head and sump all painted in this 'lovely' shade of green, Linden Green!
-
Had the exhaust valve seat recut today, ground the valves in, honed the worst of the damage from the bore, then stripped, cleaned and primed the block.
Found some original paint in a inaccessible part of the sump, so took this down to the local paint supplier and had some of this green mixed up. The closest match is a colour called "Linden Green"
-
Bitten the Bullet and ordered the bits to repair this engine following a chat with Gareth, a new set of rings, full gasket set, oil seals and a plug.
This is what greeted me when I removed the cylinder head....... Hmmmm, That looks like a lot of water has been in there, so I drain the oil, about a cupful of oil, followed by a litre of water! Further investigation revealed rusted piston rings, rust damage to the bore, heavily pitted exhaust valve seat and a seized rebuildable Lodge plug, thankfully the crank and bearings are fine.
-
Cheers Gareth, Say, will make some enquiries today on the bits required....... Could be an expensive resto again!
-
Cheers Paul....... Not sure where im going with this one after this afternoons discoveries! Looks like the engine could well be beyond economical repair, toast as they say!
Despite being told it ran as recently as a year ago, I very much doubt its ran in the last 10!!!
-
I'd be happy if it made any noise at present........ honking or not its sitting silent! Not touched it, too busy with garden produce, currently doing a batch of 'chilli jam'
-
Ahhh Gareth, You life saver! Its a B10/1
There is also V2075C marked on it? On closer inspection, the actual carb itself appears ok, its the housing which has the red air cleaner clipped to which is smashed, Air cleaner also missing!
The engine is free, however has little compression, so thinking valves, piston rings??? But 1st I will see if I can get a spark, apparently it was running a year or 2 ago, but then got left outside...... uncovered......
-
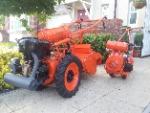
I took a trip down to Exeter to collect this today......... It will need some work, the original handle bars are missing, a previous owner has grafted a pair from a child's bike onto it. The carb will probably need replacing as there is a lump smashed out of the side, its also missing half its blades, wouldn't even know where to start looking for those?
-
Thanks Nigel.......
Hi Angus...... Not sure 'y', it was suggested in a conversation had ages ago, that modern 2 stroke oils wouldn't provide the lubrication/sealing required for the oilite type bronze bush/bearing. As it is designed for more modern roller type bearings and seals. Im no expert on oils and the additives used within........ just applied a bit of 'bit of both' logic?
-
Stuck the box on the front and pushed it outside today for the final pictures......... Have a new project to collect tomorrow!
-
Here is what the 'id' tag looks like on my 1949 14" Villiers 79cc 2 stroke. The 14 refers to the cutting width and the 49 to the year of production.
|
|