| |
-
There is usually a little brass tag, somewhere on the frame where the fuel tank mounts meet the mower side pieces. On that will be a date code. Sometimes these are painted over..........
-
"Decals look superb repro's". They are...... Unfortunately not our Titch's fine work, but from a chap IN Australia, found on the bay of E. Ordered and delivered in just over a week!
-
Sussed it!!! Windows 10 uses a different photo viewer....... have changed settings to use old windows 7 style viewer and resized all the images again, all is now well! WELL, I say well...... now have to edit the posts again..........
-
Right!!!! I have now edited these posts about 5 times now and still cant get the pictures to appear the correct way around!!!! The only change is I am now running windows 10? Anybody else having issues????
-
Hi Richard, I was at work.... lol
Its running 16:1, but the oil is a 50/50 mix of modern low ash 2 stroke oil and the recommended sae30....... Have been told it would be fine on the modern stuff, but not so sure if any of the bronze eating additives are in it? So used sae30 mixed 50/50 to at least give some of the 'old' protection. Logic or not? It doesn't smoke very much, not like my 14" Atco does on pure sae30 mixed at 20+:1!!!
-
Here's a short video as promised.............https://youtu.be/gFFY3Uj0sAA
-
Also had a small pressie from the 'postie' arrive today, all the way from Australia! Have placed the ones on the fuel tank and chain cover. Will fit those to the grass box in a couple of days, once the paint has hardened.
And with the freshly painted box fitted.
-
The grass box got finished today, all green and shiny!
-
The grass box to this mower required a bit of work to make it fit this machine. It was from a later machine and had different brackets. Here is a photo after the modification and test fitting.
-
Cheers Nigel! Just the grassbox to do now and decals!
-
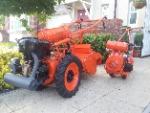
Finally got to the bottom of the non starting problem....... A mixture of a slightly moved flywheel and a poor seal on the crankcase drain plug. All is fixed now and running really well. Will get a video tomorrow, but for the meantime a front and rear photo.......
-
Cheers Richard! 1....... What are you doing up at 3am? 2....... Whatever your on, I want some!!!lol
In answer to your postcard...... I have tried fuel straight in the plug hole, checked the crank case (engine was completely stripped and rebuilt) I made all new gaskets and used RTV gasket sealant to ensure an air tight crankcase and good seal to the barrel. The crank has no play/leaks in the bronze bushings, so compression is good. It also has good draw on air/fuel from the carb. I did rest the plug on cooling fins or bare metal to test spark, spark is regular, bright and strong so doubt its lost under compression.
My Dad used to work a lot on Villiers engines on old bikes, he seems to think its fuel related as the plug isn't very wet? There is fuel mixture getting through, some was present when checking crank drain plug. So thats where Im gonna start today, pull the carb apart and start from scratch! I have my 14" to compare with, It uses the same engine and runs a dream, so will set this engine the same and see what happens???
-
It is! Its a 1948 model.......
It should have stayed there too! Driven me nuts today. When I rebuilt the engine I fitted a new coil, it had a good strong spark when I put it away before painting all the green bits. Finished putting the mower back together earlier and tried to start it...... nothing! No cough, no splutter, dead! Checked for fuel, yep! Checked for spark..... erm? no spark? Retimed the engine and flywheel, still no spark. Cleaned and regapped the points and spark now returned! So you would think it would run? No...... dead as a dodo! Have taken the carb apart, cleaned it and reassembled.....Gave up for today, Its far too hot to be thinking!!!
Ideas on a postcard please?
-
Refitted the cylinder and bottom blade yesterday, adjusted them, and did the 'shiny paper' test......... nice pile of confetti! Then put the rest of the machine back together, but it got too late to start it up, A job for today maybe?
-
Thanks Ian....... Couldn't resist starting to put it back together! Managed to get this far yesterday....... the cylinder and bottom blade are being dropped off at a mates for grinding. He works at a golf course and will be doing it over his lunch break.
-
Cheers Gareth, Its coming along nicely, and no........ Didn't paint the wifes freezer this time!!!
-
Started the task of painting all the parts in Green today Here is a couple of piccies...... You don't realise just how many bits there are???
Will leave the paint to harden for a couple of days before starting the re-assembly........
-
Have managed to make a good bit of progress in the last couple of days. The rollers have been filled, removing the very deepest pitting, etch primed and painted silver. Also refitted the flywheel cover and secured using new brass screws.
-
Yes!!! Thanks Paul....... The 12" is on the right.......
-
These 2 pictures bring us up to date....... Yesterday I welded 15 cracks in the cylinder blades, Vee'd them, drilled a small hole at the end on the crack to prevent it from running, and then welded the crack and hole both sides and smoothed out with the flap disk. Here it is with todays progress, the 1st bit of colour........ Also painted the clutch mechanism and the flywheel cover......
-
All the Aluminium parts have been cleaned as have all the nuts and bolt. Threads cleaned, some fittings replaced. The carb has has the once over and required the housing to be 'heli-coiled' as it had stripped the thread for the banjo bolt.
I had a duff coil and purchased an almost new replacement. Fitted, and pleased to report a good strong spark. The engine is all ready to go back on the mower. Exhaust has been painted with VHT paint.
-
As promised some pictures of this mower. Unfortunately I don't have any prior to starting this project as my phone has done the android 5.0 update, has had an episode and deleted all the pictures I had......... If anyone from Ardingly has any of this mower next to my restored 14" Atco, I would very much appreciate a copy???
So, here is where we are......... The mower was missing a grass box, one was sourced from the bay of E, not in too bad a condition, a few dents but nothing that cant be fixed.
These are the larger parts back from the blasters. The rollers will require a small amount of metal filler to improve some of the deep pitting...... the rest is all in etch primer ready for paint.
-
A quick question guys...... Does anyone have a photo of my 14" Atco, with the unrestored 12" Kev and I 'shared' next to it???? Flippin phone has had a meltdown and deleted most of the pictures on it!!!!
-
New replacement coil fitted and reassembled, sparking like a good-un!
Will get some photo's up this week.
All parts are back from the blasters and primed. Cylinder blade cracks all welded up and primed too. Hoping to get some colour on this week.......
-
Cheers Paul and Gareth, have managed to source a fairly new, tested and working coil from George at Villiersparts for sensible money. He has no new in stock at the mo, and apparently neither has anyone else! At least another month before brand new ones are available again!
|
|