

rotoscytheben
-
Content Count
240 -
Joined
-
Last visited
-
Days Won
6
Reputation Activity
-

 rotoscytheben reacted to Ian in Project "Why Not"
Thanks Mark..
Thanks Charlie, it's looking even more the part after the past two days..
And what a two days it has been.. This sudden house move lark has slowed things down a bit but over the past couple of days I have got the top chassis rail tacked in place..
-
rotoscytheben reacted to Wristpin in Winter draws nigh!
Time to fire up the Lister and make sure it's ready for any power cuts!
-
 rotoscytheben got a reaction from 4x4forks in westwood lawnbug!!
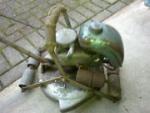
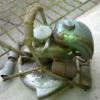
ive been after one of these for a while now and it turned up today after a few minutes it was running briefly but the carb is knackered and i hate tecumseh engines so its going to get a honda lump very soon here are a couple of pics
-
 rotoscytheben got a reaction from nigel in westwood lawnbug!!
having been over to a fellow lawnmower repair man the other day in search of a new carb for the tecumseh engine unfortunately to no avail but i did manage to find a nos float for the carb and a good seeing to in the untrasonic tank hopefully will have sorted it i will fit it over the weekend and see fingers crossed
-
 rotoscytheben got a reaction from Ian in project mobility madness monster wheels !!!!!
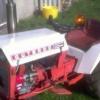
managed to get a few minutes on this one today its finally coming together
here are a couple of pictures
there are still bits to be done and i am going to change a few little bits that im not happy with
-
rotoscytheben reacted to Ian in Project "Why Not"
And onto the chassis.... Almost
I thought it would be handy to have a way of mounting the axle to the chassis so I marked out a couple of squares of steel, cut them out, tack welded together, but it was only when I started to bore the centers out on the lathe that I realized the square plates were going to be too small!!
Take 2 on a slightly bigger scale.. That's take 1 on the bench behind it!
A perfect fit around this axle off cut..
Chopped in half's and tacked on to the axle.. The sticking up bit's at the back are temporary and were only added to keep the plates the right distance apart for tacking onto the axle... Strengthening will be added but on when I have the chassis sorted..
And finally the first 2 new bit's of chassis roughly in place..
Working out the step up and step out so the rails line up with the axle mounts is going to be fun
-
rotoscytheben reacted to Ian in Project "Why Not"
I wish I had more of an update on Why Not for you guy's, but as my ordered steel has yet to turn up (fingers crossed for tomorrow he says yet again ) I've not been able to get on with much..
These two bits of blue box have been welded to the back of the body and screwed to the bench..
And a couple more lengths at the front.. These hold the bodywork in the right place so I can work out how the new chassis rails will run..
Nothing is set in stone yet, but I do know I want the top rails to run inside the bodywork..
Roll on when the steel arrives, it will look better and be a bit stronger than the lengths of wood
-
rotoscytheben reacted to Ian in Project "Why Not"
Well, the time had come to get cracking on with building the rest of "Why Not's" chassis, but before I could do that I needed to make sure the rear axle was in the right place and would stay there.. So I dug out some old angle iron to make a pair of bolt on axle stands..
But how to find the center of the axle!!
Not a problem... I bolted a thin steel plate over the hole and gently tapped around the edges of the bearing hole which kinda gave me an outline, but a rough one..
Once the plate was removed it had a nice smooth sharp bearing hole mark... Just right for marking out the middle
The center mark was given a light nudge with a punch so it could be seen on the outside and then bolted back to the axle like so
A view from the rear.. The axle is 100% in the right place now and is firmly fixed down to the bench..
And the prop shaft mocked up..
-
rotoscytheben reacted to meadowfield in project mobility madness monster wheels !!!!!
...and a shelf for the Kleenex and wurthers originals
-
rotoscytheben reacted to meadowfield in Raider 16 4x4 articulated -aka project bendy
here's the rest...not my hood - stole it from Ewan, also still 4x2 - I needed the tin work in place before I finished the idler and 4WD select/difflock
and the obligatory video
-
rotoscytheben reacted to nigel in westwood lawnbug!!
you must keep that origanal ben, buy the way angus will proberly know this but the lawnbug was made with 2 differant chassis a low side and a high sided one my question is which came first and what year was the change?
-
 rotoscytheben got a reaction from Triumph66 in westwood lawnbug!!
ive been after one of these for a while now and it turned up today after a few minutes it was running briefly but the carb is knackered and i hate tecumseh engines so its going to get a honda lump very soon here are a couple of pics
-
 rotoscytheben got a reaction from pmackellow in westwood lawnbug!!
ive been after one of these for a while now and it turned up today after a few minutes it was running briefly but the carb is knackered and i hate tecumseh engines so its going to get a honda lump very soon here are a couple of pics
-
rotoscytheben reacted to pmackellow in Gardenmaster 34... a bargain !!
Wendy and I went into Hampshire this morning along the scenic A272 to collect this little machine that I had won on that well know auction site
Its a Landmaster Gardenmaster 34, not quite complete but with lots of bits including a direct plug in Tarpen drive (hadn't got one of them)
plus a pair of tines, a spin weeder, a stand for when the machine is running a drive unit, another drive head and two tine covers
There was another Tarpen shaft drive hedge cutter as well
Not bad for £5.50 !!
-
rotoscytheben reacted to nigel in something for the winter!
i reckon theres a way of fitting 2 of those engines in that ben
-
rotoscytheben reacted to nigel in the new project handy landy
i came across this old hydraulic road breaker it was run by a Kohler engine so i sold that to ian with the frame, but i got a good hydraulic pump and a ally petrol tank and hydraulic tank out of it. the bits for this project are gradually turning up ready for a proper start next month
-
rotoscytheben reacted to Vinnetrow in Villiers Atco Twin News
So..I'm super excited about some news i have received from Spain. That's right Spain!
The little bike is gonna be published in a bike magazine from overseas!
Mondo Biker Magazine visited way back in May to take a few pics and I hadn't heard anything until yesterday, when Joseba emailed again asking for me to fill a Tech Spec sheet ASAP because he wanted to publish the bike
Its a pretty well established magazine too http://mondobiker.com/ shame its in Spanish
Here's a sneak peak photo he sent me
-
rotoscytheben reacted to Ian in something for the winter!
Good to see you have got started on this project Ben.
When did they start making Westwoods in green?
-
rotoscytheben reacted to Ian in Project "Why Not"
Yet more work on the engine frame thingy, top mounts this time..
I did tack a couple of the top mounts on complete with bit of the bike frame attached.. I didn't like the look of it so the mounts came back off, lost their bit's of bike frame and were welded back on.. They will have some more strength added.
A bit of thick wall tube..
With a bung/spacer thingy welded in each end.
It fit's here on top of the engine..
To make space to get a long bolt through I had to notch and weld a bit of tube into the frame each side.
Part welded on to the frame.. The welds do look much better from the underside
And a couple of rare shots of the engine frame without the engine
-
-
rotoscytheben reacted to nigel in the new project handy landy
ive tried 5 differant rads on this now in the end i found a dexta one that fits, only problem its full of holes so i will have to have it recored so i welded brackets on to fit it before i do that.
found a grill of a david brown with a bit of folding and bending it fits ok,
had an old army towbar kicking about so have plonked that on
-
rotoscytheben reacted to Wristpin in Ransomes roller rescue
The Honda engined machine also had its issues despite bills for over £1100 (yes, you read that right) in the last six months!
Problems included collapsed front roller bearings, seized/worn out traction clutch push rod, sticky, incorrectly set up main clutch , four inch crack in the engine platform and strangely enough considering that new cylinder bearings had been fitted, unequal length reaction springs on the cutter unit!
All fixable with knowledge, attention to detail and a bit of graft.
The collapsed roller bearings were a bit tricky as the outer races were buried deep in the roller end caps and required the old trick of running a bead of weld around the inside of each race which when cooled shrinks and loosens race. A sharp tap and they fell out.
Have tried to upload some images but although I succeeded yesterday, today it just sits buffering. The only thing that's changed is an upgrade to iOS8. Hope that it's not that as it will mean a bug fix from Apple!
Going to email the images from the iPad to the PC and see if I can post them from there.
Looks like that has worked!
-
rotoscytheben reacted to Ian in Project "Why Not"
It is indeed Mark.. Shame it's taken my brain so long to work it out
Thanks mate, the welds get better
Thanks Ben.
Thanks James, I've not quite mastered it yet but I'm getting there..
More mounts almost made up..
And tweaked a bit to give a bit more space around the starter motor..
They bolt here..
The only trouble with recycling steel is it needs a good clean up first.. This was part of the filming trailer I built ages ago but never used!
Cleaned up and welded on..
And on to today's fun and games, starting with the remains of the frame that the engine top mount was once attached to.. I only needed the threaded tube bit's..
You can just about see it in this balancing act of bits of metal.. Its the bit with the masking tape on it that was being marked out for more trimming.
After a day of careful measuring, cutting, welding and getting really confused until I realized the radiator is mounted on the engine an inch more to the right than left (why did Honda want everything on the outside of this engine offset from the center?), I had come up with most of the engine mounting frame..
I still need to make some cross members for it, but I'm happy with how it's turning out
As I'm only using one of the engine mounting places at the top of the engine, I will be making some mounts which will go forward from the threaded stud and join onto my engine frame.
So does the hood still fit?
That would be a Yes
-
rotoscytheben reacted to Vinnetrow in Project: 'TBD'
Kohler K181? Peerless 1200 series transaxle, Ford Model Y rear wheels...so far
I started as a tubular frame tractor, something a little different? But it is starting to be inspired by the Villiers Bike, there are plans to build a trailer to tow the bike
I'll try my best Niget!
-
rotoscytheben reacted to vegikev in apple sunday at mount ephraim
just a few pictures from my day at work not working