O&RBike 47 #1 Posted August 21, 2015 (edited) I started this thread over on the Old Mini Bike forum where I am a member but I thought the folks over here might enjoy seeing it too. I have gotten a lot of help over here since joining and I surely appreciate it. Helping my son build a small (BMX) 20" bicycle that uses a 1HP O&R engine as a power assist. The idea will be to pedal it up to approx. 10 MPH and then let the motor propel the bike to (hopefully) 20 MPH if geared properly. Not sure if it work but it will be an interesting exercise for his mechanical engineering project. You may have to bear with me as I figure out how to cut and paste and upload images here....thanks ! Edited August 21, 2015 by O&RBike 1 pmackellow reacted to this Share this post Link to post Share on other sites
O&RBike 47 #2 Posted August 21, 2015 This started out as one of those ideas where my son and I just sat around wondering if it would work and sketching it out...the next thing I knew we were building it ! We've all seen the Tom Thumb and Micro Bikes...not very practical being 6 inches off the ground. Or the 26" cruiser bikes powered by the 50cc import engines...cool but it's been done a million times. We wanted to try something a little different. The aim was to build a lightweight, small frame bike to ride around the school campus. There are some pretty stringent rules as to what will qualify as a "motorized bike" vs a street legal machine that needs to be registered and tagged. Your not going to bolt a West Bend 580 into a Schwinn and go ripping down the bike lane and get away with it. Campus police are hip to people bending the rules. My son thought an old BMX bike might be an interesting platform...and the Ohlsson and Rice being a vintage "Made in the USA" engine was appealing to me. The biggest challenge will be wringing every bit of that 1 HP from what I see as an oversized model airplane engine. It may end up being an exercise in futility...but it will be an exercise in backyard mechanical engineering none the less and hopefully we'll both have some fun and learn stuff along the way. 3 Stormin, pmackellow and Alan reacted to this Share this post Link to post Share on other sites
O&RBike 47 #3 Posted August 21, 2015 First order of business was to locate a suitable 2-wheeled candidate. A trip to the local Re-Cycle center turned up this forlorn looking mid-80's Huffy BMX in need of a good home. Hey at least it was made in the USA out of American steel and my SAE wrenches even fit it ! After some tense negotiating and arm wrestling it was acquired for the princely sum of $40 and tossed into the truck. Share this post Link to post Share on other sites
O&RBike 47 #4 Posted August 21, 2015 Next I sourced an engine from Joe Webber out of Missouri. I told him it was a father son project we were working on and he couldn't have been nicer or more accommodating. He gave us a great deal on the beautiful 1HP Compact III...looks like nos ! 2 pmackellow and S1g reacted to this Share this post Link to post Share on other sites
O&RBike 47 #5 Posted August 21, 2015 (edited) Here's the bike blown apart... And back from the blaster's with some assorted parts we collected: Edited August 21, 2015 by O&RBike 3 nigel, Stormin and pmackellow reacted to this Share this post Link to post Share on other sites
O&RBike 47 #6 Posted August 21, 2015 Motivating this thing is going to take some serious leverage given the lack of HP and torque. We're shooting for a final drive ratio somewhere in the neighborhood of 20:1. There's a company called Stanton that makes all sorts of engine powered bike accessories including this rear hub with LH and RH threads on each end. One side gets a freewheel flange made to accept the (#35 chain) drive sprocket ...the other side gets a freewheel bike chain sprocket so you can stop peddling when the engine takes over. 2 S1g and pmackellow reacted to this Share this post Link to post Share on other sites
O&RBike 47 #7 Posted August 21, 2015 (edited) We figured out early on working on the floor or bench wasn't going to cut it. We turned down a piece of black pipe and clamped it in the vise. Then we could drop the front fork neck over it and it conveniently allows us to swing the frame around from side to side. It would work better if we squared the bottom end to clamp it...instead we just cranked down on it hard enough to flatten the pipe lol... Here you see the new hub laced into the rear wheel and the 72T sprocket mounted... Edited August 21, 2015 by O&RBike 2 Stormin and Vinnetrow reacted to this Share this post Link to post Share on other sites
O&RBike 47 #8 Posted August 21, 2015 (edited) Having different mini bikes over the years we've fooled with lots of engines ..Clinton, Briggs, Tecumseh...but never one of these little O&R engines. Decided we better fire the motor and see what it was like. We made a temporary motor mount and clamped it to the old truck-hitch "dyno" lol we had made some years ago for testing small engines... Haha...looks lost sitting on the plate. Short fire up video: You may notice the recoil wanted to push the rope back out while running...the ratchet pawls were not retracting properly and needed a little adjusting/servicing (thanks Wallfish !) Edited August 21, 2015 by O&RBike 1 S1g reacted to this Share this post Link to post Share on other sites
O&RBike 47 #9 Posted August 21, 2015 (edited) For the actual engine mount in the bike we had to get a little more creative. We made a "saddle mount" out of some 1" I.D. DOM tubing. We split the tube and welded a flange along each edge. By loosening the 4 screws you can slide the motor fore and aft to adjust the chain tension...then lock it down. Edited August 21, 2015 by O&RBike 2 S1g and nigel reacted to this Share this post Link to post Share on other sites
O&RBike 47 #10 Posted August 21, 2015 Both halves of the finished mount : 4 S1g, nigel, Alan and 1 other reacted to this Share this post Link to post Share on other sites
Wallfish 724 #11 Posted August 22, 2015 Nice job! Can't wait to see it done Did Joe have a throttle for you or do you need the one I showed apic of?? Share this post Link to post Share on other sites
O&RBike 47 #12 Posted August 22, 2015 Hi Wall...actually we found a spring loaded brake lever that looks real good on the bike and seems like it will do a nice job as a throttle control. Really appreciate the offer but that throttle belongs in a display case I think, I found out they are pretty rare ! Share this post Link to post Share on other sites
O&RBike 47 #13 Posted August 22, 2015 (edited) Looking at pictures of vintage BMX bikes online, we noticed a lot of the high end bikes of the day had a gusset behind the fork neck. Of course we had to have one too.... Edited August 22, 2015 by O&RBike 2 S1g and Vinnetrow reacted to this Share this post Link to post Share on other sites
Stormin 4,458 #14 Posted August 22, 2015 Your not wasting any time. Looking good. Share this post Link to post Share on other sites
pmackellow 2,738 #15 Posted August 22, 2015 Looks a great project Share this post Link to post Share on other sites
O&RBike 47 #16 Posted August 22, 2015 Thanks guys. My son had a 2 week break from school including 2 travel days so that was our time frame to build the bike from start to finish. We were thrashing on it 6-8 hrs a day every day.The project is actually close to completed, I'm just getting caught up on copying the photos over to the forum and trying not to overload the server or wear out our welcome here lol. Share this post Link to post Share on other sites
O&RBike 47 #17 Posted August 22, 2015 Bent up a fuel tank bracket and plug welded it to the frame behind the seat... Added a strip of self stick foam padding on it : And clamped the tank into place : 2 S1g and nigel reacted to this Share this post Link to post Share on other sites
Stormin 4,458 #18 Posted August 23, 2015 He'll get some mileage out of that tank. 2 S1g and Vinnetrow reacted to this Share this post Link to post Share on other sites
O&RBike 47 #19 Posted August 23, 2015 He'll get some mileage out of that tank. Yeah we thought about cutting it down to help keep the bike streamlined looking but were afraid if we un-soldered the joint and started fooling with it we would end up with a mess. Share this post Link to post Share on other sites
Ian 2,417 #20 Posted August 25, 2015 Some great fabrication work going on there, keep the photo's coming Share this post Link to post Share on other sites
O&RBike 47 #21 Posted August 25, 2015 Some great fabrication work going on there, keep the photo's coming Thanks. I think I got a little carried away with the photos and I reached the limit in my album before I could finish the story. I found out I could increase my limit by becoming a supporting member, so we're back on board and I call it money well spent. 2 C-101plowerpower and Stormin reacted to this Share this post Link to post Share on other sites
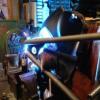
O&RBike 47 #22 Posted August 25, 2015 We sourced a 1/2" bore 10 Tooth, 35 pitch sprocket from Martin Company to fit the pto shaft. Then we got the mini jackshaft and clutch mounted. We're trying a nos 300 Series (3" diameter) Comet clutch I had kicking around because we felt the small diameter fit the proportions of the bike better. Since the jackshaft is only turning roughly 1/4 crankshaft speed (3.6:1) achieving enough revs at the jackshaft to engage the clutch is a bit of a concern at this point. I have an old dealer service kit for these clutches and we installed the lightest engagement spring available (1100-1500 RPM). That equals approx. 4,000 -5400 engine RPM. Mounting the clutch directly to the 1/2" engine pto is just not practical. Share this post Link to post Share on other sites
O&RBike 47 #23 Posted August 25, 2015 Getting there.... 2 Vinnetrow and Wallfish reacted to this Share this post Link to post Share on other sites
O&RBike 47 #24 Posted August 26, 2015 Off camera we had to bend the arms on the pedal crank outward to clear the works...sort of a "Z" shape bend, out and then back parallel again. The local bike shop actually had a special tool with a long cheater bar on it designed for bending the arms (cold) that we borrowed. It's really made for making small tweaks on a bike that's been laid over or crashed. We needed a full 2" offset. I could not believe the steel arms would bend that much without heating them up but they did with a lot of persuading. I said we did it "off camera" because there was a lot of swearing going on hahaha... Share this post Link to post Share on other sites
O&RBike 47 #25 Posted August 26, 2015 Odds and Ends.... Turned a longer solid aluminum seat post for it to gain some leg room ... Swiped a set of suspension forks off another junk BMX bike: We had to press a sleeve in them to fit the vintage aftermarket handlebar stem. Aside from the internal springs, these also have the provision to mount a front caliper type brake. (We had to ditch the original coaster brake with the custom rear hub.) 4 Stormin, Wallfish, nigel and 1 other reacted to this Share this post Link to post Share on other sites