


Westie1
-
Content Count
103 -
Joined
-
Last visited
-
Days Won
6
Reputation Activity
-

 Westie1 got a reaction from Cub Cadet in Rotavator and snow plough help
Hi, I fancy a snow plough and rotavator for my c165 and these have popped up.
Problem is the plough is odd (what's it off?) And a bit rough.
The rotavator is missing the belt and pulleys, the idler pullet from the unit its self and the pulley is very small.
What other bits are needed? I have the axle bracket.
Thanks I'm thinking this is just too much effort as it's not exactly cheap either.
-
 Westie1 reacted to kpthorsefan in Wheelhorse snow plough/ dozer blade 42"
complete but no rear hitch attachment, restored in 2010 and shown at tractor world in 2012 and not seen the light of day since then.
but I cant get photo's on...
-
Westie1 got a reaction from Cub Cadet in Koehler carb help please
Cleaned up and some tie rods made, I went for m10 so had to drill out slightly on the steering rack end.
-
Westie1 got a reaction from Cub Cadet in Koehler carb help please
Nothing would touch the carbon other than the rotary tool with a steel wheel and wd40 after a screwdriver scrape (I was very careful with both). Lots of dings in the head so figured I can't make it any worse. The piston going to look like the surface of the moon I bet.
Think I'm done on this now after 1 more sheet for good measure tomorrow
-
Westie1 reacted to Stormin in Koehler carb help please
Check the depths of the holes with a screw driver, pen or similar. The deepest hole will be for the longest bolt usually.
-
Westie1 reacted to Jarrovian in NVTC Rally
Northumberland Vintage Tractor Club rally October 20th & 21st held at Brunton Airfield near Alnwick
-
 Westie1 got a reaction from Stormin in Koehler carb help please
Cleaned up and some tie rods made, I went for m10 so had to drill out slightly on the steering rack end.
-
-
 Westie1 got a reaction from Anglo Traction in Koehler carb help please
Nothing would touch the carbon other than the rotary tool with a steel wheel and wd40 after a screwdriver scrape (I was very careful with both). Lots of dings in the head so figured I can't make it any worse. The piston going to look like the surface of the moon I bet.
Think I'm done on this now after 1 more sheet for good measure tomorrow
-
Westie1 got a reaction from Stormin in Koehler carb help please
Nothing would touch the carbon other than the rotary tool with a steel wheel and wd40 after a screwdriver scrape (I was very careful with both). Lots of dings in the head so figured I can't make it any worse. The piston going to look like the surface of the moon I bet.
Think I'm done on this now after 1 more sheet for good measure tomorrow
-
Westie1 reacted to Stormin in Home made plough/dozer blade.
I built this out of what I had lying around, in anticipation of snow last winter. I'm still waiting.
First a frame was made using some 1-5/8 bore pipe and box section.
Then the front end put together
The blade was made at the local smithy. No rollers big enough, so it was curved in stages on a folder.
I made my own tach-o-matic for the rear.
Then this dodgy character nicked it.
-
Westie1 reacted to rog8811 in My westwood mini jeep
This was one of those things, i saw a picture on the internet and had to have a go.
The first picture was my first mod, front wheels the same size as the back ones.
The rest are the finished Jeep.
If you want to see more info on this I did a blog on instructables
http://www.instructables.com/id/Gas-petrol-powered-jeep-from-ride-on-mower/
If the link isn't allowed/doesn't work just search my screen name in google images.
-
Westie1 reacted to Stormin in E- tank.
I know this subject is posted elsewhere, but as I decided to make a bigger one, I thought I'd do an update. Actually, certain persons told me too.
So first a plastic drum was procured from up at a mates farm.
Next, the top was cut off.
I had these hooks that are for hanging florescent lights from. After cleaning the paint off the hook and the back, they were fitted to the drum. Two eye bolts were also fitted opposite to each other. These for wire or some sort of support to hang the work piece from.
Copper wire was secured behind the hooks and out through a hole drilled in the side. Also a wire and crocodile clip secured to one of the eye bolts. The later will attach to the work piece.
Sacrificial anodes were made using some box section with copper wire attached, so they could be hung from the hooks.
I had an 18v battery charger for a cordless drill lying about, so this has been modified to provide the electric current. The blue wire, negative, is attached to the copper wire running round the inside of the tank. The brown wire, positive, is attached to the eye bolt with the wire and clip on.
All that's left now is to fill it with water and add washing soda and it should work.
The top will be fitted upside down to act as a cover. Why upside down? The barrel after being cut and having bits bolted to the sides, is distorted. Upside down it fits grand as owt.
-
Westie1 reacted to Cub Cadet in Transport Box
Starting to look the part now, just got to do a little more tweaking on the lift mechanism and then paint it.
-
Westie1 reacted to Stormin in A horse and a Billy goat.
Last year on my annual trip down south, one of the things I returned with was this Billy Goat. There is a thread on it in Pedestrian machines.
As you can see I'd been having a bit of a play with it. Today I dug it out of it's hiding place had more of a play with it.
First I amputated it's back legs wheels. I then found these two pieces of scrap, plus the jaw plates removed from my Saxon trailer.
They became this towing attachment for the front of the Billy Goat.
Next job was a rear towing attachment. A length of 1"x1". Another of 1"x2". A couple of U bolts. Tow ball plus a spare spacer and I had this.
At end of play this is how things look.
There's still more to do and one or two alterations but so far so good. All made from scrap lying around, so zero cost.
No Billy Goats were harmed and if needs be can be put back as was.
To be continued.........
-
Westie1 reacted to Anglo Traction in Koehler carb help please
To be honest, I would say you are there with it. Hopefully the new gasket rolled lip will sit in the same depression area remaining.
You have enough flat area for a gas tight joint now. The original pic of the head showing the blown gas leak areas, which I later showed and denoted (but forgot to explain) with green arrows are now fine.
There is just the chamber carbon deposit areas to finish back to bright and you're done with the C/head.
Nearly time to arm yourself with a torque wrench and bolt it down to the sequence in the manual.
-
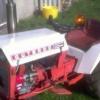 Westie1 got a reaction from 4x4forks in Wheel horse fergie
I've just been shown these pictures on Facebook.
I know it will irritate both camps but I'm very tempted to do this!
-
Westie1 got a reaction from Stormin in Wheel horse fergie
Very true, mine this year lol
Only got 5 though must try harder
-

-
 Westie1 got a reaction from nigel in Wheel horse fergie
I've just been shown these pictures on Facebook.
I know it will irritate both camps but I'm very tempted to do this!
-
Westie1 got a reaction from Stormin in Wheel horse fergie
I've just been shown these pictures on Facebook.
I know it will irritate both camps but I'm very tempted to do this!
-
-
Westie1 reacted to Stormin in Koehler carb help please
To remove carbon, I use an old 6" rule very carefully. Also a piece of brass strip. I finish off with Scotch Bright or wire wool. For the outside, wire brush, scraper and plenty of patience.
-
Westie1 reacted to Anglo Traction in Koehler carb help please
Firstly, don't throw the old carb away. I presume this is for a 16hp K341 or Magnum?. The Carb in your pic looks aftermarket. The original was either a Kohler with #30 in raised letters in the casting above the venturi aperture when looking through past the Choke plate. Or it is/was a Walbro. Both have different settings and the later ones from the 80s had fixed Main/High speed needle jets.
I have no experience with those Chinese Knockoffs, but have heard different opinions and experiences. Is that Carb specifically for a 16hp? or a generic one which states it fits all?.
If the Needles actually adjust the mixtures, then the top one is the high speed/main, the angled side needle is the Idle mixture. Top screw is the Idle Speed adjuster.
Need to know what your engine model, spec and serial number is to establish correct needle settings.
Will probably need to guess or take an average of the preliminary settings for a chinese one.
As for the Head Gasket, the quoted genuine Kohler ones are preferable, as they still have the folded over edges that are exposed to combustion forces.
Aftermarket ones are likely to be just a pressed sandwich style, unless you can see what you are buying. I which case, they will work ok.
Flatness of the head/cylinder faces are essential. you can check the head flatness after a clean on a good sheet of thick plate glass (smooth and very flat) and feeler gauges.
You should not be able to get a 3 thousandth (0.003") of an inch feeler gauge between the 2 faces anywhere around it. If can-.......
obtain 2 new sheets of non-creased Wet or Dry P400/P600 (1 of each). Proceed to flat the head gasket face down on the P400 (dry) in circular movements until the high/low merge.
Finish on the P600 the same way. The small impressions left by the original gasket do not really need to be removed, just aim for a smooth clean area all around.
Head bolts are torqued to 28-30 lbs ft and rechecked after an hours running.
Once the head leaks are sorted, you can sort the carb. Good luck
Edit -Bit slow, Reiver beat me to it.
-
Westie1 reacted to Reiver in Koehler carb help please
Looks like head gasket has been leaking, I have found in the past that some kohler heads seem prone to warping. A quick check of head for warp is to place a straight edge across head face and look for light under straight edge. more accurate way is to try and slide a feeler gauge between bottom of straight edge and head face.check diagonally.