Another question I haven't got an answer for, what is hidden on the inside of that pulley? There has to be a reason why it's extended.
I thought that too when I first saw it.But the pulley pictured above appears to be something someone machined. Doubtful there's anything special about it since the gearbox has the centrifugal clutch inside of it. The extension or thickness of it is probably just to fit on the length of the shaft so the shaft doesn't protrude out the end.
Carb cleaner, Brake clean Lacquer thinner etc soaking in the bottom of the tank as it could just be the screen filter is clogged from the old gas gum. Swish around every once it a while.
Small wire into the tube if that's clogged too but don't bury it as there is a very delicate screen filter on the end. If you can get any flow then I use a bulb type thingy to force wash the cleaner back and forth through it until it clears out.
Difficult to find throttle and cable for that. You're going to have to get creative like using a mini bike throttle kit.
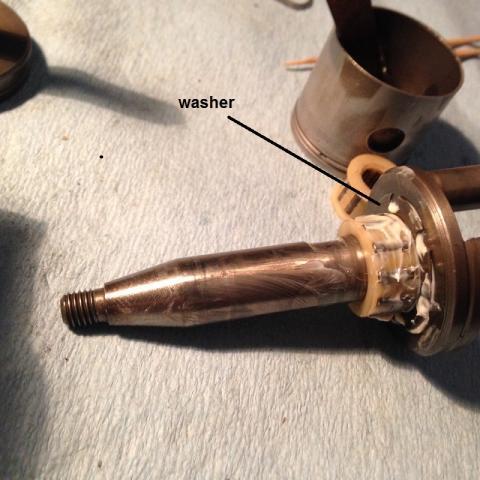
That leak is at the governor spring. Fuel shouldn't be passing the little ball bearing check valve in the carb unless the engine is running. When running it shouldn't be leaking because all the fuel is being sucked into the engine to run. You might have to pull the carb apart and clean the bearing and seat real well because it should seal. Or replace that bearing too
The only way to access them is to split the tank open. Thought you had to do this before?
All of them are a screen on the bottom of a small cone. Soak with carb cleaner in the tank. Then I use something like this connected with a fuel line to force flush the cleaner back and forth through the screen. Never had to open a tank yet. If the tube is filled with gunk you can use a fine wire to clean most of it out but BE CAREFUL not to poke it through the screen.
Spark should be a sharp snapping blue color. if it isn't, try changing the condenser
If it's still hard to turn as mentioned before you should try it with the spark plug out. It should now turn as easy as every other one does. If it's not, there's something binding inside from assembly and you will need to find out what that is and correct it.
What are you powering with it? Sensitive computer equipment? Typical lights and motors ain't gonna care.
The governor should limit the rpms so make sure it's not hanging up or something. You can probably add a screw where the cable would go for things like a drill or mini bike engine that uses a throttle cable if you need to limit the butterfly from opening.
Some good reviews on the 110v Harbor Freight ones according to a guy I know. Not overly expensive. Spend good money on a good helmet though, you get what you pay for and welder's flash really sucks when it happens!!!
Sell me one of your rare O&R tools (Cheap) to finance one! LoL
I had a Hobart 140 using flux core wire before graduating to real 240v mig with Argon mix gas. It was great little machine for the "everyday" stuff but I would still stick weld any heavy structural type things.


 Post some pics of the tank

 You can buy small line too

Ohlsson & Rice: 1968 Devillaine Ouragan with O&R Engine
in Ohlsson and Rice
Posted
I thought that too when I first saw it.But the pulley pictured above appears to be something someone machined. Doubtful there's anything special about it since the gearbox has the centrifugal clutch inside of it. The extension or thickness of it is probably just to fit on the length of the shaft so the shaft doesn't protrude out the end.