This WAS a nice NOS chicken power unit in the original box too
It's been packed way in the back and has been there for a very long time. 2012 maybe? Pulled it out today and discovered the ruined unit. Mice made a home in the box and the urine covered thing now needs a complete overhaul and paint.
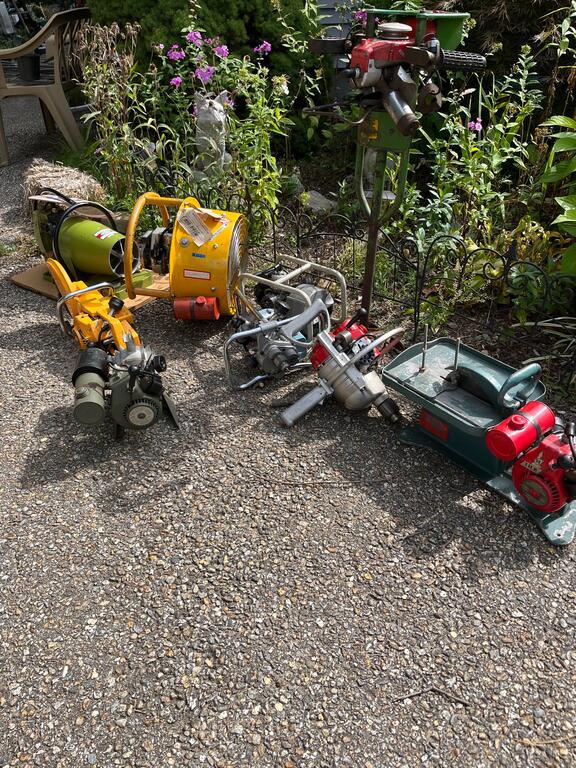
Next Saturday is a smaller get together up in Maine so figured I'd bring up some of the stuff that doesn't go to the big shows. They haven't seen the light of day in a LONG time so it'll be nice for people to see them. They're too small and expensive to leave unattended at the big shows although I have never heard of any stealing of anything at any of them.
Just a small sample and will probably bring about 20-25 tools or so depending on available time to get them out. Pictures of the entire display all together next week
Those rubber pad arms are the newer type and difficult to find as there were not near as many produced. They tried to band aid the carb again with that fix instead of the ball.
You can try sending a PM to @Mike in NC as he recently posted a big parts find and may have something in there for you. He never mentioned if he was going to sell anything or not but worth a try.
A product called Seal-All will stand up to the fuel or Yamabond sealer to try and glue it .
Since I'm always working on bush fixes for unobtainable things, I was looking at the Kohler carb float valves. They have a rubber tip on them which is about the same size. Never tried it yet but if it can be cut off clean and flat, then poke the point (may need to be sanded or cut a little) through the arm hole, Use a solder iron or something to melt the rubber to lock it in the hole.
Small RC check valve or valves in the fuel line before the carb?
Changing the diaphragm body to a ball type. It will bolt right on
Or, just in case it disappears like a sock from the dryer! No one knows how it happens but we all know it does happen. LoL
Once it's all back together use a piece of fuel line connected to the inlet and try to blow in it. It should only allow air to pass when the primer button is pushed. If it's allowing air to pass otherwise it's not sealing and therefore not check valving.
Some carbs allow the cover to push down on the little arm ever so slightly too. I typically don't use a paper gasket along with the diaphragm but I do add one when this condition occurs. It's an easy solve compared to trying to bend that little arm.
There were 2 different sizes but I "believe" yours would be the smaller of the 2 . They are 1/16 and 3/32 ball bearings. They can be found at old school type hardware stores with all the little parts in the drawers.
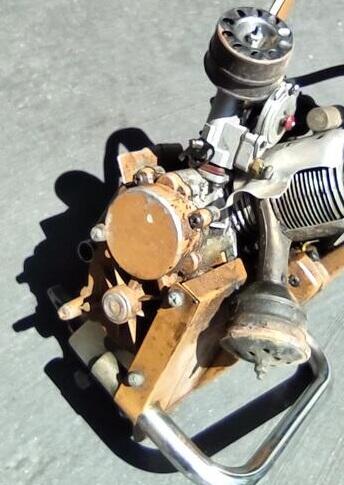
The little steel ball bearing in the carb is not sealing. You can see the bearing in the carb pic above. That ball bearing sitting in the hole is the check valve. If fuel is pushing back past the ball, you can see it travel towards the tank. If the ball is sealing well, the fuel will travel through the carb to the engine.
Getting that ball to seal better will help with performance of the engine.
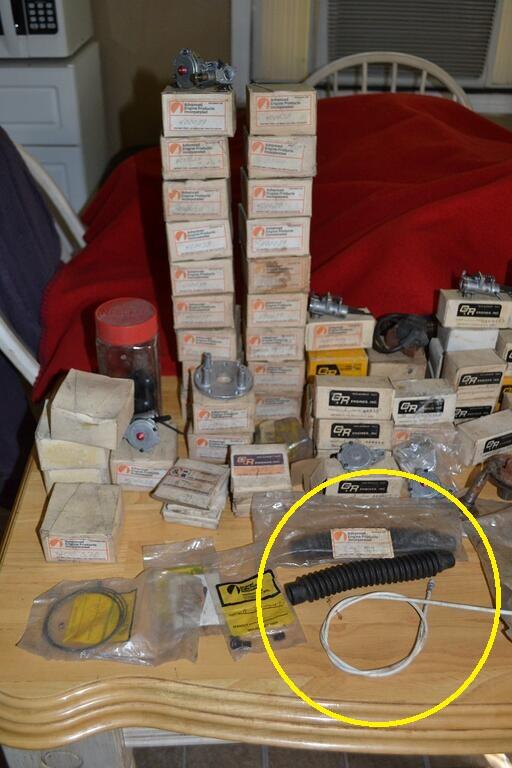
Well, actually I'd be interested in all of it but let me know if you're willing to part with those boots and cable. I don't know what the black boots were used for as an O&R application but I have a tractor project that needs boots for 3/4" rod
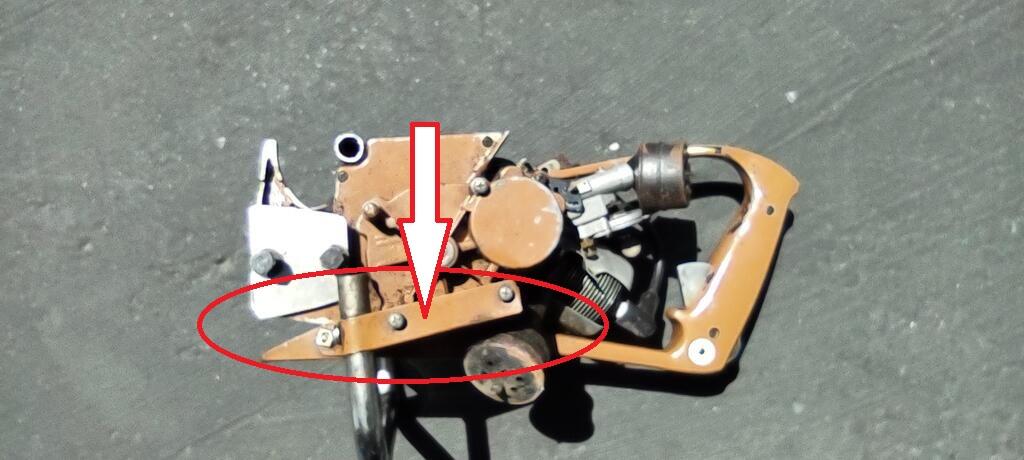
That looks like a homemade fix for the missing clutch cover. Fortunately, that's an easy part to find.
That was my first thought as well but then in this pic it looks more professional. Not that someone couldn't make that but then there isn't any other paint color obvious under that color at the scrapes and missing paint. Someone could paint it too but I'd guess if someone was to go through all that trouble of completely striping the paint and building a part it would be easier to just find a correct part and make it a complete restore job. I'm guessing it could be another branded Mustang with little change to the cover
A closer look. This cover is different from the Mustang saws but that seems to be the only major thing that's different. Maybe the paint color but that could just be pics.
Many were branded under different names with minor adjustments like many other O&R tools were. Mostly paint and decals but some with body panels too. All the other parts are the same.
Many carbs are interchangeable as those type are the most common. Not just chainsaws but most O&R engines have those which will bolt right on. If the ear is completely broken off then you will probably need a replacement. Repairs will not be strong enough to hold it tight and the vibration will probably crack JB weld. If it were just cracked then maybe it's salvageable.
The little ball bearings can typically be found in the old school type hardware stores with the little drawers full of that small stuff.
There were 2 different size bearings used--they are 1/16" or 3/32" ball bearings
Do you have a picture of what my bearing should look like.
Sorry about that!! Click on the link above (I fixed it!) and scroll down to you see the rod bearings. And yes, there should be a cage. I'll see what I can find for parts
There were 2 sizes over the years but I believe a drillgine would have the larger of the 2. they are 1/16 and 3/32 ball bearings. If you have an old school hardware store close by you can find them in the drawers with all that small stuff
Bienvenue sur le forum. Il semble que nous n’ayons pas de manuel pour le taille-haie, mais vous êtes invités à poser des questions afin que nous puissions vous aider. Mieux vaut que vous puissiez d’abord les traduire en anglais pour recevoir plus de réponses. Il est possible que nous puissions vous aider avec les pièces du moteur, mais les pièces de l’outil sont obsolètes
Can anyone confirm the engine Type/Model used, I suspect it might be Type 97, this is listed as a "Chipper Saw" from Comet Industries, Type 97 is not mentioned in any of the Comet literature I've seen, could they have made it for JB Bennett?
I can but the saw will need to be disassembled to get to that end of the engine. It's buried in the saw mount. Maybe @Edman6625 can report back if his is taken a part
It makes perfect sense for everything you found as it's the same exact set up like a Comet circular saw with the belt drive to the blade, The coil cover screams Comet Industries, the chainsaw type teeth on the blade say it's intended for raw wood. The bottom plate certainly isn't intended for finish work as the screw heads protrude out just a little. Mine definitely came from Georgia.
Sure seems to be such a specialized tool to be mass produced. How many gum sappers can there be?


 I'm guessing it could be another branded Mustang with little change to the cover
.jpg.b12cb086813938d9674b5f24d49b9924.jpg)
Ruined NOS Chicken Power
in Ohlsson and Rice
Posted
This WAS a nice NOS chicken power unit in the original box too
It's been packed way in the back and has been there for a very long time. 2012 maybe? Pulled it out today and discovered the ruined unit. Mice made a home in the box and the urine covered thing now needs a complete overhaul and paint.