
Leaderboard

Popular Content
Showing content with the highest reputation on 01/25/2015 in all areas
-
2 points
well its been a year
Triumph66 and one other reacted to Lauber1 for a post in a topic
I think its going rather well. Maybe some more action photos of working tractors would be all i need. -
1 point

1968 wheel horse lawn ranger
jparkes43 reacted to Charlie Smith for a post in a topic
looking good James, its coming along nicely, Good to see you'll be helping out with the advertising of MoM i have one of them decals on my trailers, and tractors that i show -
1 point
1968 wheel horse lawn ranger
meadowfield reacted to jparkes43 for a post in a topic
look whats coming!! james -
1 point

1968 wheel horse lawn ranger
jparkes43 reacted to the showman for a post in a topic
Making steady progress James, well done -
1 point

Yellow Mower Challenge!
S1g reacted to Anglo Traction for a post in a topic
Long time since I visited the forum (last year!!). Hope all are ok etc. I'm adapting to a few shortfalls in physical health (thanks Ian/Norm for your concern). Still looking forward to the chance of spending time down in the Workshop when weather warms up. Have been able to do a few little fiddly bits recently though. Back in Post number #34 on page 2 of this 'Topic', I had a few jobs to finish on the Carb. A new Strangler (choke) Rod has been made up from 1/8" stainless steel and a 'Lift Knob' formed on the top. I also added a fibre washer and spring to prevent vibration wear and seal from dirt etc The 2 Filter Body retaining screws also made.- Made up a new Throttle Cable, turning up some new nipples now that I've fixed the required length and route, the Villiers Throttle Lever also fully refurbed, but had to replace the Chromed Top Screw. Original Cable Ties (2) shown just in top left of next pic will be re used-. Other little tinkering bits I'm managing to do are Fuel Tap(s). The Fuel Tap on this mower is the Lever turn type (bottom in next pic). I thought I'd add a bronze Mesh screen filter (149 microns) like the one I made and fitted to the (1954) Ewarts Tap (right in pic) I'm refurbishing , but may make a 'Drop In' one that sits inside the Tank Filler neck. The other (1964 chrome) Ewarts Tap on the left of pic is finished and from the Seagull Outboard and needed a new Brass Plunger made before fitting a new Cork on it-. Here's hoping we have a good Spring 'n' Summer . Lots to do, Places to go, People to see. -
1 pointhello guys, here is some more progress for you, not much but some rear wheels tyres are off the tractor, they have been wire brushed so that they are ready to be sand blasted at school the front split rims have been split, they have also been soaking in petrol and various other liquids to de grease and clean them ready for sand blasting too (they are really clean photo doesn't do it justice). i also got the steering wheel masked up, sanded and first coat of primer applied (past couple of days have been too cold for any more) and now you can see what it looks like james
-
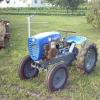
1 pointAt last I collected the Lawn Keeper along with a few implements (a tiller and a mowing deck) this morning from North Devon. The seller is a really nice guy with his own Bolens G14. I pressure washed the LK plus the implements this afternoon and they are safely stored under cover. My son removed the plastic seat from the LK. The rust is only surface rust. The plan is to renovate the LK with a fresh paint job, replacing the MTD engine with a more appropriate one and to find a suitable seat. It's a fairly light machine and is very manoeuvrable.
-
1 point

Raider 16 4x4 articulated -aka project bendy
Cub Cadet reacted to meadowfield for a post in a topic
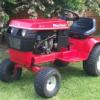
Thanks guys, finished the upper dash panel too. It's a lot easier than painting and lettering Plus I can change the words... -
1 pointWhen I had the business we had a 5 lire capacity stainless steel tank with a heater that would take several carbs at a time. In retirement I have a three litre stainless, again with a heater and it does a good job. It came with a bottle of Seaclean concentrate but I prefer Ultraclean SA plus just a drop of washing up liquid. It should be noted that the cleaning fluid should be matched to the metal being cleaned. Some cleaning solutions are too aggressive for the soft alloys used in carburettors. Some people use a 50/50 solution of white vinegar and water. Another tip that I picked up along the way is that the plastic parts baskets supplied with some cleaners absorb about 30% of the ultrasonic energy before it reaches the parts being cleaned, whereas a stainless mesh basket only absorbs around 8% - I found a suitable stainless one in a cookware shop and subsequently a better one from a jewellery supply company ! Remove jets etc from the carb body and clean them at the same time but loose in the float bowl or a separate container. Alter the orientation of the carb body during the cleaning process so that the "shaken loose" dirt can fall out. I usually clean in two 15min sessions at 50degrees C. After posting the above I was browsing some US sites looking for home made cleaning solution recipes and stumbled across this - interesting, "Do not clean ball or roller bearings in an ultrasonic cleaner. The vibration of the components of the bearing will cause surface damage on the raceways and rollers or balls. We ran tests on several groups of bearings and found that even after a short cycle in the cleaner there was enough damage to cause rough noisy operation when we tested the bearings in a noise test machine. This program was initiated when customers complained about noise after ultra sonic cleaning the rust inhibitor from new bearings, since it was not compatible with the lubricant they were using in the application."
