
Leaderboard


Popular Content
Showing content with the highest reputation on 08/25/2017 in all areas
-
2 points

Wheel Horse RJ-58 Restoration
Triumph66 and one other reacted to Cub Cadet for a post in a topic
Since the chassis and gearbox are now operational i thought i would take a look at the bonnet which was in a very bodged state, fibreglass had been used to reinforce the metal and i thought it must've been in a bad condition underneath all the filler, I managed to file the filler off which revealed just what a state the bonnet was in and then the fibreglass which was on the underside just peeled off as it was stuck to paint and rust. Before photos After some filing The only way to fix it was to cut the whole section out and weld in fresh metal, it took some bending to make a piece that would fit but its worked well and its now very strong. -
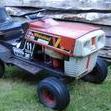
2 pointsBut of course old bean, of course Sorry for the slight delay in finishing this post, spare time is hard to find! Anyway... Quite a few months ago when MadTrax was being stripped down for paint I found that I couldn't get the exhaust off the engine! Something had closed up during welding and made the very small clearance there was too small to clear anything.. So, the only option was to put an extra flange in the system.. Almost finished here, just need the welding finished when it's unbolted. And on to todays main attraction Never being one to take the easy option and also having a history of making drastic changes when I'm most of the way through a build, I thought the best way to bolt the new wheels on is if I use the matching hubs..... And suspension.... And brakes....... And steering With a couple of bars cut out under the seat the Quadziller rear end could be rolled in place. The heavy duty sump guard came in handy, nice and flat for balancing on a widened wheel rim that was just the right height. With the front end stripped off, there was only one thing to do.. Slice off her nose To fit this, Quadzillers front end A little trimming later and both ends are near enough in the right places. Lot's of measuring later the front and middle sections lined up and were held together with some tempoary bracing. The first two new tube to on were the rear end, I just had to give her a slightly cheeky curvy rear No problems getting the exhaust back on, the battery box will be cut out as MadTrax has one already. Working out how to make the top shock mounts was interesting, but worth it as they look good. It's a shame that I ran out of welding gas as I was tack welding them on! I will put a bracing tube between the shock mounts. And that's where the build is up to for now... More to happen when I get more gas..... (No fart jokes please)
-
1 point
One of the first Westwood Gazelles
WestwoodGazelle reacted to WestwoodW8Gazelle for a post in a topic
Hi, ok I will have a look at the last numbers and will let you know. I never would of worked that out! Thanks. I am currently away at the minute so won't be able to have a look until Monday next week. It will be interesting to know what mine is. This is the only picture of my Westwood that I have at the minute, but i will post a video if it running as well as other photos if you would like. In this pic you will probably notice the seat has no edging, this is because when I took the photo last year I was in the middle of fitting new seat and sorting rust problem under the cushioning. I was surprised at the rust being so much of it under the foam. Ha ha. Thanks. -
1 pointVery nice work Ewan
-
1 pointYou get a gold star, David.
-
1 point
One of the first Westwood Gazelles
WestwoodW8Gazelle reacted to WestwoodGazelle for a post in a topic
A video would be great to see if you can get one Do you know what your serial number is? Mine is 252707 1062 01 78061411, you can work out the date from the last part- 78061411. 78(year)06(month)14(date)11(horsepower, I believe?). So mine is stamped from 14th June 1978. Sounds like you did a good job on the engine! Mine starts on the key too, although I fitted a separate choke. Hope all goes well sorting out the pulley. -
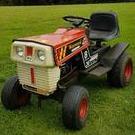
1 pointIts been a long time since I did an update! The restoration is moving along nicely, heres a few pictures from what seems to be months ago now. Heres one of the wheels cleaned up, notice all of the welding. We have replaced a lot of metal which had completely rusted away. The chassis was primed, its currently in the stages of being painted red. The brake drum for the trans was missing so when I was at Newby hall I took some measurements from Chris' RJ. We had a cast pulley hanging around which was a near identical casting to the original and the bore and keyway were the same. With lots of turning I ended up with as perfect a match as I would ever get Before and after In situ More updates to follow shortly
-
1 pointNutter as mad as a box of 🐸 frogs
-
1 pointI'm still a little confused, did you service the carb? You can check the carb primer works by attaching a short piece of fuel line to the inlet, put the open end of the fuel pipe in some fuel and see if it will pump fuel when pressing the primer button. If it doesn't pump fuel, check the ball isn't stuck to the valve seat (they can stick with dried out old oil) and that the diaphragm is in good condition (flexible with no cracks) if you haven't renewed it of coarse. As for the tank, only one pipe goes to the bottom of the tank, that is the fuel pipe and has the filter, the other two pipes are bridged to prevent an airlock and are not for fuel to pass through. You can check if they are blocked by part filling the tank and tilting it vertically (with something underneath to catch the fuel), cleaning can only really be done with fuel, try leaving some in it for a few days, or use or carb cleaner etc down the pipe. If there is a lot of dirt in the bottom of the tank I also put some nuts in the tank with the fuel and shake it to dislodge the dirt. Pour out the contents and repeat if necessary. David

