If you think that the yellow wire is the kill, check it out . With the ignition OFF you should have continuity to Earth . With it ON , it should be open circuit. When you say "wont start" do you mean totally dead or "cranks but wont run" ?
The danger is that if you’ve got things wrong it’s possible that you may have put voltage through the ignition coil and cooked it, so the first thing to do is to isolate the engine. Disconnect all wires other than the heavy one from the solenoid to the starter motor and crank it over but be prepared to pull the plug lead off to stop it. If it starts it at least shows that you have a runner and can relax and sort out the stopping!
I will dig out a wireing diagram but normally the kill wire will go to a terminal on the throttle plate and will have a loop terminal under a nut.
The 8 hp lump may have a single charging wire with a “ tubular” connector or a dual circuit alternator with two wires and a double pin connector that can only be fitted one way round.
Yes, the yellow is shown as the kill wire. As well as going to the kill terminal on the ignition switch It is also connected to a couple of safety switches which will also prevent the engine from firing unless in the safe position.
Are you sure about that part number? If I’m looking at the correct part the book that I’m looking st says 1662. In stock at my Hayter agent , key 505, for 94p + vat
Without the key and just putting the pulley on the crank, how much wobble is there? One of the heavier grades of Loctite, such as High Strength Retainer , should sort the problem .
A drop of Loctite won’t hurt but the spring washer should be sufficient. Remember the a liquid thread locking compound effectively lubricates the threads and makes it easier to strip or shear the screw so reduce the tightening torque accordingly.
Not sure if this particular engine will live again, it has been robbed of most ancillaries, really depends if I can identify the engine model, and then source either parts or a donor.
Don't be in too much of a hurry to bin that lump as those reduction box engines are hard to come by. Strangely enough, a couple of weeks ago, not having seen one for ages, I was brought one to sort out by another "fettler", who had given up on it,
Unleaded petrol, unlike leaded, doesn't keep for very long. I've used two year old leaded without problems in the past.
It is not the removal of the lead that has caused the problems that we have now but the inclusion of ethanol which is inheritly unstable and also hygroscopic . Fuel stabiliser is useful but the simpler solution is to only buy fuel in a quantity that will be used in a month and keep it in 5 litre plastic cans rather than a 20 litre “Jerry can” .
The problem is likely to get worse as while UK fuel containes around 7.5 % ethanol , other parts of the world are on up to 13%.
Finally got the little JAP 80 engine running today but removing the flywheel was hell's own job. They don't have a keyway on the shaft so the shaft and flywheel are tapered and once on they want to stay on. I had to drill into the ally flywheel right next to the shaft to release it's clamp on the shaft. Luckily I drilled into the shaft a bit. I used this to re-align the flywheel, as there is no way of knowing which position is correct without a keyway.
2
Not quite so, you can retime the ignition using the Before Top Dead Centre figure from the engine spec in relation to the points starting to open. I believe the setting for a JAP80 is 25degrees or 7/64" BTDC. Points gap 18thou and plug 25thou
I'll leave the tap question to someone who knows. What make of magnetic clutch has it got or did Gutbrod make their own? Some electric clutches are self-adjusting while others require setting with feeler gauges to achieve the correct air gap. If it is driving a cutter deck, check the seized or partially seized blade spindle bearings are not overloading the clutch.
Maybe there’s a reason. Rigger boots are banned on many construction sites and I’ve never seen an explanation for that either. Australian construction sites and mining operations insist on long sleeved shirts to reduce the likelihood of skin cancer.
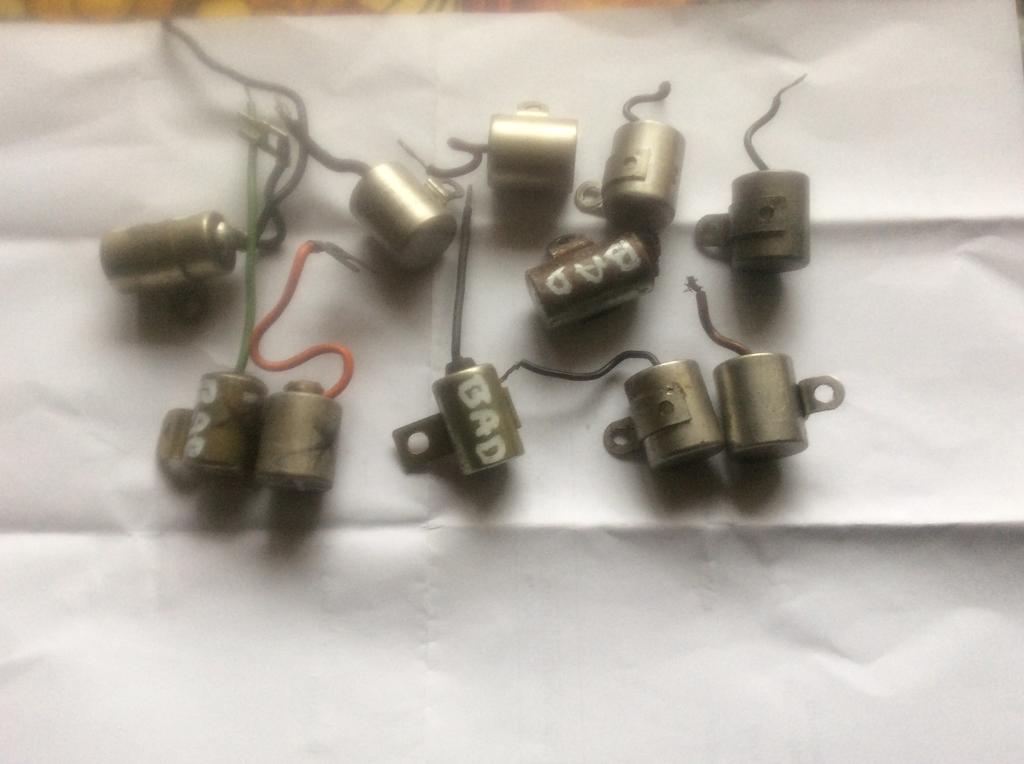
Not wishing to be to controversial but my experience shows more capacitor failures with a magneto ignition if used with a resistor plug or a suppressor cap which has the same affect.
That’s an interesting observation. I’ve always associated condenser failure to be age related rather than resulting from any other influence.These days I rarely work on anything with an exterior ignition coil , slightly more often on machines with exterior “ platform” magnetos and the bulk of the time on flywheel magnetos. I do change a lot of condensers on the latter group but then they are usually 50+ years old. Not sure.
This lot have been changed in the past 15 months or so.
Exercise caution if you split the box, they are usually held together with steel taptite self-threading screws. Steel into alloy, plus moisture and the passage of time equals seized screws and a possibility of sheared screws; at which point the law od Dr Sodt takes over.
I now realise why the Hayter connection came to mind. Spicers were used in Murrays and Hayter were the distributors both for red Murrays and similar machines in Hayter green. We used to see Foote boxes in Ariens YT models but I believe that Foote had a disasterous fire at their factory and never got back into production, but the designs were bought by Husqvarna.
those peerless boxes will generally allow shift on the go if the are the ones with a spring loaded key that runs through the gears. They are usually 5+reverse all in constant mesh and packed with sticky bentonite grease.
Don't want to start a controversy but the Peerless box referred to will not put up with that sort of treatment for long. All Peerless literature makes the point that the machine must be stationary for gear selection. In my 30 years of running a garden machinery business, most as a Peerless agent, we rebuilt dozens of their MSTs (Manual Shift Transmissions), nearly always as the result of such abuse. If the owner was lucky it was just new selector keys but often also the replacement of the most frequently used gear wheels where the engagement dogs had become rounded as well as the keys.
Yes, they were filled with Bentonite grease but this tended to be thrown outward to the inner walls of the casing and dry out there, away from where it was needed. We always used to add a cupful of semi-fluid grease to help fill the voids.
Spicer boxes were quite a rarity in the UK and were a product of Dana Spicer the big US transmission manufacturer - more often associated with trucks and off-highway equipment. We very rarely saw a Spicer transaxle but something at the back of my mind says that Hayter was the source of parts etc for their horticultural boxes.
I don'tthink that you can shift on the move with that box. That said there was at least one ride-on manufacturer who used a manual box with an in-line shift pattern but moving the lever sideways disengaged the drive to the box allowing a sort of shift on the move. Before the advent of lower-priced hydrostatic boxes, Ariens and Snapper used a stepless variable speed transmission consisting of a friction wheel running at right angles to a drive disc. When the friction wheel was running further from the centre it was in high ratio and closer into the centre, low. When it crossed the centre the drive was reversed. Sounds a bit Heath Robinson but actually worked well on walk-behinds and lighter ride-ons. MTD, used and may still use, a similar system on self-propelled vacuums and snow blowers.
Thanks Wristpin - I have checked the axle and bush again on the Hayter 21 and there is 36 thou between the exterior radius of the axle and the inside diameter of the bush. Do you know what the correct difference should be? The part number for the O ring is very helpful and I am trying to order one. I will try to adhere to your list of essentials and look forward to being dragged along as I had to physically help the mower along last week for 3 hours to get a job done (before the inevitable prolonged rains appear!).
2
Rain - what's that?
36 thou!!! - far too much. Slide the bushed components onto the axle one at a time and grasp them at 9 and 3 o'clock, if there's any "wiggle room" it's too much.
It is a parallel shaft with a straight key. Get two pieces of "tin" and cut a U shaped slot in both and slide them in between the sump and the pulley from opposite sides to protect the sump. In these circumstances the seal is expendable!
Find a friendly mechanic with oxy-acetylene and get the pulley and its sleeve cherry red, leave it to cool and then give it the diesel soak treatment. It will then probably lever off with a couple of tyre levers or pry bars. Protect the sump further with some scrap steel under the heels or fulcrums of the bars.
Or use folding / fox wedges as suggested by Headexam. Perhaps someone knows why they are called Fox wedges?
That axle looks to be badly worn and even a new bush won't restore the distance between the two sprockets. I cannot overemphasise that to "get a good clutch" everything has to be right - don't kid yourself that near enough is good enough.
At some point in the production of 21s and Ospreys Hayter used to fit a heavy duty O ring around the chain and sprockets to contain the sag in the chain and scraping the inside of the chain case . Part number 4946.
Essentials for a good clutch.
No end float on the axle so that no clutch movement is absorbed by the axle shifting sideways.
No radial wear on the axle either where it passes through its bearings in the cross tube or where the sprocket or hub rotate on it.
No bush wear in the sprocket allowing it to "flop" left and right and not run at 90 degrees to the axle.
No bush wear in the hub - same as for the sprocket.
Eliminate wear in the handlebar clutch lever lockout so that the full amount of cable pull is maintained when hand grip is released. There's a fairly simple fix for this.
Get it right and you will have a machine that spins its wheels and drags you along, ignore it at your peril.
Setting up those clutches is a bit of a black art. In the 80s the roving Hayter Service man used to have an Osprey / 21 axle assembly set up on the bench in his high top van and ran an impromptu service course on site.
There should be a thick friction lining bonded to the large sprocket. I believe these are still available from an aftermarket supplier of friction materials.
However, from your image, it appears that there is a lot more to be done. Looking at the relationship between the bush and the axle it appears that one or the other - or both, are badly worn. I think that a complete strip and assessment of the axle is required.


.JPG.9e6cd635d607470ae4a2234afc3eb870.JPG)


Put engine back into ride on but wont start now
in Ride On's
Posted · Edited by Wristpin
Wiring diagram added.
If you think that the yellow wire is the kill, check it out . With the ignition OFF you should have continuity to Earth . With it ON , it should be open circuit. When you say "wont start" do you mean totally dead or "cranks but wont run" ?
The danger is that if you’ve got things wrong it’s possible that you may have put voltage through the ignition coil and cooked it, so the first thing to do is to isolate the engine. Disconnect all wires other than the heavy one from the solenoid to the starter motor and crank it over but be prepared to pull the plug lead off to stop it. If it starts it at least shows that you have a runner and can relax and sort out the stopping!
I will dig out a wireing diagram but normally the kill wire will go to a terminal on the throttle plate and will have a loop terminal under a nut.
The 8 hp lump may have a single charging wire with a “ tubular” connector or a dual circuit alternator with two wires and a double pin connector that can only be fitted one way round.
EDIT added
https://www.dropbox.com/s/lgchle1pohn1r1z/Lawnflite 504 wireing diag0001.pdf?dl=0
Yes, the yellow is shown as the kill wire. As well as going to the kill terminal on the ignition switch It is also connected to a couple of safety switches which will also prevent the engine from firing unless in the safe position.