

Cub Cadet
-
Content Count
483 -
Joined
-
Last visited
-
Days Won
21
Reputation Activity
-

 Cub Cadet got a reaction from Stormin in C-125 Rebuild.
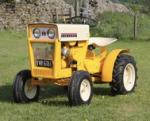
Looking awesome Norm! Really like the narrow wheels on the front of the C-series, best thing I did to my C-121.
-

 Cub Cadet got a reaction from HeadExam in C-125 Rebuild.
Looking awesome Norm! Really like the narrow wheels on the front of the C-series, best thing I did to my C-121.
-
 Cub Cadet reacted to Stormin in C-125 Rebuild.
Got another day in the workshop. Sorted and replaced the bonnet. All that's left now are the tach-o-matics to paint and fit. Touch up some bits of paint work and order graphics.
Another exhaust will be made later. May not be a stack though.
That's it. Horse ready to be put back into harness.
-
Cub Cadet reacted to Stormin in Mud! Mud! Glorious mud.
Northern Classic Trial today. I was Section Controller on a section in the morning. Sorry no photo's as I was setting the competitors off.
The term Classic has nothing to do with the vehicles taking part, but to the rules under which classic trials are run. Any age and type of motorcycle or car can compete, except four wheel drives.
I did get a few photo's at another section in the afternoon. This was a steep, wet and muddy climb, though it doesn't look it.
-
Cub Cadet reacted to Joseph in Our other 1971 Bolens Husky 1054
Some of you guys may remember the Bolens stash that we acquired about 2-1/2 years. The tractor that appeared to be in the best condition was a blue painted Bolens 1054 which looking like it needs very little to get working. We got that assesment wrong as it has taken us a long time and lots of new and replacement parts to get it running. We still have a few more jobs to do but we would like to use it a bit first and see what other problems appear.
Video of some of the work and the test drive
Alan, please pass on our regards to John and he may enjoy the video
-
Cub Cadet reacted to rolloman 1 in My Gutbrod 1032 with new attachments
Hi All here is some pictures of my 1032 with Busatis finger mower and rear Rotavator which came with The Callender ploo-mans new 1030 He bought the tractor I bought the tools for my own 1032 Tractor hope you like
-
Cub Cadet reacted to Anglo Traction in A Mystery Roaring Twenties Refurb.......hopefully!
Brief update. Wasn't happy that the outlet bushing in the tank would solder properly, so I removed it to clean it up and re solder it-
Prepped and painted a few parts, tank and straps finished. A lot of work involved to reach this stage.
Also one of the control levers finished, where I had to make a new limit strap and rivets, as it was too rusted (see 3rd pic in post #13) -
.
Tank and straps have had a coat of fuel proof lacquer to protect it and I'll give it a final 'shake up' with stones, kerosene/redex to swill the residues out.
I've got 2 tank lids, one original and one a few years younger with it's own measure for the correct oil to petrol ratio !.
Fuel line will be done near the frame completion stage.
Shaft bearings next and look's like I'll have to make several fixings including 'Butterfly' Wingnuts as several of the originals have had the wings broken off, now unobtainable.
tbc
-
Cub Cadet reacted to Anglo Traction in A Mystery Roaring Twenties Refurb.......hopefully!
Thanks Norm. I won't keep the mystery for too long now, as I will need to start on the frame etc soon. I'm sure some visitors/Members will know what it is.
Cyril Grange's book was a significant reference for many years. first published in 1929 and the ninth edition in 1954 (mine's the latter). I have the 2nd edition (I think) as an 'E' book which revealed the clutch info.
Brief update-
Working through the power unit and associated parts, I started checking out the Fuel Tank. An irreplaceable item for this machine, so I was pleased to find it bone dry inside. A thin layer of dried up petrified fuel/oil was able to be scratched away from the inner surface. I went to my 'Scope on a Rope' to check it out. Images are not great quality as copies, but gave me a good view-
So I started to check the outside soldered joints and the level of rust penetration to ensure no perforations-
Nothing that can't be put right cosmetically and with only 2 small/shallow dents in one end and the dents/marks where it is fixed to the frame.
Only thing to repair is the outlet boss, where the Tap/filter must have been hit at some time and bent/cracked the old lead soldered joint-
Tinned Steel plate is not very thick, but certainly the plating helped keep the bad rust at bay and happy with the initial external clean up-
So started on inside using pea sized shingle dry to start with and does it well -
Will do several more 'shakes' with this, then when I've sealed and repaired the external bits, I'll change to fluids with the shingle and a final washout.
The tank is 1/2 imperial gallon (2.27 ltrs). Fuel pipe is 1/4" copper pipe which I will need to replace (to save repairs and cleaning)......tbc
-
Cub Cadet reacted to JimStDavids in BSA Power unit
Hi
Got in touch with Paul and he was able to help with manual.
-
Cub Cadet reacted to rolloman 1 in My Gravely Pair
Hi all on Saturday I pulled out from Hibernation these two Machines after a short time they both were running nicely .
Both were given a wipe down with wd40 and some nice pictures taken for the forums hope you like
-
Cub Cadet reacted to Anglo Traction in A Mystery Roaring Twenties Refurb.......hopefully!
I was surprised it is still a significantly popular material, primarily due to it's durable stability.
Having shoved the engine to the back of the bench with a lightly cleaned Flywheel cover fitted after tapping out a few dents-
I moved on to tackling the Clutch. This is the very first Villiers version of a unit that fitted directly onto the output side of the crankshaft.
It was called the 'Villiers Free Engine Clutch' designed to allow Motor bicycles to be push started (no kick starts then) and then draw in the clutch to allow the rider to bring the machine to a halt and mount before pulling away smoothly/coming to a halt with the engine still running.
I had a real challenge finding anything on this unit until I found a sectional image of it, but with no nomenclature-
It was a start, but I had much trepidation about attempting to dismantle it without at least some info. I found only a brief reference to it in the books I had.
After much searching, I actually found where the above pic was taken from.
Some guy had taken it from an earlier publication (1st or 2nd edition) of 'The book of the Villiers Engine' by Cyril Grange .
It described the whole thing, operation, dismantling and assembly in detail .
Obsolete since the early 30s, I was on a 'no hoper' with spares.
So I set to and began stripping it out. Major job trying apply forces to undo the Bell cover (N) despite having Knurling to show it was only hand tightened.
Tried to release spring pressure on the plates by adjusting the cable tension, but overdid it and the cable pulled out of the aged nipple inside.
Succeeded with same process as the Flywheel removal and used 'Sisal rope' with a tourniquet and injected some oil where upon all came apart.
Multi layers of alternate steel and Bronze plates transfer the drive loads (7 of each) some are damaged and broken (not clear how?) -
All removed and retained in their respective positions for cleaning and inspection, so they all go back the same way.
A broken and bent plate was clearly put back and used like it, as wear is visible. Lot of work to make new ones, so will flatten and repair them as needed-
Bronze plates are the 'Drivers' and steel ones are 'Driven'. I had dearly wanted to strip the Counter shaft completely,
but it is impossible to release the Clutch body and it's retaining nut from the tapered end of the shaft-
So I am having to work around the assembled shaft parts in situ for now. Maybe when/if it has been run for a while, it may ease up?.
Cleaned all the constituent parts and quite impressed with the design. Felt Oil seal is rotted where the cable lead out exits, but will try and insert a new one-
Cable adjuster spanner flats are rusted to nearly round, so made a new one with lock nut-
Aged it by oil staining and roughing it up with a few burrs
Confident I can get this bit working as it should, so onto the next bits
-
 Cub Cadet got a reaction from meadowfield in MF7E Refurb project
Afternoon all, After a few busy months I finally had the chance to make a start on the massey! The aim is to get it running for a show late in July.
Heres some before photos in case you forgot
First job was to get the front up on some axle stands, remove the hood and front wheels. The steering needs some work as everything is very worn.
it needs some serious degreasing as well so the engine was next to come out, it also helps to have the engine on a bench as it will need a partial strip down.
here you can see just how worn the axle is, it is a very lightweight casting and unfortunately it is a bit twisted.
Next I made a new bush for the axle, should work just fine.
after a bit of cleaning up. the original paint is in excellent condition, just a shame someone painted over it.
These are going to require some attention at some point.
On closer inspection, one of the engine mount holes has cracked, just visible above, now welded up.
The idler pulley and steering column was removed and then everything given a good clean.
For a 56 year old machine, i'm surprised nothing is rusted solid, didn't even have to use any heat.
Next job when i'm home next is to replace the bearing in the idler pulley and sort out the worn steering components.
-
Cub Cadet reacted to rolloman 1 in Holder ED11
Hi all Yet some more pictures of exhibits for 2019, My Holder ED11 Single axle tractor with Butterfly Reversible plough and 3rd wheel and seat, had it a long time too also again 2 owner from new. Powered by a Sachs 500 Two stroke diesel of 9 hp water cooled thermo syphon no pump 4 forward and 1 reverse , It runs like a Clock I havent found any of these in the uk so far hope you like it i love it
-
Cub Cadet reacted to Anglo Traction in A Mystery Roaring Twenties Refurb.......hopefully!
Only too aware Ray that running clearances in engines need to be as recommended to avoid nasty noises and disintegration. Just a matter of cleaning the old dry oily dirt
off with scrapers and soft wire brushes, then finishing with a bit of soft scouring pad. It's not super polished, as I don't want it looking new.
Starting handle in the previous post is reassembled, greased the tubing/handle before pressing back on. ready for painting.
Returned to checking out the ignition bits to see what was needed. Having obtained the HT Coil and Lead, I started on the Points Box and when I opened it up,
I found it surprisingly tidy-
Clearly, towards the end of it's working life, it was opened up quite a lot judging by the scratches on the bright, heavy nickel plated lid.
Repairs had been attempted by the use of hard (red) sealing wax to act as insulation under the screw head. The small insulating bushings were originally made of 'Ebonite',
a hard vulcanised rubber shaped under high pressures. These had broken and cracked under the screws, but the spacer bushings underneath the plate were ok.
I set about making new flanged bushings that would fit with the engine's age, and I remembered I had a rod of 'Tufnol' from the 50s that was my Father's.
Good stuff this, but never machined it, so did some checking up first. Also found this Ad from the mid 1930s-
This stuff was being made before the company was formed and is used on the 'Heel' of the breaker points on this engine (which may need replacing).
The rod is surprisingly close tolerance in diameter ( 0.001" under 1/2") and dead straight. This version is known as 'Carp'.
Fine woven cotton fabric tightly rolled, soaked in resin and pressed until set. Cut a piece off, set it in the Baby lathe and turned down to outer diameter-
Clearance drilled for 4BA Screws, then turned down each one to 1/4" (6.35mm) and parted off. I used white spirit as a lubricant and helped reduce
the dust level (mask and vacuum used). Cleaned up the part machined cast brass Points box.
The wires are all still good. Finished bushes seen here and re-using the original spacers-
The worn breaker heel (circled in the above) on the original points arm can be fabricated from this tufnol if I find the wear is too great for points adjustment.
The arm and both contacts have so little wear, that I only had to lightly mirror polish the Platinum faces. Virtually no pitting, which tells me that the condenser
was working as it should when last run. I plan to get this running with all these parts initially.
Will attempt some repairs to the enamelled badge that fits in the Flywheel cover. Also need to repair the worn slots in the lightly cleaned up cover-
-
Cub Cadet reacted to Anglo Traction in MF7E Refurb project
Good luck Ewan, I'll be following your progress .
-
Cub Cadet got a reaction from HeadExam in MF7E Refurb project
Thanks Alain! yes, as you say there is no engine spec number decal, the small hp decal is present and after scratching off the paint we can determine that it is a 7hp model.
-
 Cub Cadet got a reaction from Anglo Traction in MF7E Refurb project
Afternoon all, After a few busy months I finally had the chance to make a start on the massey! The aim is to get it running for a show late in July.
Heres some before photos in case you forgot
First job was to get the front up on some axle stands, remove the hood and front wheels. The steering needs some work as everything is very worn.
it needs some serious degreasing as well so the engine was next to come out, it also helps to have the engine on a bench as it will need a partial strip down.
here you can see just how worn the axle is, it is a very lightweight casting and unfortunately it is a bit twisted.
Next I made a new bush for the axle, should work just fine.
after a bit of cleaning up. the original paint is in excellent condition, just a shame someone painted over it.
These are going to require some attention at some point.
On closer inspection, one of the engine mount holes has cracked, just visible above, now welded up.
The idler pulley and steering column was removed and then everything given a good clean.
For a 56 year old machine, i'm surprised nothing is rusted solid, didn't even have to use any heat.
Next job when i'm home next is to replace the bearing in the idler pulley and sort out the worn steering components.
-
Cub Cadet reacted to rolloman 1 in Another tractor out for 2019
Hi all another Tractor out for the rallies , now fitted with Rubber Tyres for the first time in years .Still quite a handfull even on Rubbers . Lovely sounding Two Stroke Engine 3.5 hp only second owner from new born in 1947 and supplied by A M Russell Edinburgh .to a Market Garden in Denny Falkirk Question should this be painted our preserved as is ,thanks for your comments
-
Cub Cadet reacted to HeadExam in MF7E Refurb project
Here is the engine manual and a Massey 7E page so you can see original tyres and paint http://www.simplicityva.com/ymf/executive.html .You probably don't have the Kohler spec and serial number decal that was originally on the engine so you will have to look closely at the TP manual and find what sump, generator, air breather, rope start or electric start or both and other parts that were particular to your engine, by doing so you maybe able to determine the original 7 hp Kohler variant Duro Corporation installed into the Massey 7E. I would say it is real possible that it is a spec number of 2801 or very close to that. The TP manuals allow you to look up the spec number and cross reference which parts were used on your tractor.
K161-L161_7HP_TP1053A.pdf
-
 Cub Cadet reacted to 4x4forks in MF7E Refurb project
Cracking looking machine . Should keep you out of trouble for a while
-
Cub Cadet reacted to Stormin in MF7E Refurb project
You going to do a full refurb, Ewan, or just a sympathetic rebuild.
-
Cub Cadet reacted to Westie1 in MF7E Refurb project
These little tractors look ace, I would love to find one some day.
I'll enjoy following this!
Ah I didn't realise this was you Ewan lol
-
 Cub Cadet got a reaction from nigel in MF7E Refurb project
Afternoon all, After a few busy months I finally had the chance to make a start on the massey! The aim is to get it running for a show late in July.
Heres some before photos in case you forgot
First job was to get the front up on some axle stands, remove the hood and front wheels. The steering needs some work as everything is very worn.
it needs some serious degreasing as well so the engine was next to come out, it also helps to have the engine on a bench as it will need a partial strip down.
here you can see just how worn the axle is, it is a very lightweight casting and unfortunately it is a bit twisted.
Next I made a new bush for the axle, should work just fine.
after a bit of cleaning up. the original paint is in excellent condition, just a shame someone painted over it.
These are going to require some attention at some point.
On closer inspection, one of the engine mount holes has cracked, just visible above, now welded up.
The idler pulley and steering column was removed and then everything given a good clean.
For a 56 year old machine, i'm surprised nothing is rusted solid, didn't even have to use any heat.
Next job when i'm home next is to replace the bearing in the idler pulley and sort out the worn steering components.
-
 Cub Cadet got a reaction from 4x4forks in MF7E Refurb project
Afternoon all, After a few busy months I finally had the chance to make a start on the massey! The aim is to get it running for a show late in July.
Heres some before photos in case you forgot
First job was to get the front up on some axle stands, remove the hood and front wheels. The steering needs some work as everything is very worn.
it needs some serious degreasing as well so the engine was next to come out, it also helps to have the engine on a bench as it will need a partial strip down.
here you can see just how worn the axle is, it is a very lightweight casting and unfortunately it is a bit twisted.
Next I made a new bush for the axle, should work just fine.
after a bit of cleaning up. the original paint is in excellent condition, just a shame someone painted over it.
These are going to require some attention at some point.
On closer inspection, one of the engine mount holes has cracked, just visible above, now welded up.
The idler pulley and steering column was removed and then everything given a good clean.
For a 56 year old machine, i'm surprised nothing is rusted solid, didn't even have to use any heat.
Next job when i'm home next is to replace the bearing in the idler pulley and sort out the worn steering components.
-
 Cub Cadet got a reaction from S1g in MF7E Refurb project
Afternoon all, After a few busy months I finally had the chance to make a start on the massey! The aim is to get it running for a show late in July.
Heres some before photos in case you forgot
First job was to get the front up on some axle stands, remove the hood and front wheels. The steering needs some work as everything is very worn.
it needs some serious degreasing as well so the engine was next to come out, it also helps to have the engine on a bench as it will need a partial strip down.
here you can see just how worn the axle is, it is a very lightweight casting and unfortunately it is a bit twisted.
Next I made a new bush for the axle, should work just fine.
after a bit of cleaning up. the original paint is in excellent condition, just a shame someone painted over it.
These are going to require some attention at some point.
On closer inspection, one of the engine mount holes has cracked, just visible above, now welded up.
The idler pulley and steering column was removed and then everything given a good clean.
For a 56 year old machine, i'm surprised nothing is rusted solid, didn't even have to use any heat.
Next job when i'm home next is to replace the bearing in the idler pulley and sort out the worn steering components.