

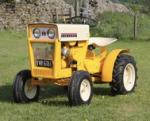
Cub Cadet
-
Content Count
483 -
Joined
-
Last visited
-
Days Won
21
Reputation Activity
-

 Cub Cadet got a reaction from diggerjames in Cub Cadet 70 restoration
Cheers Paul, but none of this would have been possible without my dad!
-
Cub Cadet got a reaction from diggerjames in Cub Cadet 70 restoration
So after many hours of battling with the axle pin we have finally got it out, after breaking a punch trying to get the rolled pin out we resorted to this.
We tried to use the vice as a press to try and push the pin out however we had no luck.
Next we tried to use the heat from a weld to try and loosen the pin but this didn't work either so we just cut the two collars off and drilled the pin out.
This is what was left of the pin.
When we make a new pin we will put a grease nipple in the end so that we can grease the axle and this won't happen again!
-
 Cub Cadet got a reaction from Ian in Cub Cadet 70 restoration
Decided to make a start on the chassis which is in a fairly bad state, yesterday we began to cut out the metal that had completely rusted away and replace it. Here's a before shot.
We used a dremel to cut the hard to reach spots.
This is after we cut the really bad bits out.
We used an old piece of steel angle from a scrap drawer, here's what it was like before we welded it.
We lined it up and then tacked it down.
Here's a shot of one side finished, the other side is worse, there is barely any metal left.
-
 Cub Cadet got a reaction from Stormin in Cub Cadet 70 restoration
Decided to make a start on the chassis which is in a fairly bad state, yesterday we began to cut out the metal that had completely rusted away and replace it. Here's a before shot.
We used a dremel to cut the hard to reach spots.
This is after we cut the really bad bits out.
We used an old piece of steel angle from a scrap drawer, here's what it was like before we welded it.
We lined it up and then tacked it down.
Here's a shot of one side finished, the other side is worse, there is barely any metal left.
-
 Cub Cadet got a reaction from Triumph66 in Cub Cadet 70 restoration
Decided to make a start on the chassis which is in a fairly bad state, yesterday we began to cut out the metal that had completely rusted away and replace it. Here's a before shot.
We used a dremel to cut the hard to reach spots.
This is after we cut the really bad bits out.
We used an old piece of steel angle from a scrap drawer, here's what it was like before we welded it.
We lined it up and then tacked it down.
Here's a shot of one side finished, the other side is worse, there is barely any metal left.
-
 Cub Cadet reacted to pmackellow in Cub Cadet 70 restoration
Well done chaps , following this thread with interest
-
 Cub Cadet got a reaction from HeadExam in Cub Cadet 70 restoration
Decided to make a start on the chassis which is in a fairly bad state, yesterday we began to cut out the metal that had completely rusted away and replace it. Here's a before shot.
We used a dremel to cut the hard to reach spots.
This is after we cut the really bad bits out.
We used an old piece of steel angle from a scrap drawer, here's what it was like before we welded it.
We lined it up and then tacked it down.
Here's a shot of one side finished, the other side is worse, there is barely any metal left.
-
 Cub Cadet got a reaction from nigel in Cub Cadet 70 restoration
Decided to make a start on the chassis which is in a fairly bad state, yesterday we began to cut out the metal that had completely rusted away and replace it. Here's a before shot.
We used a dremel to cut the hard to reach spots.
This is after we cut the really bad bits out.
We used an old piece of steel angle from a scrap drawer, here's what it was like before we welded it.
We lined it up and then tacked it down.
Here's a shot of one side finished, the other side is worse, there is barely any metal left.
-
 Cub Cadet got a reaction from Alan in Cub Cadet 70 restoration
Decided to make a start on the chassis which is in a fairly bad state, yesterday we began to cut out the metal that had completely rusted away and replace it. Here's a before shot.
We used a dremel to cut the hard to reach spots.
This is after we cut the really bad bits out.
We used an old piece of steel angle from a scrap drawer, here's what it was like before we welded it.
We lined it up and then tacked it down.
Here's a shot of one side finished, the other side is worse, there is barely any metal left.
-
Cub Cadet reacted to meadowfield in Snow... Only one thing for it
Playtime...
Kids were up at 6, I wasn't far behind. Opened the curtain and greeted by this.
It was a blizzard outside
I had a run up the lane whilst Jake got the snowplough out.
And Finn wanted a tow on his sledge
It's raining now and the garden looks a little worse for wear
Video to follow
-
Cub Cadet reacted to Alan in Diff rebuild
I like fiddly bits Mark. Not quite mechanical but some details of a four foot radio controlled battleship I made some years ago. All scratch build. The hand rails are 10mm high which will give an idea of the size. Eyes not so good now so might be difficult to repeat.
-
Cub Cadet reacted to Ian in Project Horse Gut....Nigel and Ians joint project
Were at the good bit already
Hi Mark, yep we will be wanting decals soon.. I have a few ideas
Thanks Alain
With HG pulled apart the fun job of cleaning and repainting loads of parts could start...
The gearbox gets it's first coat of red oxide..
It always amazes me how a quick coat of paint can make something look a 1000 times better
Before we went any further with painting we thought we should get the front axle off!! The axle pin had other ideas and refused to move using all the normal methods, i.e a large hammer and block of wood.. Soooo.. Time for some welding..
One very large steel bar welded to the axle pin!
The heat from welding wasn't enough to talk the pin into moving, so it got more heat..
Until eventually the pin decided it had had enough and finally twisted loose then out!
Yesterday also marked another milestone... Yep the first coat of shiny paint went on.. IH red which I had left from painting the 6x6 all those years ago..
Not too bad after the first coat.
Waiting for red oxide to dry on the chassis..
The front axle got it's first top coat too..
-
Cub Cadet reacted to moogie in New Tractor Workshop
Made a start to my stove today. Had to have a change of plans as i couldn't get a cutting of box section big enough, needed a bit 12in or bigger.
So, plan B. Had a look about to see what i could use and decided to go the gas cylinder route.
After deciding on the orientation of the stove i marked out the door size, then cut down the hinge side and welded on two trailer hinges.
Then cut free the remaining three sides.
Found an old grate and tin pan and cut to fit.
Didn't want it to sit on the floor so raised it up on 16in legs. Ran out of welding wire so thats the end of progress for today.
-
Cub Cadet reacted to expeatfarmer in Ransomes MG2 number 137
Today was track fitting and lubricating hubs,final drives and track rollers. The arduous task of tensioning both tracks was also finalised 29 track pads per side, two bolts per track , 116 bolts to tighten to achieve a spacing between track plate faces of 21/16". Boring and laborious but has to be done, planet rock on the radio a glove on the right hand and get stuck in! two hours later ,job done! Using a ratchet spanner on one side and a long spanner on the other makes it bearable. Both tracks set for pitch and then tensioned to 1 1/2" below load roller for correct track tension. I used three clamps to hold the tracks in position whilst I made the join. Tomorrow I will top up the engine and main gearbox oil and then fingers crossed start the engine, no idea how long it is since this engine ran but I hope I have everything at optimum to achieve a good start without breaking my wrists as these engines are notorious for doing. I have a secret weapon which I hope will make it both easier and safer.
Final jobs are to make up floorboard sections, front bumper and then final touch up.
And finally to apply the two decals to each side which are the only Ransomes reference on the whole machine. Over it's life 137 was serviced by a main dealer and had a number of later fitments such as a tool box and track mudguards but my ideal has been to restore it to a condition in which I believe it left the factory some time in February 1936.
-
Cub Cadet reacted to Ian in Project Horse Gut....Nigel and Ians joint project
I've had two of these frames in my "might come in handy one day" collection for about 12 years.. Yesterday was the day to use one..
Some cutting, welding and drilling later it had turn into this spacer.
Which fits here to raise the front of the fender pan up a bit..
Take a rusty and dented Gutbrod bonnet/hood..
And cut the first of two patches out of it..
Just in case your getting bored of welding shots, here's a grinding shot instead
Ta-daa.. An extended fender pan at the front.
Brackets were made and welded to the chassis to stop the fender pan extensions from flapping about the place..
-
Cub Cadet reacted to Ian in Project Horse Gut....Nigel and Ians joint project
Digging through my spares this morning I found this universal choke cable.. On the back it says it's for various triumphs, Escorts, Hillmans and an Austin Princess I guess it's rather old but it will do for HG
The fender pan extension edges had a bit of a tweaking to follow the lines down and to add a bit of strength.
We also reached a build milestone today.. With all the fabrication done the time had come to pull HG apart for cleaning and painting.
A huge amount of grease and dirt had found it's way to the front of the gearbox over the years!
Only a few small parts left to come off and strip down is done.. A good place to finish 2015
-
-
Cub Cadet reacted to meadowfield in Cub Cadet 70 restoration
Agree with your thoughts and it is lack of maintenance. Age is irrelevant, it needed lubrication....
There's no excuse for two close tolerance moving metal parts to not be oiled or greased. A grease zerk/nipple is an oversight as all big tractors and even wheel horse include one. There's just no way you could get any oil in there to help, so after 50 years it as rusted in solid. Unlike the steering spindles which came straight out - oddly they had grease points! We have never struggled removing a pin on a wheel horse. There's a lot of posts on the IH forums on drilling the pins out and you can buy the full replacement kit.
It will end up with a grease point, it's just not worth the pain.
-
Cub Cadet reacted to Stormin in Cub Cadet 70 restoration
If there was no way to grease the pin in the first place, Alain, that to me is poor design, penny pinching or not thought of.
-
Cub Cadet got a reaction from nigel in Cub Cadet 70 restoration
Cheers Paul, but none of this would have been possible without my dad!
-
 Cub Cadet got a reaction from meadowfield in Cub Cadet 70 restoration
Cheers Paul, but none of this would have been possible without my dad!
-
Cub Cadet got a reaction from HeadExam in Cub Cadet 70 restoration
Cheers Paul, but none of this would have been possible without my dad!
-
Cub Cadet got a reaction from HeadExam in Cub Cadet 70 restoration
So after many hours of battling with the axle pin we have finally got it out, after breaking a punch trying to get the rolled pin out we resorted to this.
We tried to use the vice as a press to try and push the pin out however we had no luck.
Next we tried to use the heat from a weld to try and loosen the pin but this didn't work either so we just cut the two collars off and drilled the pin out.
This is what was left of the pin.
When we make a new pin we will put a grease nipple in the end so that we can grease the axle and this won't happen again!
-
Cub Cadet reacted to pmackellow in Cub Cadet 70 restoration
Well done Ewan, perseverance paid off !!
-
 Cub Cadet got a reaction from pmackellow in Cub Cadet 70 restoration
So after many hours of battling with the axle pin we have finally got it out, after breaking a punch trying to get the rolled pin out we resorted to this.
We tried to use the vice as a press to try and push the pin out however we had no luck.
Next we tried to use the heat from a weld to try and loosen the pin but this didn't work either so we just cut the two collars off and drilled the pin out.
This is what was left of the pin.
When we make a new pin we will put a grease nipple in the end so that we can grease the axle and this won't happen again!