


Ian
-
Content Count
2,952 -
Joined
-
Days Won
193
Reputation Activity
-

 Ian got a reaction from Triumph66 in This RJ turned up at the workshop today
It's a pleasure to be helping on such a machine Neil, a great bit of history with it too.. A "he" it is
Ta for that photo Neil, it helped a great deal working out how the pulley system worked
I'm not sure about the silver steering wheel though, what is the correct colour as I've seen em painted silver, black and red..
It didn't take long to get the belt guard and hood off..
The first job was to have a look at the engine, it has good compression and after a bit of plug and plug lead cleaning it has a spark
I expect with a temporary gas tank fitted and a bit of move juice the engine should come to life.. Something to look forward to on Monday
The engine pulley is not quite in the right place on the shaft, it should be closer to the engine..
Me thinks the pulley needs to turn a little on the shaft as well..
Having not worked on an RJ or any really early Wheel Horses before this er.. brassy bit on the back of the pulley confused me for quite a while until I worked out it's the reverse er.. cog
In fact the whole drive belt system confused me for a while until I disconnected this spring and then everything fell into place..
With the RJ's engine having a good spark the time had come to look at the carb..
An interesting find behind the carb... Me thinks that gasket might be a bit small!
Everything moved freely in the carb, so with a new gasket made (your see it in an up and coming video) the carb was bolted back on and a temporary fuel tank lashed up.
A few pulls of the cord (steel cable in this case!) and the engine coughed into life and ran for a few seconds before stopping, which was just as well as the carb was leaking fuel from around the float bowl in vast amounts!
Off with the carb again, ahhh there's the problem!
As luck would have it Nigel had a spare carb which I could borrow to check out how the engine runs.. Thanks mate
A few pulls of the cord later and the engine didn't start... One "big" pull later the pull cord came off in my hand but the engine did start, run and sounded very nice until it ran out of petrol and I gave myself a shock from the HT lead!
All of which you will see in a video of course
I thought I had snapped the steel cable pull cord thingy (I hadn't seen on either) until a saw how long it still was and checked the (not so) snapped end!
As it turned out the nut that holds the end of the cable on was loose and the steel cable had simply pulled out! Phew
While we have the pull start assembly apart let's turn it over and have a look..... What the???
Pull the cord and the center changes into a hexagonal shape!
Which grips on a hexagonal shaft on the flywheel!
I've never seen a pull start that works like that before... Me likes
Then this happened
This is a good point to put up a RJ Intro vid, the first part of "The RJ Diary's" should be up later today
-
 Ian got a reaction from Wallfish in 1960 Wheel Horse Suburban
A few photo's of the hood, fenders etc after they were painted Monday.. They be looking good
-
 Ian got a reaction from S1g in This RJ turned up at the workshop today
More of an RJ update for you chaps, let's have a look at the hood/bonnet shall we..
Interesting, a repainted gas tank with no fuel tap (Neil did mention it leaked ) and lot's of paint cleaned off the bottom!
What's going on under (or is that above?) the tank?
Soooooo... Someone has ground back the filler smoothing out the underside of the hood/bonnet to weld on new fuel tank straps!
I'd guess when the hood was painted no tank straps were fitted.. It so happen that the strap welds are in the same place as the filler cracks above!
Who ever did it thought something sucked as that's what it looks like has been written!
No idea why when I upload this photo it turns it sideways!
Oh, and the top of the tank never got painted!
Out with the grinder and a workshop full of filler dust later it was good to see the rust was surface rust only, and only where the filler had cracked... And a random pop rivet!
As the bonnet/hood has quite a lot of ripples under the filler, there was no point in taking it all out only to replace it.. So with the surface rust carefully cleaned back to bare metal the first layer of filler went back in..
Easy sand no pin holes filler eh! At least the easy sand bit was right.. No worries, a second skim will sort it.
Meanwhile I catch Nigel dancing with some masking tape and a bench full of RJ parts!
Some parts like the gear (I'm not sure it should be called that!) lever had never be repainted, so here it is with all the thick surface rust cleaned off awaiting some red oxide primer.
Some parts in the "need to to have the paint flattened back to give the primer a good key" Que
Some primed parts hanging about the place.
The hood now looks good with a fresh coat of red oxide primer, I'm happy with the overall shape of my filler work, there's a just a couple of little spots that are annoying me.. I will sort them tomorrow.
-
 Ian got a reaction from pmackellow in 1960 Wheel Horse Suburban
A few photo's of the hood, fenders etc after they were painted Monday.. They be looking good
-
 Ian got a reaction from Darmic1 in This RJ turned up at the workshop today
More of an RJ update for you chaps, let's have a look at the hood/bonnet shall we..
Interesting, a repainted gas tank with no fuel tap (Neil did mention it leaked ) and lot's of paint cleaned off the bottom!
What's going on under (or is that above?) the tank?
Soooooo... Someone has ground back the filler smoothing out the underside of the hood/bonnet to weld on new fuel tank straps!
I'd guess when the hood was painted no tank straps were fitted.. It so happen that the strap welds are in the same place as the filler cracks above!
Who ever did it thought something sucked as that's what it looks like has been written!
No idea why when I upload this photo it turns it sideways!
Oh, and the top of the tank never got painted!
Out with the grinder and a workshop full of filler dust later it was good to see the rust was surface rust only, and only where the filler had cracked... And a random pop rivet!
As the bonnet/hood has quite a lot of ripples under the filler, there was no point in taking it all out only to replace it.. So with the surface rust carefully cleaned back to bare metal the first layer of filler went back in..
Easy sand no pin holes filler eh! At least the easy sand bit was right.. No worries, a second skim will sort it.
Meanwhile I catch Nigel dancing with some masking tape and a bench full of RJ parts!
Some parts like the gear (I'm not sure it should be called that!) lever had never be repainted, so here it is with all the thick surface rust cleaned off awaiting some red oxide primer.
Some parts in the "need to to have the paint flattened back to give the primer a good key" Que
Some primed parts hanging about the place.
The hood now looks good with a fresh coat of red oxide primer, I'm happy with the overall shape of my filler work, there's a just a couple of little spots that are annoying me.. I will sort them tomorrow.
-
 Ian got a reaction from nigel in This RJ turned up at the workshop today
Paint chat now had, he (I keep going to call him her!) will look stunning with fresh paint.
Glad you like the vid's, Part two will be along in a mo..
It's a shame about the cracked filler, but the rust has been caught in time before it chews holes through the hood..
Lot's of filler in it, but it had been done to a very high standard.. Just a shame about the bubbling.
As promised here's Part 2 of the RJ Diaries..
-
 Ian got a reaction from Stormin in 1960 Wheel Horse Suburban
A few photo's of the hood, fenders etc after they were painted Monday.. They be looking good
-
Ian got a reaction from Triumph66 in 1960 Wheel Horse Suburban
A few photo's of the hood, fenders etc after they were painted Monday.. They be looking good
-
Ian reacted to neil in This RJ turned up at the workshop today
Oo , that's not pretty , filler looks quite deep , although I did know that there was some filler work on the hood .
-
Ian reacted to nigel in This RJ turned up at the workshop today
yes ime going to give it a spray coat of paint neil cos the bonnets full of filler and rusted up its a shame realy cos the rest wasnt to bad , but you wont match it
-
Ian reacted to neil in This RJ turned up at the workshop today
Not sure if it was discussed with you guys but was there any talk in repainting said RJ ?
Loving the vids
-
-
-
Ian got a reaction from nigel in This RJ turned up at the workshop today
Speak with you tomorrow Neil, it's been a long day!
Here's a couple of pic's of what's hiding under the filler bubbles on the hood!
-

-
Ian reacted to Cub Cadet in This RJ turned up at the workshop today
Thats a cool bit of history to have! Great little machines
-
Ian reacted to neil in This RJ turned up at the workshop today
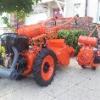
Here is a little guide as to what it supposed to look like , this model has the black rear wheels & silver front wheels .
these little tractors were actually built buy Cecil Pond himself .
-
Ian reacted to neil in This RJ turned up at the workshop today
Wow , I'm delighted my little baby is is on the operating table this little tractor used to belong to the Straight from the horses mouth author Michael Martino and if I remember rightly he said it was a He ,
-
 Ian got a reaction from squonk in This RJ turned up at the workshop today
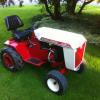
A little RJ update, she (Is it a she Neil?) has moved onto my bench ready for work to start on it Friday, it's a kinda joint mini project with Nigel..
It's going to be interesting working on such an old and fine machine
-
 Ian got a reaction from Alan in This RJ turned up at the workshop today
A little RJ update, she (Is it a she Neil?) has moved onto my bench ready for work to start on it Friday, it's a kinda joint mini project with Nigel..
It's going to be interesting working on such an old and fine machine
-
Ian got a reaction from Triumph66 in This RJ turned up at the workshop today
A little RJ update, she (Is it a she Neil?) has moved onto my bench ready for work to start on it Friday, it's a kinda joint mini project with Nigel..
It's going to be interesting working on such an old and fine machine
-
Ian got a reaction from nigel in Honda MadTrax V Twin Quad.. Nearly Finished.. Woo Hoo
The carbs had a quick (very quick) clean up before being hit with some black paint.
For some reason the engine when in the trike never had a choke cable fitted, but it was quite easy to fit the original quad cable to the carbs.
Carbs fitted.
The throttle cable had seen better days and decided to snap! Looking at this "unsnapped" section of it I'm surprised it had held together for as long as it did!
Another thing for the shopping list!
Tank and seat plonked back on..
The reason for fitting the tank was to work out if I needed to re-position the fuel tap.. As it turned out the original tap position was spot on, it's just a shame someone had cut it out to fit it to Why Not's tank!
The plan was to cut this tap off the trikes tank and graft it onto MadTrax's tank..
Well... That was the plan until I found the tank still had some petrol in it! I guess it still is the plan, it will just have to wait a few day for the tank to air out..
Some funky airbrushing.. Looks like a previous owner had a thing for Iron Maiden
-
Ian got a reaction from nigel in Honda MadTrax V Twin Quad.. Nearly Finished.. Woo Hoo
Morning all, time for a long over due update starting with a much more detailed photo (that I found buried in my phone) of the captive nut and screw thingy that holds the top of the gauge pods together.
Both freshly painted gauge pods were part assembled and bolted back on MadTrax.. They looked so terrible that they came off again, got hit will some filler and then repainted!
Me thinks they look much better now
The temp gauge and warning lights almost ready to go in the pod. The original bike warning lights would not fit in easy..
So I bought some of these
Two extra holes drilled in the temp gauge mounting plate which for some reason doesn't look too happy about it!!
A small but worthy attention to detail thing.. The new warning lights had chrome effect surrounds.. That would never do, something shiny!! So....
Fitting the temp gauge and warning lights in the pod was a bit tight... Yes the paints chipped already
Ta-Daa..
The rev counter...
A new rev counter cable was fitted, which meant the radiator had to come off the engine again!
I'm finally happy with the gauges now
-
 Ian got a reaction from DougC in This RJ turned up at the workshop today
A little RJ update, she (Is it a she Neil?) has moved onto my bench ready for work to start on it Friday, it's a kinda joint mini project with Nigel..
It's going to be interesting working on such an old and fine machine
-
Ian got a reaction from Stormin in Honda MadTrax V Twin Quad.. Nearly Finished.. Woo Hoo
The carbs had a quick (very quick) clean up before being hit with some black paint.
For some reason the engine when in the trike never had a choke cable fitted, but it was quite easy to fit the original quad cable to the carbs.
Carbs fitted.
The throttle cable had seen better days and decided to snap! Looking at this "unsnapped" section of it I'm surprised it had held together for as long as it did!
Another thing for the shopping list!
Tank and seat plonked back on..
The reason for fitting the tank was to work out if I needed to re-position the fuel tap.. As it turned out the original tap position was spot on, it's just a shame someone had cut it out to fit it to Why Not's tank!
The plan was to cut this tap off the trikes tank and graft it onto MadTrax's tank..
Well... That was the plan until I found the tank still had some petrol in it! I guess it still is the plan, it will just have to wait a few day for the tank to air out..
Some funky airbrushing.. Looks like a previous owner had a thing for Iron Maiden