


Ian
-
Content Count
2,952 -
Joined
-
Days Won
193
Reputation Activity
-
 Ian reacted to Stormin in Wheel mod.
The standard rear wheels on the C-121, (Black Horse), though fitted with ag tyres, are a little wide for ploughing. The earlier narrower wheels tend to be a bit hard to come by.
I acquired a pair of 700 x 12 ag tyres off the Fife Pooman. These had come off a walk behind and practically new. Tubes with them as well. Bit narrow for the standard wheels, but as I had some spare wheels a plan was formed. People widen wheels, so how about going t'other way?
Off to a local engineering firm with a pair of wheels. A week later I had six wheel parts and my wallet £20 lighter.
Today I had some workshop time and started to build them up.
Gavin who had machined them for me, had marked them up. So each half would match it's respective other half. The cut out centre pieces I cut through once to make a band that would hold the two halves in position. Yes, I know. I should have taken a photo.
The band was placed round the two wheel halves and clamped in position. I only used one G clamp, as I only had one big enough and moved it round as I tacked the band in place. With both wheels done and the welds cleaned up a bit, the result is below.
Not pretty I know, but they will be. Next job is to clean off the old paint. One job I really enjoy.
-
Ian reacted to slf-uk in This RJ turned up at the workshop today
It looks absolutely fabulous Ian, you are doing a great job. Are you using spraying with cellulose?
Iain
-
 Ian got a reaction from S1g in This RJ turned up at the workshop today
Yesterday the little RJ started going back together, lift cable first followed by the engine.
I put a couple of bit's of inner tube on the frame before dropping the engine on.. It makes it easy to line the bolt holes up and stops the frame getting scratched while moving the engine about.
Cleaning out the grease nipples in a little petrol
Pulleys and drive belts on.
Front axle and steering on.
The crowning moment..... The tank isn't fixed under the hood yet, but we just had to have a look
Not much left to do, the paint for the wheels and the fuel tank sealant should arrive tomorrow, and I need to sort the carb out now the rebuild kit has arrived..
-
 Ian got a reaction from ranger in This RJ turned up at the workshop today
Yesterday the little RJ started going back together, lift cable first followed by the engine.
I put a couple of bit's of inner tube on the frame before dropping the engine on.. It makes it easy to line the bolt holes up and stops the frame getting scratched while moving the engine about.
Cleaning out the grease nipples in a little petrol
Pulleys and drive belts on.
Front axle and steering on.
The crowning moment..... The tank isn't fixed under the hood yet, but we just had to have a look
Not much left to do, the paint for the wheels and the fuel tank sealant should arrive tomorrow, and I need to sort the carb out now the rebuild kit has arrived..
-
 Ian got a reaction from Cub Cadet in This RJ turned up at the workshop today
Yesterday the little RJ started going back together, lift cable first followed by the engine.
I put a couple of bit's of inner tube on the frame before dropping the engine on.. It makes it easy to line the bolt holes up and stops the frame getting scratched while moving the engine about.
Cleaning out the grease nipples in a little petrol
Pulleys and drive belts on.
Front axle and steering on.
The crowning moment..... The tank isn't fixed under the hood yet, but we just had to have a look
Not much left to do, the paint for the wheels and the fuel tank sealant should arrive tomorrow, and I need to sort the carb out now the rebuild kit has arrived..
-
 Ian got a reaction from slf-uk in This RJ turned up at the workshop today
Yesterday the little RJ started going back together, lift cable first followed by the engine.
I put a couple of bit's of inner tube on the frame before dropping the engine on.. It makes it easy to line the bolt holes up and stops the frame getting scratched while moving the engine about.
Cleaning out the grease nipples in a little petrol
Pulleys and drive belts on.
Front axle and steering on.
The crowning moment..... The tank isn't fixed under the hood yet, but we just had to have a look
Not much left to do, the paint for the wheels and the fuel tank sealant should arrive tomorrow, and I need to sort the carb out now the rebuild kit has arrived..
-
 Ian got a reaction from Stormin in This RJ turned up at the workshop today
Yesterday the little RJ started going back together, lift cable first followed by the engine.
I put a couple of bit's of inner tube on the frame before dropping the engine on.. It makes it easy to line the bolt holes up and stops the frame getting scratched while moving the engine about.
Cleaning out the grease nipples in a little petrol
Pulleys and drive belts on.
Front axle and steering on.
The crowning moment..... The tank isn't fixed under the hood yet, but we just had to have a look
Not much left to do, the paint for the wheels and the fuel tank sealant should arrive tomorrow, and I need to sort the carb out now the rebuild kit has arrived..
-
Ian got a reaction from S1g in This RJ turned up at the workshop today
Really moving on with the RJ rebuild now, the frame has been cleaned up, primered and the underside has been top coated hence why the frame is on it's side
Is this strange two part valve arrangement a USA thing? We had never seen it before!
It turns out that the strange two part valve is to make it easier to ballast the tyres. Thank you Evanloock on RS for the answer
Top coat time,
Meanwhile I find this old WH rear wheel with bolts welded through from the outside (not by me I should add)...
Makes a perfect tool to hole the RJ's front wheel for a clean up. Note the crack in the paint...
Well, the crack is actually in filler!! Someone did like the ol bondo in the past!
And to bring this build thread up to date, lot's of freshly painted panels and parts
-
Ian reacted to Jarrovian in some old some new
Hi everyone a couple of new pieces one Lister push hoe and unknown seed drill old Auto Culto L, £10 Allen Scythe( runner), grey Fergie ( owned since 1960 ) anyone give me maker of seed drill
-
 Ian got a reaction from Alan in This RJ turned up at the workshop today
Yesterday the little RJ started going back together, lift cable first followed by the engine.
I put a couple of bit's of inner tube on the frame before dropping the engine on.. It makes it easy to line the bolt holes up and stops the frame getting scratched while moving the engine about.
Cleaning out the grease nipples in a little petrol
Pulleys and drive belts on.
Front axle and steering on.
The crowning moment..... The tank isn't fixed under the hood yet, but we just had to have a look
Not much left to do, the paint for the wheels and the fuel tank sealant should arrive tomorrow, and I need to sort the carb out now the rebuild kit has arrived..
-
 Ian got a reaction from squonk in The Little Wonder hedge trimmer
That's just the sort of thing I need, a 12 volt hedge cutter.. Plug it into a Wh, cut the hedge and let all the trimmings fall in a trailer behind
-
Ian got a reaction from squonk in This RJ turned up at the workshop today
A little RJ update, she (Is it a she Neil?) has moved onto my bench ready for work to start on it Friday, it's a kinda joint mini project with Nigel..
It's going to be interesting working on such an old and fine machine
-
Ian got a reaction from S1g in This RJ turned up at the workshop today
Glad your enjoying the build Neil, how could we not do a thread when there are so few RJ's over here... It gives me something extra to make a few video's about as well
More progress..
Getting the knackered tyre off the front wheel rim was fun, the tube put up more of a fight than the tyre!
Does anyone know what the random hole in the wheel rim is for? It doesn't seem to line up with anything on the RJ and I'd of thought it would have two holes for bolting a wheel weight onto!
I wondered why the paint off the bottom of the gas tank had been stripped, someone has done a solder repair..
What's Nigel spotted in the tank?
Nope, it's not a mini star system but quite a few holes instead!
Some detail brought back by cleaning up the pull start casing..
Cleaning up the rear wheels.. Someone at some point had flattened the paint back to a beautiful smooth finish and then for what ever reason gave them a quick (very quick) spray with grey primer.. The odd rusty bit cleans up very easily
The other rear wheel decided it wanted to leak water on my bench! 10psi later and water was pouring/bubbling out all over the place! I'm not looking forward to popping the tyre off the bead to clean the water out and see how badly rusted it is inside!
I must remember to take a photo of the tyre valve tomorrow as I've never seen one like it!
A hint of things to come
Not forgetting of course
-
Ian got a reaction from Stormin in This RJ turned up at the workshop today
Glad your enjoying the build Neil, how could we not do a thread when there are so few RJ's over here... It gives me something extra to make a few video's about as well
More progress..
Getting the knackered tyre off the front wheel rim was fun, the tube put up more of a fight than the tyre!
Does anyone know what the random hole in the wheel rim is for? It doesn't seem to line up with anything on the RJ and I'd of thought it would have two holes for bolting a wheel weight onto!
I wondered why the paint off the bottom of the gas tank had been stripped, someone has done a solder repair..
What's Nigel spotted in the tank?
Nope, it's not a mini star system but quite a few holes instead!
Some detail brought back by cleaning up the pull start casing..
Cleaning up the rear wheels.. Someone at some point had flattened the paint back to a beautiful smooth finish and then for what ever reason gave them a quick (very quick) spray with grey primer.. The odd rusty bit cleans up very easily
The other rear wheel decided it wanted to leak water on my bench! 10psi later and water was pouring/bubbling out all over the place! I'm not looking forward to popping the tyre off the bead to clean the water out and see how badly rusted it is inside!
I must remember to take a photo of the tyre valve tomorrow as I've never seen one like it!
A hint of things to come
Not forgetting of course
-
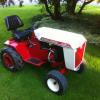
 Ian got a reaction from Wallfish in 1960 Wheel Horse Suburban
A few photo's of the hood, fenders etc after they were painted Monday.. They be looking good
-
Ian reacted to ACman in RJ plowing the garden
Hello from the USA ! I bleed orange but don't own one AC . My grandpa and father owned a AC ag tractor dealership and somehow I started collecting Wheel Horses . I currently have 10 in the stable along with 2 1964 Simplicity's and a Massey Ferguson 12 .
This is my son back in October 2015 on my RJ58 . The front weight is off an early Simplicity if you're wondering . It's amazing what these little tractor with a 4hp kohler can do!
http://youtu.be/pSnWliSydIU
-
Ian reacted to neil in This RJ turned up at the workshop today
This is awesome guys , I'm so looking forward to seeing the end result & I'm delighted with this restoration thread , I never though it would get to have a dedicated thread on its revival .
-
 Ian got a reaction from pmackellow in 1960 Wheel Horse Suburban
A few photo's of the hood, fenders etc after they were painted Monday.. They be looking good
-
Ian got a reaction from S1g in This RJ turned up at the workshop today
More of an RJ update for you chaps, let's have a look at the hood/bonnet shall we..
Interesting, a repainted gas tank with no fuel tap (Neil did mention it leaked ) and lot's of paint cleaned off the bottom!
What's going on under (or is that above?) the tank?
Soooooo... Someone has ground back the filler smoothing out the underside of the hood/bonnet to weld on new fuel tank straps!
I'd guess when the hood was painted no tank straps were fitted.. It so happen that the strap welds are in the same place as the filler cracks above!
Who ever did it thought something sucked as that's what it looks like has been written!
No idea why when I upload this photo it turns it sideways!
Oh, and the top of the tank never got painted!
Out with the grinder and a workshop full of filler dust later it was good to see the rust was surface rust only, and only where the filler had cracked... And a random pop rivet!
As the bonnet/hood has quite a lot of ripples under the filler, there was no point in taking it all out only to replace it.. So with the surface rust carefully cleaned back to bare metal the first layer of filler went back in..
Easy sand no pin holes filler eh! At least the easy sand bit was right.. No worries, a second skim will sort it.
Meanwhile I catch Nigel dancing with some masking tape and a bench full of RJ parts!
Some parts like the gear (I'm not sure it should be called that!) lever had never be repainted, so here it is with all the thick surface rust cleaned off awaiting some red oxide primer.
Some parts in the "need to to have the paint flattened back to give the primer a good key" Que
Some primed parts hanging about the place.
The hood now looks good with a fresh coat of red oxide primer, I'm happy with the overall shape of my filler work, there's a just a couple of little spots that are annoying me.. I will sort them tomorrow.
-
Ian got a reaction from Stormin in 1960 Wheel Horse Suburban
A few photo's of the hood, fenders etc after they were painted Monday.. They be looking good
-
 Ian got a reaction from Darmic1 in This RJ turned up at the workshop today
More of an RJ update for you chaps, let's have a look at the hood/bonnet shall we..
Interesting, a repainted gas tank with no fuel tap (Neil did mention it leaked ) and lot's of paint cleaned off the bottom!
What's going on under (or is that above?) the tank?
Soooooo... Someone has ground back the filler smoothing out the underside of the hood/bonnet to weld on new fuel tank straps!
I'd guess when the hood was painted no tank straps were fitted.. It so happen that the strap welds are in the same place as the filler cracks above!
Who ever did it thought something sucked as that's what it looks like has been written!
No idea why when I upload this photo it turns it sideways!
Oh, and the top of the tank never got painted!
Out with the grinder and a workshop full of filler dust later it was good to see the rust was surface rust only, and only where the filler had cracked... And a random pop rivet!
As the bonnet/hood has quite a lot of ripples under the filler, there was no point in taking it all out only to replace it.. So with the surface rust carefully cleaned back to bare metal the first layer of filler went back in..
Easy sand no pin holes filler eh! At least the easy sand bit was right.. No worries, a second skim will sort it.
Meanwhile I catch Nigel dancing with some masking tape and a bench full of RJ parts!
Some parts like the gear (I'm not sure it should be called that!) lever had never be repainted, so here it is with all the thick surface rust cleaned off awaiting some red oxide primer.
Some parts in the "need to to have the paint flattened back to give the primer a good key" Que
Some primed parts hanging about the place.
The hood now looks good with a fresh coat of red oxide primer, I'm happy with the overall shape of my filler work, there's a just a couple of little spots that are annoying me.. I will sort them tomorrow.
-
 Ian got a reaction from nigel in This RJ turned up at the workshop today
Paint chat now had, he (I keep going to call him her!) will look stunning with fresh paint.
Glad you like the vid's, Part two will be along in a mo..
It's a shame about the cracked filler, but the rust has been caught in time before it chews holes through the hood..
Lot's of filler in it, but it had been done to a very high standard.. Just a shame about the bubbling.
As promised here's Part 2 of the RJ Diaries..
-
Ian got a reaction from Stormin in This RJ turned up at the workshop today
More of an RJ update for you chaps, let's have a look at the hood/bonnet shall we..
Interesting, a repainted gas tank with no fuel tap (Neil did mention it leaked ) and lot's of paint cleaned off the bottom!
What's going on under (or is that above?) the tank?
Soooooo... Someone has ground back the filler smoothing out the underside of the hood/bonnet to weld on new fuel tank straps!
I'd guess when the hood was painted no tank straps were fitted.. It so happen that the strap welds are in the same place as the filler cracks above!
Who ever did it thought something sucked as that's what it looks like has been written!
No idea why when I upload this photo it turns it sideways!
Oh, and the top of the tank never got painted!
Out with the grinder and a workshop full of filler dust later it was good to see the rust was surface rust only, and only where the filler had cracked... And a random pop rivet!
As the bonnet/hood has quite a lot of ripples under the filler, there was no point in taking it all out only to replace it.. So with the surface rust carefully cleaned back to bare metal the first layer of filler went back in..
Easy sand no pin holes filler eh! At least the easy sand bit was right.. No worries, a second skim will sort it.
Meanwhile I catch Nigel dancing with some masking tape and a bench full of RJ parts!
Some parts like the gear (I'm not sure it should be called that!) lever had never be repainted, so here it is with all the thick surface rust cleaned off awaiting some red oxide primer.
Some parts in the "need to to have the paint flattened back to give the primer a good key" Que
Some primed parts hanging about the place.
The hood now looks good with a fresh coat of red oxide primer, I'm happy with the overall shape of my filler work, there's a just a couple of little spots that are annoying me.. I will sort them tomorrow.
-
Ian got a reaction from nigel in This RJ turned up at the workshop today
More of an RJ update for you chaps, let's have a look at the hood/bonnet shall we..
Interesting, a repainted gas tank with no fuel tap (Neil did mention it leaked ) and lot's of paint cleaned off the bottom!
What's going on under (or is that above?) the tank?
Soooooo... Someone has ground back the filler smoothing out the underside of the hood/bonnet to weld on new fuel tank straps!
I'd guess when the hood was painted no tank straps were fitted.. It so happen that the strap welds are in the same place as the filler cracks above!
Who ever did it thought something sucked as that's what it looks like has been written!
No idea why when I upload this photo it turns it sideways!
Oh, and the top of the tank never got painted!
Out with the grinder and a workshop full of filler dust later it was good to see the rust was surface rust only, and only where the filler had cracked... And a random pop rivet!
As the bonnet/hood has quite a lot of ripples under the filler, there was no point in taking it all out only to replace it.. So with the surface rust carefully cleaned back to bare metal the first layer of filler went back in..
Easy sand no pin holes filler eh! At least the easy sand bit was right.. No worries, a second skim will sort it.
Meanwhile I catch Nigel dancing with some masking tape and a bench full of RJ parts!
Some parts like the gear (I'm not sure it should be called that!) lever had never be repainted, so here it is with all the thick surface rust cleaned off awaiting some red oxide primer.
Some parts in the "need to to have the paint flattened back to give the primer a good key" Que
Some primed parts hanging about the place.
The hood now looks good with a fresh coat of red oxide primer, I'm happy with the overall shape of my filler work, there's a just a couple of little spots that are annoying me.. I will sort them tomorrow.
-
