
Leaderboard


Popular Content
Showing content with the highest reputation on 07/31/2017 in all areas
-
4 pointsFantastic job Norm, I happened to make one the other day for my RJ using measurements from Chris' at Newby.
-
3 pointsWell this is as much as I can do for now, until I get some 1/2" x 1" flat bar for the lifting arms. I've had to do a bit of fettling with a file, as two were a bit of a tight fit on the back of the trans. I've only done three, as when making and working out the first one, the first arm I made turned out a bit short when bent. Unfortunately I'd not enough material to make another. I may make one with shorter arms sometime.
-
2 points

Wheelhorse B115
the showman and one other reacted to Alan for a post in a topic
You rotten s++ Chris. Both my favourite tractors now gone. Suppose I'll have to use the wheel barrow to tow the trailer now. Norm, can you rig up a hitch for it. ? -
2 points

Wheelhorse B115
Stormin and one other reacted to the showman for a post in a topic
Now sold. -
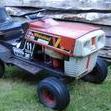
2 pointsHello the electrostaticy is fantastic the powder is so flexible once cured. You can powder coat tin foil crumple it up ....unfortunately fold and the powdercoat is still intact. I didn't use Primer my alloys were done without Primer 5 years ago and still great and it's a lawning mower on a budget the powder I got of eBay roughly £15 per kg for simple colours. When you get into chrome and candies the price goes up. Withe the candy and chrome you also do 2 coats and the cure together to get some amazing colours and effects. This is the oven I made out of a old filing cabinet and a 99p cooker of eBay:)
-
1 pointNice work, Ewan. Hope mine look as good when painted.
-
1 point
Slot hitch
Cub Cadet reacted to the showman for a post in a topic
Well done both of you, they look good -
1 point
Wheelhorse B115
Alan reacted to the showman for a post in a topic
Don't worry Alan, i might have another tractor somewhere we could use, -
1 point
A Weekend at the Ringmer Steam and Country Show
expeatfarmer reacted to the showman for a post in a topic
Arrived Friday afternoon and just managed to set up camp before the rain started. During the night we had heavy rain and strong winds and 2 stalls lost their gazebos, Saturday was fine until lunchtime then it all started again and it really chucked it down most of the night. Sunday morning was bright and sunny but windy, loads of exhibitors turned up and we had a brilliant day, the ground dried up quickly and I managed to get out without a tow. Heres a few photos for your enjoyment. -
1 pointVery unusual to see the creeper gear and Hi-Lo options on a Cub https://tulsa.craigslist.org/grd/d/cub-cadet/6241563105.html
-
1 point
Getting the 'Horse back on course
meadowfield reacted to WestwoodGazelle for a post in a topic
Hi all, I have made some progress, I have removed all the rust, and painted the Horse The quality of finish isn't too bad and I have added the Wheelhorse decals (thanks Mark!). She needs the seat recovering and some engine/electrical work,and the wheels painting- once that is done I will upload a video. But for now, here is a pic! -
1 pointWell no-one had a guess so I suppose I'd better show what it's for. Slot hitches are pretty thin on the ground in this country, so The Showman and I thought we'd have a go at making some when I'm staying with him. That above is a jig for welding them up. Trying the original one for fit. I did have to cut a bit from out of the locating tubes to get the hitch on and off. I got some steel yesterday morning and the fun started in the afternoon. I thought I'd make a prototype to work out how to go about the job. First things to make were the lugs, for want of a better name. Some 40mm black bar was turned down to 35mm, as 40mm was all I had. Then drilled out to take a hitch pin. Next it was the turn of the arms. These would be the hard bits and caused quite a bit of head scratching. Several cardboard cut outs were made, then a couple of arms made using grinder and cutting discs. First off I bent a cardboard cut out and bent it to the shape of the original arms. Trying it out on the jig with lugs in place. A big bolt was cut down to make a locating pin. I then bent a welding rod to suit. How to bend the arms was the next problem, as I don't posses a hydraulic press. But I do have a pipe bender. I scribe a line on the arms where I wanted to bend them. A 3/4" former was marked on each side and fitted in the bender vertically instead of horizontal. Fitting an arm vertically across the benders top and bottom plates, lining up the scribe marks and using the bent welding rod as a gauge, I successfully bent the arms. I really should have taken photo's as I went along, but as usual I didn't think about doing so. I will when making the next one/ones. Now to weld things up. The arms were clamp to the jig sides, with a used slitting disc each side as packers. This was to provide clearance in the hitches slot. The arms were tacked to the lugs, then plates cut for top and bottom of the slot. Next the top plate was tack welded in. Removing the hitch from jig, it was replaced up side down and the same done with the bottom plate. A large washer, 1/8" thick was used as a packer to get the right depth of the slot. The whole assembly was then removed and tried on, along with the tool bar off the Black Horse. Satisfied with how everything fitted, it was all welded up. Gave it a clean up then primed it. It was then I remembered, or should I say I'd forgotten something. Can you see what?
-
1 point

Allis-Chalmers
AKAMick reacted to Old Tankman for a post in a topic
Found an AC, great shape after paint, lights and now ag's. Engine ran fine but, had a 16 hp on the shelf. Grandson is keeping the driveways graded.

