Leaderboard


Popular Content
Showing content with the highest reputation on 06/28/2017 in all areas
-
3 pointsGot the belts this morning and fitted the PTO to mule one. A little longer than I'd wanted, but the closest I could get. So now it was time to make a belt tensioner. I'd had a bit of a think and a root round. I would have liked a small pulley, but I'd nothing about. I did find a nice new bearing. What it was for is any bodies guess. Might do I thought, so before long I had this knocked up. And it ended up here. Not ideal I know and a bit of a rethink will be thought. Another problem occurred when I gave it a try. The belt came off the tensioner. I think the bottom pulley may be a tad out of line.
-
1 point
Getting the 'Horse back on course
Triumph66 reacted to WestwoodGazelle for a post in a topic
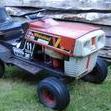
Hi all, I have begun some restoration work on my 1975 Wheelhorse C-100. This was my first ever mower and I have owned this tractor since I was 15 when I purchased it for £300 (I am now 26). It was for sale with a local garden machinery place, my mother had said I was allowed to buy a lawnmower so long as it had proper/good breaks, and I had saved up for one. I remember seeing a red Wheelhorse outside the shop, and finding it a really nice looking machine (and it had a proper break!), and after speaking to the owner of the place he said he had one identical but a little rough "upstairs". They kept their mowers stored in this sort of old wooden barn attic with a hydraulic lift to access, really quite novel, I can remember going up there, and amongst all these modern plasticy lawn-tractors was this really cool looking Wheelhorse, paint all peeling and dented, but to me it was amazing. Here's a picture of when I got it home: I repainted it in 2010 and did some repairs, and although the finish was OK, it's picked up some scratches, wear and corrosion from years of use and storage. I have decided to repaint it now, as I would like to put decals on it and really finish off the restoration. It won't be as perfect as some examples on here, but it should be a really good looking Wheelhorse. I also wanted to take the opportunity to remove some dents in the bonnet, it is hard to see from the picture above but someone might have crashed it or crashed something into it at one point because the grill was dented in a few places. I mostly fixed this in 2010 but I wanted to get the last little dents along the side of the grille sorted this time. I will also look to get some of the electrical issues fixed, working front lights, plus add a little side-light and rear light a friend got me. I will also refurbish the seat, and am thinking of attempting to make it road legal as I live in the middle of nowhere and there's lots of safe and quiet lanes around and it would be useful to move things with the trailer. I did have a question though, do you like the black chassis, or think it should be red as original? Jon -
1 point

From the album: Stormins Stuff.
-
1 pointPleased to have been of service! Your final problem and it's solution is interesting as, although I've not experienced it on s BS engine , I've seen it a few times on Tecumsehs; usually after they have been pressure washed during service. It would seem that electronic units can push enough down the kill wire to leak to ground if the conditions are right . In fact I've even experienced a " tingle " from a Tecumseh kill wire. I hope that the rest of the job goes according to plan, but if not, there's plenty of Osprey related info available.
-
1 point

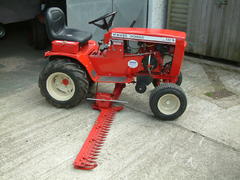
Wheel Horse Sickle Bar.
Will-Haggle reacted to Stormin for a post in a topic
Got a bit more done today. Getting the lift right was a bit of a problem. When down, the downward curve of the lift arm fouled the guard and top pulley. Eventually I decided to disconnect the lift chain and cable tie the arm up as far as I could. I could have cut the downward curve off, but I don't want to alter things if I can help it. With the arm up I fastened the lift chain to the guard/frame. Next I had to have someway of holding the cutter bar in the vertical position. Had a root round and came up with this. Finally a couple of shots of it down and up. Next thing to do is make a handle to lift the cutter bar. Again I don't want to alter the original handle. Get that done and I can work out a belt length. -
1 pointLast week or maybe the week before, I finally got around to getting some pulleys, bearings and 20mm bar for the mule drive. So today I got stuck in and got a bit done. First I made a couple of pins. And yes there's only one in the photo. These go here. One each side and QD. Next I made a couple of new mounting plates. After that there was much putting on, taking off, head scratching, fiddling and general phaffing about. But finally I had this....... apologies for the poor photo. This..... This.... And this Tomorrow I may get more done.
-
1 pointA few more scanned, the leaflets for the Turbair Tot 2S, Imp 12 & Scamp 240. Turbair Leaflets, Tot 2S, Imp 12, Scamp 240.pdf David
-
1 pointI've finally scanned the instruction manual for the Turbair Tot 2S and created a pdf of it. Turbair Tot 2S Instruction Manual.pdf There is more to follow when I've l got it scanned & edited. David