
Leaderboard


Popular Content
Showing content with the highest reputation on 10/25/2017 in all areas
-
3 pointsBit more done to this old girl front half being put back together, big difference now from the back end.
-
3 pointsStill no luck getting the rear diff out, but I did take the input shaft out to try and see what's going on inside.. No diff inside but both cogs look in great shape. Getting drive from the Honda bike gearbox was always going to be fun as there isn't much space! The only thing I could do was move the transfer box as far back as possible. So out came the Quadzilla battery tray, followed by a slice taken out of a rear strut tower. The transfer box/rear diff coupler limits how far box the TB (transfer box) can be moved back. But notch cut out of the strut tower allowed me to move the TB back a good 1/2 inch.. Not much but it all helps. At this point I still didn't have a working Mig welder and couldn't really do any more on the project, so I tidied the bench and had a think. A change of plan getting the drive to the front er... I keep going to call them "diff's" but they dont have a diff in them! Anyway, you know what I mean. Rather than go the chain and sprockets way I meantioned in my last update, I will be using the Quadzilla drive shafts, all I need is one more UJ tyo get the shafts around the engine. Of course the front part of the exhaust won't fit because of a drive shaft in the way, but hey, it's only metal While on the subject of shafts, this is part of the drive shaft that fit's on the bike gearbox, the problem is the splines inside don't go all the way to the UJ, so I can't just cut it to length! The only way to do it is to slice a bit out the middle and weld the splined section back on much closer to the UJ. I need to shorten this so it will fit onto the gearbox splines and leave enough room for the UJ on the shaft that runs from the TB to the front axle. To make it easier to line the two bits back up for welding I needed to machine the slined end to an even size outside. As the UJ isn't designed to be taken apart (thanks for that Honda!) I had to be inventive and find a way to hold it all steady in the lathe. It's been a long time since I've used a steady rest, but it did the job well and the machining went smoothly.
-
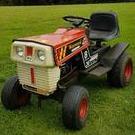
3 pointsI see what you mean Norm, I'm sure something "in keeping" can be made Quite a bit of updateing to do, not sure I will make it all in one sitting as I've a lot to get done today! Before I started to slice MadTrax open for a transfer box implant, he was taken off the bench and wheeled outside so we could have a good look. Back on the bench the rear end was stripped off, a bit of grinder work later and the transfer box was almost in. By almost, I mean the box fitted in but splines wouldn't quite line up.. By connecting the diff and tranfer box shafts I get drive to the rear diff but it also dictates exactly where the TF box has to go. And this is the point where I need some help guys.. The front and rear came from a 2012 Quadzilla 325E 4x4. The problem is I can't get the rear half shafts out of the diff! All the research I've done says inside the rear end is a crown wheel that has a shaft with splines on each end running through it. The end of the half shaft should have internal splines that push over the "crown wheel shaft" and is held in place by and expanding spring/washer thingy. I can pull the end of the half shaft out of the er.. diff/and or crown wheel case only a certain amount and then it feels like there is an internal "cir clip" holding the shaft in.. Also as you will see from the photo the end of the half shaft has external splines not internal ones like the internet whould have me believe! My thoughts are it does have a diff in the back, but someone has cracked the case open and welded it up to make a "locked" rear end.. There is plenty of signs that someone has been in the rear end before, lot's of mastic type sealer on the case joins! Oh, the diff won't come out of the frame without taking the end of the half shafts out first! To join the transfer box to the rear diff I needed the longest length of slined section from one of the Quadzilla prop shafts.. You might say the UJ was a bit worn! The "coupler" needs a bit of work but transfer box and rear diff joined A shaft with 2 UJ's comes out of the front of the transfer box. Which will fit onto a nice sturdy shaft running forward with bearings to hold it in place. The thin walled white tube is for illustration purposes only The front of the shaft will connect to the front diff via some very strong chain and sprockets. Disclaimer... " The above chain idea has now been changed but I've put it in as it's part of the MadTrax story" Nows a good point to drop in a video..
-
2 points
1978 Westwood
pmackellow and one other reacted to WestwoodW8Gazelle for a post in a topic
Hi guys, came across this Westwood last winter and thought I would post if you may be interested. The previous owner had this Westwood for many years and looked after it, that is until she was replaced by a newer and bigger mower, I had mixed feelings about whether I should go for it and I asked if I could have it. He wanted it gone or one day for scrap so he gave me the mower! I saw the mower parked up under a bush when gardening for clients and as I am interested I asked about the mower, the mower is a W8 1979. (Built one year after my 78W8) When brought it back home, noticed all the buttons and levers were and still are all seized!! The mower had stood outside for a good 20 years under the bush so no surprise. Previous owner used mower for rolling field and also using harrow. It's good to have a pull start mower as my other gazelle is only ignition start. There are some weird adaptions made to this mower i.e. the ignition switch, highly doubt this was factory, but I believe this model of Gazelle is the basic model as for some reason the headlights are bolted in with a metal sheet. Previous owner painted green, have no idea why. Next year I am planning to either try to get this old girl running alongside my W8 gazelle, or I may break up. Seems a shame to do so. Already used spare front tire for my diesel Westwood as seen in the first pic. Haha. Is this the beginning? Hopefully not. Still have to order pulleys and new lights for my 78W8 may be for Christmas, haha. Found pulleys but they are in America! So am trying to find a UK supplier. Will be posting video of my 78W8 running once I have pulleys and also the first start of this new 1979 W8! Also was able to print off Westwood Manuel so if anyone needs pictures from Manuel, I can post them. Thanks for reading. -
2 pointsA big thank you to Rex at this point for turning up at the workshop one day sporting a couple of massive MAN truck steering columns. Thanks mate I can't use two of the UJ's as they have a plastic center bit. "I have since found out that the plastic bit is only a cover so I can use them" But I can use the shafts and other UJ's (one of which is a double) to get the power from the GB (gearbox) to the TB input shaft... But more on that when I get to sort it. With my Murex TradeMig finally fixed I decided to celebrate and make some mounts for the TB. Two of the mounts were cut off the remains of the Quadzilla frame which gave me a good start. Space is so tight getting the TB in and out of the frame I have to make all the mounts removable from the frame so they don't get in the way! I welded on a couple of captive nut before welding this bit to the frame. Once the TB has been taken out again I can fully weld it up. MMmmm, some nice strong welds This bracket bolts the TB to the frame, but I didn't like the look of it. So the corners were sliced off. And some new metal was added to put the strenth back in the bracket. Will you look at those pretty colours, yep I'd say my Mig is now working better than ever and producing the heat it needs to do a very strong weld That looks better.. The TB mount the other side. Nice and strong (well it will be when I can fully weld it up when the TB comes out), but I'm not sure I like the shape of it so a few mods will need to be done. That will do for now, it's given you all plenty to read More to come later.. The trouble is I can't split the box with it in the frame, and I can't get it out!
-
1 point

Ransomes Turf Trak 425
4x4forks reacted to expeatfarmer for a post in a topic
My new Tractor arrived today,a Ransomes (Steiner ) Turf Trak 425 21,5 Hp 3 cylinder Kubota Diesel, 4 x 4 hydrostatic transmission with two speed axles. Very similar to my existing 420 but a bit bigger. Seems to be excellent condition with just enough bits to sort to make it interesting. Number two cylinder running badly ( loose injector pipe joint ) number three cylinder glow plug has a dead short, quite a few stray wires that seem to do nothing but generally very pleased with it. There are a couple of trim panels missing from the front end. -
1 point
1978 Westwood
WestwoodW8Gazelle reacted to WestwoodGazelle for a post in a topic
Nice, glad he gave you the mower With some TLC the Westwood could be very nice, if you need to weld the seatbox/bulkhead where it's rotted by the rear fenders, when we did my '84 Westwood it was fairly easy to repair, though unfortunately have no pics of that. I don't know if it is a basic model, or if lights were an optional extra, either ways I hope it goes well if you decide to restore. -
1 point
Ransomes Turf Trak 425
HeadExam reacted to expeatfarmer for a post in a topic
Yes it bends in the middle, front and rear axles are both fixed with a pivot below the steering wheel and two rams. Many thanks Mark. Trying to find an operators manual, contacted Steiner but they dont list one any more. I have looked on download sites but vary wary when they offer free downloads but want your address and credit card details. -
1 pointSounds to me you could be right about things being welded up. Maybe a half shaft broke at sometime. I think you'll need to split the box.
-
1 point

South Downs Heritage Centre display 22/10/17
Triumph66 reacted to pmackellow for a post in a topic
This is the Heritage Centre flyer... -
1 pointI could see there's one under the diff, Nigel. I was meaning where the frame comes down. The diff plate could be extended to curve up in front of it.
-
1 pointhttp://Think you need to go to spec savers Norm, there is a plate under the front diff
-
1 pointA skid plate under the front end might be an idea, Ian. Stop the front getting caught on anything sticking up or digging in a hump.