Leaderboard

Popular Content
Showing content with the highest reputation on 02/06/2015 in all areas
-
3 points

Scored on a rare attachment
bowtiebutler956 and 2 others reacted to OldBuzzard for a post in a topic
http://www.ebay.com/itm/Bolens-18082-Rear-PTO-Kit-2000-RPM-Fits-Large-Frames-/331464616789?autorefresh=true&ssPageName=STRK%3AMEBIDX%3AIT&_trksid=p2047675.l2557&nma=true&si=X1N8qDmKPSEf2RevC8ZjF9yK7c0%253D&orig_cvip=true&rt=nc This is the only rear PTO the will also work whilst the 3-pt hitch is installed. If I decide to put it on the HT20D or HDT1000 I will still have to find the proper propshaft. I can put it on one of my 1886s as it uses the same propshaft as the tiller, which I already have. -
3 points

Project "Why Not"
rotoscytheben and 2 others reacted to Ian for a post in a topic
So today I decided I'd have a look at the fender pan and seat mounting... There is only one way to work out where the seat will go.... Yep, that feels about right This is the start of the seat/fender pan mounting frame, I do need to add more but I need the fender pan to fit first so I can work out what's what.. Hhmm... The fender pan needs a bit of work to make it fit.. It need to be wider and the bit the seat bolts onto need to be about 6 inches lower!! Let's tackle the widening bit first.. The original fender pan was very rotten in the middle and at the back, but I kept the "arches" parts should they come in handy one day A 2 1/4 section was sliced from the spares arch and plonked roughly in place.. Due to fender pans having lot's of different curves and contours a few tweaks will be needed A bit of cutting and welding later and the fender pan was wider one side with matching curves up top.. Oo-er missus The front and back don't quite line up, but I can't work that bit out until the center of the fender pan is in place.. You can see how much wider it is compared to the left side. And that Gent's is this build up to date other than....... A video -
1 point
Ploughing and ploughs 2015
HeadExam reacted to The Fife Plooman for a post in a topic
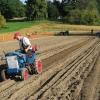
Hi all Starting to put together some hints for all interested in ploughing for fun Here is what we should aim for The Gutbrod and others rear wheels can been adjusted to suit but others you have to put a slimmer tyre on the back or use spacers but it is important before we go any further that this can be achieved The plough must be parallel with the ground the tip of the ploughshare and the heel of the plough must be on the ground with a hollow in-between to create what is called suck I will take a pic of this to give you an idea Hope you can follow me so far Thanks George S -
1 point

nice pub, shame about the rotting farm machinery.
Triumph66 reacted to Simon Taylor for a post in a topic
Hi All, Back in the 1980's, the Plough at powdermills (near hildenborough, kent) had a lovely display of farm stuff, chaff cutters but also bigger seed rattlers, and corn rippers or whatever they were. but now after many years and changes of landlord, the one proud display next to the car park has become overgrown to the extent that most of the stuff is concealed from view. I am wondering if somebody might try and see if this stuff can be saved. some of it may only be good for parts, but other items may be restorable. there is a representitive pic or two below, but please visit my album to see all the pics at... https://www.flickr.com/photos/123783909@N06/ IMG_3543 by lister53827, on Flickr IMG_3539 by lister53827, on Flickr IMG_3541 by lister53827, on Flickr Hopefully, somebody might be able to rescue these? -
1 point
Project "Why Not"
rotoscytheben reacted to Ian for a post in a topic
Thanks Andrew, there isn't much planning going on, but plenty of thinking does happen I don't think I'm working at a fast pace.. I would like to get more done faster than I am doing but my brain and body can only handle so much! After lot's of turning the lump of green painted steel in the lathe in my last update turned into this spacer/brake hub thingy.. Next up in the lathe was a stripped down wheel hub.. Notched.. The spacer/brake hub thingy is a perfect fit And now for the brake disc starting with this 5 inch square of 5mm thick steel... I've no idea what the coating is or what they do during the manufacturing process but this steel is very hard stuff which is quite handy for a brake disc, but it makes it a right pig to turn on the lathe! Getting there.. Almost there... Spacer thingy and disc.. It all fit's inside the wheel... Just A hint of things to come... I can't do anymore brake or steering work until some carbide cutting tips and some rather hefty rose joints turn up.. It will be nice to get away from the lathe for a while anyway -
1 pointBeen putting off painting the coach lines for a while, but it came to the point I couldn't go any further without doing them so, I did! Got the engine on and the oil guage piped in as well as the rest of the 3 point hitch and hydraulic ram.
-
1 point

Homelite XL Tool collection
pmackellow reacted to Wallfish for a post in a topic
Added some more pieces to the Homelite powered tool collection. Upgraded to a better example of the XLS Water Pump. The old one had a broken handle and was missing the gas tank. An XL-12 toy chainsaw with box And a Millitary version of the XL-A115 generator. -
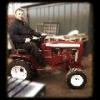
1 pointI have what you are looking for.
-
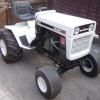
1 pointneeds some T L C but for what I gave for it and few quid tidying it up with a coat of paint will be just the job
-
1 pointThere's a lot thinking and planning behind these projects. I am, yet again, amazed at the pace you're setting yourself Ian. More good work and I await further progress with interest. Cheers.
-
1 point
-
1 pointSounds painful Nigel