Leaderboard
Popular Content
Showing content with the highest reputation on 05/16/2015 in all areas
-
3 points

Digging out a large bush
nigel and 2 others reacted to Wallfish for a post in a topic
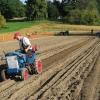
So the wife is always pestering me to work on the "Honey Do" list. She also says I should use those tractors instead of reading about tractors! So...... Since RedSquare is down today, out came the backhoe for some work. Thought I would post over here since I still have the need to read about tractors, engines and machines. Needed to remove a large 12 foot Forsythia bush. She wants to do a small garden in this area and this thing took up quite a bit of room. Had to dig a trench around the base, hooked up a chain to the front end bucket and yanked it out. Put a beating on the hoe with some of larger roots and rocks but got it done. She hasn't decided if the others will need to go yet so I may be back at again next week. -
3 points
Digging out a large bush
OldBuzzard and 2 others reacted to Wallfish for a post in a topic
These are when the power and utility lines to the house were put underground. Trench was about 150 foot long by 4 foot deep. -
2 points
Digging out a large bush
OldBuzzard and one other reacted to Wallfish for a post in a topic
more pics of the machine.These were back from when the back hoe was built. Loader is factory -
2 points

Cub steering box overhaul... If it's possible.
slf-uk and one other reacted to meadowfield for a post in a topic
The new cone fit inside the alloy housing perfectly and was pressed into place before assembling the lower bearing with new 5/16 bearings and lots of fresh grease. Before screwing the end cap into place. With lots of free grease and fully adjusted up, there's no play, just a little binding at the mid point. But that's normal for a steering box. -
2 points
Down by the riverside
nigel and one other reacted to The Fife Plooman for a post in a topic
Hi all This is my toy for the day A stiga 125 mower that I am using to cut the grass along the river Tay the longest river in Scotland I was thinking about calling it the Swanny river Rallies start next week for me -
2 points
Cub steering box overhaul... If it's possible.
HeadExam and one other reacted to meadowfield for a post in a topic
Thanks for the ideas, links and encouragement. Desperation saw us start early this morning trying to fix it in order to have it back on the road for Newby in a few weeks. First part to try make and fix was the upper bearing, I sourced an old headset cup from my bike spares and proceeded to try turn it down on the lathe. Solid chrome is hard stuff! Sparks started to fly from the carbide insert... Here's the old and new cup side by side The old bearing journal was turned off, in order to add a sleeve, made from a CAT 1 to 2 adapter. Which was pressed over and welded Before pushing the old headset cone was pressed on and tacked in place -
2 points

2 lawnriders
pmackellow and one other reacted to nigel for a post in a topic
if you look at this bottom pict it seems to have a differant belt set up -
2 points
2 lawnriders
Triumph66 and one other reacted to nigel for a post in a topic
they look in good condition kev, just watch them when you turn sharply though, they tend to fall over MP046: British Anzani Easimow & Lawnrider Primary tabs View (active tab) What links here The British Anzani Easimow and its successor the Lawnrider are two of the most distinctive mowers of the past 50 years. When it was introduced in the early 1950s the Easimow was one of the first mowers specifically designed as a ride on machine for the domestic, as opposed to professional, market. The Easimow was originally designed and manufactured by E F Ranger (Ferring) Limited. Later that decade the manufacturing rights were acquired by British Anzani, an established and well-known manufacturer of agricultural and horticultural machinery. The company had historic links to the Anzani company that made its name manufacturing aeronautical and aircraft engines in the early years of the 20th century. The Easimow was a very basic design. A tubular steel frame supported the engine and cutting assemblies as well as the roller seat. The mower was articulated in the middle and was steered using what might best be described as a cross between bicycle and pram handles. The early models had a 16" cut and were sold for £80 plus £16 purchase tax (a forerunner of VAT). Production was steady and, judging by the relatively few examples that are around today, the mower was not as popular as contemporary walk-behind mowers from companies such as Atco. In the early 1960s the Easimow was developed into the Lawnrider. This mower, available in 18" and 24" versions, had the same basic configuration but the major difference was that the chassis was now enclosed in sculpted steel panels. The seat and rear roller became much more integral to the design and the mower had an appealing streamlined appearance. Some people refer to the mower as "the swan neck" because of the shape of the chassis as it rises from the rear section to the front. The Lawnrider was painted in a distinctive pale green with a metallic finish. An unusual feature of both the Easimow and the Lawnrider is that they are basically "front wheel drive". The power from the engine was transmitted to a drive roller on the front section of the chassis just behind the cutting cylinder. The roller of the rear chassis section supported and provided stability for the rider who sat on a bicycle seat. This layout gives the impression of a tricycle, especially on the Lawnrider where the front roller was very narrow, and can occasionally make for an interesting driving experience over uneven surfaces! One of the innovations of the Lawnrider was that the cutting cylinder could be lifted from the lawn while the mower was in motion for easier travelling between tasks. This also enabled the Lawnrider to be used for other tasks around the garden in conjunction with attachments such as a trailer. The use of rubber belts rather than chains or gears to drive the cutting cylinder was also unusual at the time. By the late 1960s British Anzani was facing stiffer competition and the company stopped making the Lawnrider. The company had disappeared from the horticultural market by the early 1970s. The Easimow and Lawnrider have a dedicated if small following among collectors. They are an interesting stage on the evolution of the lawn mower. Examples in dilapidated condition are relatively easy to find but good quality machines are more sought after. -
2 points

Project "Why Not"
Vinnetrow and one other reacted to Ian for a post in a topic
Morning all, a bit more progress for you.. Starting at the top... Brake fluid reservoirs mounting bracket.. Only tacked on at the mo. Middle... Bonnet hinges... Bottom... Two bit's of box welded to the engine frame... These will bolt to the chassis and will add vital strength to that area.. Getting the engine out was interesting, slide it forward and lift at the same time! Engine frame bolted back on to help keep things in line during welding... Plenty of surface rust to be cleaned off! A view you would only normally get if you were lying on your back and had just been run over by WN I did make a good start on the cleaning up and welding yesterday, lot's of joints like this needed welding up.. A few more parts have turned up.. New front tyres, sorry for the rubbish photo.. And some shiny stainless pancake air filters.. These are for a 1098cc MG Midget engine so two of them should flow more than enough air. -
2 points
1945 Briggs NR2
S1g and one other reacted to bowtiebutler956 for a post in a topic
The NR2 is now living the good life with my other honored engines that live in my bedroom. Actually its more like a storeroom off the side of my bedroom, but there is no door separating the two. This is where all my restored, and very special engines live. I have a really good wife! There are 20 here in my bedroom, and another 20-30 at my shop. Here are a few pics. Matt -
1 point

2 lawnriders
pmackellow reacted to vegikev for a post in a topic
hi all, i managed to add these 2 british anzani lawnriders to the anzani fleet today -
1 point
Digging out a large bush
OldBuzzard reacted to Wallfish for a post in a topic
You are correct. I didn't like the swivel and lift seat idea because the hoe would have to set farther off the back of the tractor. I wanted it tight as possible so I made the tank and valves swivel back and forth. The valves can be pulled towards the operator when the seat is flipped up, then push them back to drop the seat down. For small jobs, I just kneel on the seat. -
1 pointPost processing still going, unfortunately it went faster on the test machine, I was hoping for the opposite.
-
1 point

RedSquare information
meadowfield reacted to nylyon for a post in a topic
Upgrade is complete, post processing running. This is the longest step all we can do is wait Stepping out for a few.... see ya soon! -
1 point

RedSquare information
nylyon reacted to C-101plowerpower for a post in a topic
forum offline [x] -
1 point
1945 Briggs NR2
bowtiebutler956 reacted to nigel for a post in a topic
my mrs would move me into the shed if i did that matt -
1 point
1945 Briggs NR2
bowtiebutler956 reacted to Ian for a post in a topic
I've seen it all now, engines in the bedroom I think my good Wife would freak if I tried that.. -
1 point
Cub steering box overhaul... If it's possible.
meadowfield reacted to Ian for a post in a topic
Ouch! That steering box does look a bit past it's best! Good to see your cracking and and fixing it Mark -
1 point

Cub steering box overhaul... If it's possible.
meadowfield reacted to HeadExam for a post in a topic
A rebuilt one on eBay for auction, at 70.00 now, not sure about shipping to the UK http://www.ebay.com/itm/Cub-Cadet-IH-Steering-Column-Cleaned-Polished-Painted-Guaranteed-/201345261505?pt=LH_DefaultDomain_0&hash=item2ee11cdfc1 -
1 point
Cub steering box overhaul... If it's possible.
meadowfield reacted to C-101plowerpower for a post in a topic
the column is still available from parts tree by the looks of it, it is a tad pricy tho http://www.partstree.com/parts/cub-cadet/mowers-lawn-garden-tractor/70-cub-cadet-garden-tractor/steering-gear-connections/ also ccwarehouse has some steering assy's http://ihccw.com/steering.html and if you scroll down a bit over here http://gardentractorpullingtips.com/steering.htm there is a list of all CC's that used the same steering assy -
1 point

Cub steering box overhaul... If it's possible.
diggerjames reacted to slf-uk for a post in a topic
Mark, The steering box on the Cub is a Ross unit which is the same as used on the Wheelhorse D-series and a number of JD garden tractors. When I overhauled the steering box on my D-series I managed to cross reference the parts to JD parts, which were on the shelve at our local JD dealer and considerably cheaper than buying the parts from the US. I posted the part numbers in a post on RedSquare ages ago, could have been within James's d-series rebuild thread. I can't even remember what my ID is on RedSquare without looking it up. It is possible you may be able to get a complete new column, certainly the JD parts lookup will give you an idea of what it available. If you can't easily find my post I will look up the details for you later as I am in the middle of trying to fit the deck to my Bolens HT23 at the moment, and forgot that a goat needs to be sacrificed first before attempting the task Iain -
1 point50 bucks for all those gems , you lucky bar steward .
-
1 pointI paid 150.00 shipped for my last two sets of rear Bolens weights. This makes 15 sets of wheel weights in my collection, I must be disturbed. For those that do not know Nigel's term of endearment, "Bar Steward, here is a link that covers the complete etymology of the phrase. http://onlineslangdictionary.com/meaning-definition-of/bar-steward That more than adequately describes me, lol. Alain
-
1 point

vivian loyd motor sickle
S1g reacted to pjtinkerer for a post in a topic
Hi all Just a couple of picks to see how it's going. -
1 point

2 lawnriders
vegikev reacted to pmackellow for a post in a topic
Nice additions to your collection mate -
1 point
Bolens HT20...A big project
Ian reacted to BIGBucks35X for a post in a topic
Time for an update!! (I hope this isn't considered butchery by the puerists!!) Well, I started to look into fitting a new engine a few weeks back and this is how it is looking so far! I have extended the chassis and built a frame on the back to fit the bench seat for two people to potter round the rally field and also replaced the foot speed control with a hand operated quadrant assembly. I have machiened a boss to take a triumph herald UJ flange (and yolk) which I am using to repair the existing propshaft. I have made a dog drive for the starting handle (also homemade) so it disengages the handle when the engine starts (as opposed to the original which was on a key) and extended the handle shaft out the front of the tractor. I'm now going to start looking at the steering which will have to go down the side as there is no room with the new engine! I will post some more pictures up as progress continues!! Also I have some bolens leftovers including the old rear wheel arch/bodywork, bonnet (both in bad condition), some steering components and front PTO parts if these are worth anything to anybody as I don't partucually want to scrap them! Just let me know. Luke -
1 pointNever have I see wooden rollers being given so much love Nice work Richard
-
1 point

vivian loyd motor sickle
S1g reacted to Anglo Traction for a post in a topic
No Problem Paul. I've uploaded the Villiers Manual and parts list in Pdf form on here for you to download a copy, click on either Downloads in the header line, or look down the right hand side of the main screen here for Latest Files and click on it. Good pile of parts there for a Summer Project. Engine parts condition look pretty clean on the exterior. Look's like you have the expensive HT Coil (M1634). Some people have obtained the smaller HT Coil Asian Import and modified it to fit if you want to go that way. Just google Villiers Midget Ht Coil and you'll find a large amount of info on them and other rebuild hints and tips. Would like to see your progress on this. Pictures always welcome. here's a few links to parts retailers- www.Villiersparts.co.uk www.Villiersspares.co.uk www.meetens.co.uk . There are several more. Regards Richard. -
1 point