
Leaderboard

Popular Content
Showing content with the highest reputation on 01/13/2016 in Posts
-
6 points

Lister12/2 and 4.5Kva "Fatboy" .
diggerjames and 5 others reacted to adgecutler for a post in a topic
So, I've noticed the forum has a Stationary engine section, although it's for Petrol engines I guess I can post about my Diesels? Not so long ago I restored a Lister CS12/2 that my Dad had started before he left this world, I thought I should finish what he had started a decade or more before. Sadly as he had left it in a stripped down state and partially exposed to the elements it involved a very thorough every part to pieces restoration. Over 18 months I restored the engine plus and alternator for it to drive, the set up is in memory of Dad who loved engines and was extremely knowledgable on electrics. I designed and fabricated a semi portable base for it all to sit on and it has now attended several rallies and been the power source at a few family parties. Here she is as Dad left her: Here are some of the components nearing the end of the restoration, I recall this was just after I reassembled the injector pumps : Out at her first rally at Newby hall where she ran 16 hours solid on he first proper run, I think we ran somewhere around 32 hours in total at that rally: And a quick video somebody took at Newby, she normally has 2000 Watts of lighting running plus a kettle or chip pan as well as all the mobile phones people bring to me to charge!: -
5 pointsThanks Ian. Glad you like. Should have said that before painting, odd gaps in the wood were filled and then the lot sealed with resin which will hopefully keep any damp at bay. The metal hood had various ripples, especially at the front end where it was bolted to the plastic grill. I got most of these out and a bit of filler helped. Not perfect but miles better than it was. A few of the fixing studs had broken loose from the plastic. These were re fixed with Araldite. A small sheet of diamond metal gauze from B & Q was JUST enough with careful cutting to complete the grill along with a pair of lamps from eBay. In hindsight, I could have made the grill from plastic. Next time maybe. When the lower grill was made the engine was not mounted so measurements were taken from the front mounting holes, engine and chassis, the front and underside of the cylinder head cowling etc to make sure that there was clearance. All well and good, until later. A replacement grill mounting bracket was made, constantly checking for correct positioning, height and did it look right on the dash. Yes, it did. Jumping ahead a little, the engine was bolted in, the cyl head cowlings fitted, still good. Until I went to fit the engine side cowling. No clearance between the front of this and the side plate of the lower grill. Bother and other such naughty words. No only was there no clearance but the grill / hood assembly needed to be moved forward by about 3/4". Couldn't work out why at first then the penny dropped. My previous measurements had overlooked that the grill side plate was set back and to the side of the engine cyl cowling. Hope this makes sense. So off came the grill and hood again. The grill was moved forward on the mount and things started looking good again. Even though there was 3/4" difference the hood catches still engaged and a bit more of the dash top showing wasn't too obvious. It was quite a while after this that I found the reason for my mistake. All the photos I had used for reference etc were of tractors fitted with Kohler or Onan engines. I finally came across a photo showing one with a Briggs engine and could see that the left lower grill side plate was NARROWER than the right. The side cowling on the Briggs has almost square corners, the others rounded ends so no need for a shorter end plate. At least that's my reckoning. Probably why the eBay sellers were unsure if their grills would fit. This last photo, from a US forum, shows an Onan engine with the more rounded cowling.
-
4 pointsNow, what to do about the grill assembly, especially the non existent lower section. A few popped up in the US, top and bottom units but all were listed for SS16 tractors. Again most with various damage and high cost with the usual lottery win postage problem. I did contact two sellers asking if the lower SS16 section would fit a GT16. After supplying engine number and other details the reply from both was "Can't be certain". At the time I couldn't see why as both the SS16 and GT16 grills looked similar on various photo's. I wondered if there was a difference with the mounting bolt or hinge pivot positions, neither of which would have mattered due to the non existence of either on my tractor. I now have a good idea why both sellers were unsure, more of this later in the build. So, what now. After studying lots of photo's, both of complete tractors and upper and lower grill sections, it was decided to make my own lower half and repair the damaged top section. Working from a good dead on side view photo found on a US forum and from my damaged top section, I was able to work out the size, width, height, depth and angle of the side panels etc of the lower section. Not to the nearest thou, but close enough to compare with the photo's. Could I make a pattern and mould one in glass fiber as I had done with model boat hulls.? Too much bother compared with a boat hull so that idea was thrown out. If I was to make a pattern why not use the pattern as the finished article. So that's the way I went. Mainly softwood and birch ply glued and screwed together. I started off by repairing the hinge mounting bar of the top grill section bolted and bonded onto the remains of the original. There was just enough left at each end which also gave the correct angle for the new wood mount. Seen in the first photo with the roughed out lower section. The following photo's show various stages of the lower section build. This seemed to take forever with constant checking both on and off the chassis, including cutting out approx 1/2" from the center of the base as the side panels were not quite at the correct angle. The next few photo's are of the almost finished assembly with modified cabinet hinges. These "Might be useful one day" hinges were cut to suit, re drilled and had the fixed pins reduced slightly in diameter so that they could be removed enabling the top section to be lifted off leaving the lower attached to the chassis. Similar to the original units. As said, it took ages getting things to look like the original. Constant assembly and dis assembly, especially with the hinges to get the gap correct between both sections. There are also various angles on the lower section inner faces, not easily seen on the photos. These were determined from the angles of the top section. More to follow. I'm out of breath from all this talking.
-
3 points
Ransomes MG2 number 137
Alan and 2 others reacted to expeatfarmer for a post in a topic
Nice new air filter arrived today courtesy of a chap called Chris Pamplin an expert on Vokes filters, he had two made for me. I have fitted one but not run engine yet, yesterday the mixture was good at speed but rich on tickover so may risk fitting a smaller slow running jet especially as the filter will richen things up slightly. Finally fitted the second floorboard. The fan belt was annoying me and very difficult to tension so fitted a new one a bit smaller, it meant completely unbolting the engine and sliding it forwards but gave me chance to clean up the flywheel etc which were covered in grease and oil from bedding in the starter mechanism. The canopy has suffered a bit with the efforts at getting the engine started so have pulled it off to clean and repair the damage.Hope to give the engine another test run later today and then start a new project. -
3 points
My Horse story.
wurzel and 2 others reacted to adgecutler for a post in a topic
Many of you will have read my thread about the Raider I had stolen, I'm very pleased to say that yesterday she was returned to the site she disappeared from. Just last week I decided I would have to replace her as I do rely on her for many jobs through the year, not least to save me many hours mowing my allotment and other peoples grass. I ended up being offered a C121 at a price I could afford and made the decision to spend the money I had put aside for the reward I was offering on my missing tractor. Here is the Raider happily returned home alongside her new stable mate. I first became fond of Wheel horses in 1995 when I took a pocket money job at a small country estate, there there was a C141 that the boss had purchased in 1978, the year of my birth. This in fact was the first vehicle I had driven and I soon learned to reverse a trailer with it too. I'm now in charge of estate maintenance at that estate and I still run the C141 pretty much every day, whatever is required of it it manages, from raking driveways to scarifying to aerating lawns to hauling mowers around the grounds on a trailer to hauling many tonnes of wood from the woodland to the yard. She is very well worked and the engine shows wear in the bore and notably where the governor spindle exits the crankcase, you can wobble this about like a knitting needle in a bucket! Over the years it has been suggested several times that she be replaced but I won't have it and if she ever has failed myself or my Dad (sadly no longer with us) will spend a little time in the shed rectifying the problem and off she goes to work again. A few years back after realising our modern Kubota didn't like cutting the long grass areas I used two scrap tractors I sourced to build one good one and this is now used solely for long grass cutting and sports a sixteen horse engine. Here are my two flanked by the ever trusty C141 and the 16BHP mongrel. The wood you see behind them plus many hundreds more tonnes have all been hauled here from the woodland by the little C141 -
2 points

Cub Cadet 70 restoration
Cub Cadet and one other reacted to Wristpin for a post in a topic
We had a customer living about quarter of a mile from the sea who parked his MTD ride-on in an open sided shed , always pointing in the same direction. The side exposed to the sea spray completely rusted away while the other side was more or less untouched . Fortunately MTD were able to supply a complete new chassis section which saved a lot of cutting and shutting. -
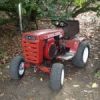
1 pointI have been intending to post this restoration since joining MoM last year but seem to have spent most of my time helping friend John dispose of his Bolens etc stash. As most of the stash has now been cleared I now have slightly more free time, so here goes. The number on the Roper ID plate,T5828DR, I have not been able to trace but the tractor appears to be identical to Sears 917- 257050. The Sears parts list, engine number etc confirms this. The tractor was a mess when dragged from the undergrowth at John's place about three years ago. Lots of damage, parts missing etc and a blacksmith repair job in various places. John was told when he bought it that it had been run into a post, smashing the grill and pushing the hood back which in turn badly damaged the plastic dash tower. As can be seen the damage was "repaired" via a heavy metal frame and alloy plates pop riveted on plus steel box section in place of the lower grill. One of the first things found was that there was no spark plug in the front cylinder of the horizontal Briggs twin. Hardly surprising as there was very little thread left in a hole which resembled a cone. Managed to fit a heli coil at a later date. Since then I have been given a pair of cyl heads. Also found that the starter motor was jammed when trying a first start. One magnet had come unstuck from the case. Stuck it back on with Araldite then found it ran in the wrong direction. Wondered if this was because of the glue used. Using a Westwood ? motor with the Sears mounting bracket and a temporary fuel tank got the engine running on one cylinder. A drive around showed that all the gears were OK. As the tractor looked do-able, with a LOT of work, the next step was to transport it to my garage so that I could get at it without 44 mile round trips to John's. Before the restoration bits, a photo of my great grandson Mini Alan trying it out for size.
-
1 point
barn find FE35
Triumph66 reacted to Joe the small engine man for a post in a topic
hi all, I have just got a gold 'n' grey fe35 Ferguson, it has a 4 cylinder diesel engine, It is completely original and hasn't been touch of over 20 years. it was left outside under a tarp for 12years, with the head off and the barrels open to the elements! the paint is fairly good. we went to move the tractor in the morning on Tuesday preparing are self's for a long day of moving it! but we inflated the tyres and to are amazement all the tyres inflated and have stayed up since, this was very shocking as they are all perished and have sat for over 12years in all weathers. we then put chains around the back axels and used a van to pull it out, it came out so easy I was so surprised. we then loaded it onto a trailer with a hand winch and it is currently on my yard awaiting its own shed to be build after new year! I'm now very busy spraying everything with WD-40 and have put ceresin down the bores to free it up a bit, and now I'm cleaning the surface rust off the inside of the liners. I will have to investigate the gear box as it wont go into gear, I have freed up the H and Low lever which in-gages and disinigages, I think the little ball that drops in to hold it in gear when driving is stuck and need moving. I think its going to be easy to get running as they are good engines, I have all the parts which just need bolting on, I will see if the engine will turn over tomorrow after the wd-40 and ceresin has done its job! then if it does I will bolt everything together and get a new battery, filters and fuel as I say everything is completely original, with even the original tax disc holder, with original tax discs in! -
1 point

My tractor.
meadowfield reacted to moogie for a post in a topic
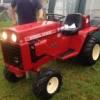
Got this about a year ago. 1978 International 784. Slowly starting to replace all the rusted parts, mechanically everything works fine. -
1 point

barn find FE35
Joe the small engine man reacted to Triumph66 for a post in a topic
Joe, I have always wanted a vintage farm tractor like the classic grey Fergie as I drive one back in the early 80s on a farm in Sussex. Bring back a lot of memories. If I ever get a house with some land to play with I will get one along with my Bolens yo have a good play. Is the one you got? It's a little unusual compared to the more usually seen Grey Fergies. -
1 pointBoards look like the illustration from Ransomes MG2 List of Parts
-
1 pointIt's a date!
-
1 pointme too minky, me too.
-
1 pointHi Alan, I remember you show Nigel and I the photo's at John's place all those months ago. It's good to see bigger photo's I knew you had put a lot of work into her, I didn't realize quite how much! Fantastic plastic repairs, and I know who to speak to should I ever need anything made/repaired with fiber glass Looking forward to the next installment
-
1 pointNice work lad's, I'm surprised that thick metal had rusted away, as it does look like.. er.. thick metal A water trap maybe? Nice repairs by the way
-
1 point

Project C1-4x6
diggerjames reacted to Ian for a post in a topic
You had best keep busy then mate if you have a Sproglet on the way! I'm guessing it is that kind of nursery rather than the growing plants kind -
1 point
Bolens QT17 home made grader/dozer
wurzel reacted to diggerjames for a post in a topic
Simple but very effective I like it -
1 pointi wana job like that.....
-
1 pointWe'll have to sort out a meeting time, place and day. I suggest, Saturday. 1pm. By Jonathans digger/dozer. You can't miss that. I assume he's taking it. If not 137. We could do the same Sunday, for anyone who can't make Saturday.
-
1 point
Project C1-4x6
Ian reacted to diggerjames for a post in a topic
cheers Ian really enjoying it I have a free reign till the end of January then I have to start to build a nursery ! -
1 pointThat's a Kohler engine in the QT? They are good looking machines and the implements are belt driven as opposed to shaft driven I think?
-
1 point
barn find FE35
Triumph66 reacted to Joe the small engine man for a post in a topic
done some more on the tractor, I put some diesel down the bores and hated them up they moved a bit very happy but a lot of work to do! -
1 pointSupposedly coming later this week?.....
-
1 pointA little bit more done today, started dismantling the engine and starter generator. First I removed the pto and pulley. I have now removed all of the tin work and have started on the starter generator.
-
1 pointDecided to make a start on the chassis which is in a fairly bad state, yesterday we began to cut out the metal that had completely rusted away and replace it. Here's a before shot. We used a dremel to cut the hard to reach spots. This is after we cut the really bad bits out. We used an old piece of steel angle from a scrap drawer, here's what it was like before we welded it. We lined it up and then tacked it down. Here's a shot of one side finished, the other side is worse, there is barely any metal left.
-
1 pointLots of small boring jobs done then it was decided to tackle the badly damaged dash tower. Nothing available this side of the pond and the very few which popped up in the US were very pricey plus horrendous postage costs and were all also damaged to some extent. Speaking of nothing available in the UK, I have not seen or heard of any other of these larger Sears / Roper tractors. Various RT 8 and 10's but nothing larger. I expect they will start popping up now. Both sides of the dash were held together with alloy plates and enormous pop rivits. As I had a stock of plastic sheet "Plasticard" in various thicknesses left over from my radio controlled model boat building days, it was decided to use this for the repair. A lot of the lower sides were cut off so that a simple butt joint could be made using the first bonded on sheet to give extra support. As I was not sure if the glue I had was compatible with the moulded dash, ( found out later it was ) the first plasticard sheet was bonded on with araldite after roughing up both surfaces. The other sheets, to build up the side thickness and the shape at the corners were glued together using normal plasticard glue. Lots of cutting, filing and sanding and the dash finished up looking a lot healthier. There were a lot of cracks around the various switch, lever etc holes which were also reinforced. Finally it was trial fitted and after making sure it was sitting at the correct angle it was marked and drilled for the mounting bolts. This last photo, lots of reflections, is after painting and the moulded lettering gone over with white paint. A fiddly job.
-
1 pointAfter most of the main components had been removed work started on cleaning up the chassis. Lots of crud, rust and dead wildlife which seemed to take forever. Some area's were difficult to reach due to various welded on brackets etc. The front axle and steering parts were removed after these photo's were taken. After painting the underside. Countless other operations, not all recorded, before joining up the chassis sections and transmission. This was a potential finger trapping job but luckily they survived. Very fiddly getting some of the nuts and bolts into position due to almost nil clearance between the inside of the chassis and the transmission. I can imagine when built, the frame would have been assembled first, upside down, then the transmission unit dropped in. Not practical for me with no overhead lifting gear or extra hands. I had lots of room in my garage then. Not now due to one of my son's moving back home, as they do, bringing loads of stuff with him, plus I have collected numerous "will be used one day" bits and pieces myself.
-
1 pointAfter transporting the tractor home and having a good look at the damage and missing parts, it was decided that a near enough non original option was the way to go. One of the first jobs was to remove the blacksmith "repair parts". The frame around the upper grill was a surprisingly good fit held on by nuts and bolts. The door butt hinges were welded on, for welded just imagine bird poop splatter, as one hinge had already parted company. The frame and the upper grill. The bit of tin at the bottom of the grill replaced the original hinge mount which had broken away. The box sections which replaced the lower grill were only firmly welded along the front face and were quickly removed with the help of a bar and G clamps. Some of the welds were good, others bird poop. Almost as if two different people had been at work. The engine was lifted off using the same bar. The heavy welded on plate which supported the box sections can be seen. I cut most of this off before realizing later that I could have reused it to mount the new lower grill. The tow bar extension, seen on an earlier photo was removed, two bolts and more poop spatter, to reveal more damage. The original tow pin hole ripped out and the plate cracked for about 1/2 the width along the bend. Could have been repaired but I went for a different option of which more later. After spending ages, on and off, trying all the usual ways to remove the well rusted on steering wheel, I resorted to cutting a slot in the hub and used a wedge to slightly open the slot. This freed the hub from the shaft. Other options suggested on various forums were a lot more drastic. Once the wheel was off and after taking lots of photo's to help with reassembly the major dismantling started.
-
1 pointYeah I don't think the FE35 is common here in the states, I see many people looking for the TO35?, I think that's the one. I have never seen a FE35 here, but that doesn't mean much, I never seen a Red Headed Nymphomaniac Eskimo girl whose dad owns a liquor store, and I even put adverts in the paper.
-
1 point
barn find FE35
Triumph66 reacted to Joe the small engine man for a post in a topic
That's fine Stormin, There are a few around the UK and other areas of the world. Thanks , I put some burning oil down them instead of diesel because it works better as a lubricant as well, will try and turn it over slowly tomorrow with a spanner, if no movement then ill leave it for a couple more days to soak. I gave it a wash today and it has a lot of the original paint on it and in fairly good condition! Regards Joe -
1 point
barn find FE35
Triumph66 reacted to Joe the small engine man for a post in a topic
The FE-35 (Gold belly) are rare as may people don't have them as many didn't sell, In the time of the tractor being made people didn't like the colour scheme that harry Ferguson wanted gold and grey its said even his employees told him that people wouldn't and didn't like the colours, and preferred the TVO 3 cylinder petrol (Perkins engine that was in the old standard cars), so many people either bought the Massey 35, which was painted the Massey colours grey and red, or even the older types for example TED-20 or TE-20 that was produced before the FE-35 and other older models which were just painted grey. As that tractor is its worth a bit not running, but when it is it can be worth over £3000, they go down in value if you re-spray them as collectors such as myself like the original patina, but if its too far gone that its full of rust they you would buy new panels and re-spray. Don't get the Ferguson FE-35 mixed up with the Massey MF35 different years (1955-1964) and colours (Red and Grey) and they have a different values in money. Regards Joe this is another picture will put some more up later after I have put some more WD-40 in the barrel and have washed all the moss and dirt of it -
1 point
barn find FE35
Triumph66 reacted to Joe the small engine man for a post in a topic
Just got tarp off and now trying to inflate tyres! amazing how they all went up and have stayed up. this is the tractor out of the garden, without the bonnet as I was looking at the cylinders. this is it loaded on the trailer, with another tractor! which I also picked up from there a westwood t1200. this is the side of the engine as it was when we took the tarp off, it has a bit of old crumbling carpet over the barrels. this is it on the trailer again, from the back showing the westwood and the bonnet. -
1 point

Cub Cadet 70 restoration
Ian reacted to meadowfield for a post in a topic
Agree with your thoughts and it is lack of maintenance. Age is irrelevant, it needed lubrication.... There's no excuse for two close tolerance moving metal parts to not be oiled or greased. A grease zerk/nipple is an oversight as all big tractors and even wheel horse include one. There's just no way you could get any oil in there to help, so after 50 years it as rusted in solid. Unlike the steering spindles which came straight out - oddly they had grease points! We have never struggled removing a pin on a wheel horse. There's a lot of posts on the IH forums on drilling the pins out and you can buy the full replacement kit. It will end up with a grease point, it's just not worth the pain. -
1 pointI'll take it, can you send it to me in by post office? lol


