Leaderboard
Popular Content
Showing content with the highest reputation on 02/08/2016 in all areas
-
8 points

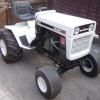
my new massey
the showman and 7 others reacted to harryt for a post in a topic
I got this last week. I bought it off the second owner from the restoration, it was restored in late 2013 to an extremely high standard, one of the best i have seen, all it needs is a choke cable fitting, i was given the before pictures as well. Here are a couple of pics -
4 points

Another Bolens joins the collection
WestwoodW8Gazelle and 3 others reacted to slf-uk for a post in a topic
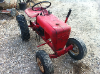
On Friday I had a quick trip to see Alan, John and Chris (The Showman), stopping off on the way to drop off a Bolens to the other Chris (Bolens Chris as my lad calls him). It was fantastic to meet up with them all again. I picked up a Bolens 1054 which I am sure a number of you have seen before. A couple of pictures of the tractor after it arrived safe in Norfolk, the home of Bolens tractors in the UK It is a 1054-03 which I believe means that it was made in 1972. Iain -
4 pointsA little bit more has been done over the past few weeks , mostly cleaning up various parts and painting, here are some photos. The wheels and brake/ clutch pedal after sandblasting. After a coat of etch primer A previous owner of the tractor had stripped all of the threads off of the light switch and so the nut had to be cut off. After cutting the nut off I discovered this. Luckily we managed to save the light switch by cutting new threads
-
2 points

Another Bolens joins the collection
Triumph66 and one other reacted to Alan for a post in a topic
Never heard John saying anything about a swap while he had it. I'll ask him next visit. Doubtfull if he would remember though. -
2 points

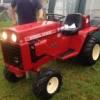
New addition - Wheel horse 312-8
Stormin and one other reacted to Triumph66 for a post in a topic
Go on; paint it yellow and say you got two CCs..... -
2 pointsWell all the tracs which came out of Johns were a little odd any how
-
2 pointsSo did I Well as Harry is only round the corner from me. Its only fair I get 1st test drive
-
2 points
Another Bolens joins the collection
slf-uk and one other reacted to Triumph66 for a post in a topic
That's why I didn't buy it.....Don't do spell in' mishake! -
2 points
Another Bolens joins the collection
WestwoodW8Gazelle and one other reacted to Alan for a post in a topic
All the years I have been around that Husky and I've never noticed the e. -
2 pointsA few updated pictures, this thing has hardly had a rest recently! Tom
-
2 points

Another Bolens joins the collection
slf-uk and one other reacted to Stormin for a post in a topic
Anyone else noticed the way the names are spelt on it? -
2 points
Another Bolens joins the collection
Alan and one other reacted to Triumph66 for a post in a topic
Glad to see it got to you safely. As you know I saw it at John's place last summer and it was up and running very well. The Bolens pushed a trailer connected to the front hitch and manoeuvred it with my wheelweights and round back tiller on it with ease to my car. I got a video of it on my mobile which I will post on to you. Another good find Iain and another saved too especially from Chris aka The Showman who unnerved me totally by saying it was a WheelHorse...... Poor old fella obviously confused by the fact it was painted red and of course it is running as well! Plus the fact he been desperate to find a working WheelHorse at John's place. -
1 pointI just edited my post Iain which confirms your and mine theory.
-
1 pointI think it was an engineering change. My 1254 is a 1972, same year as this 1054 and that also has up/down controls. The Husky (or is that Huskey ) was replaced by the G and H series in 1973 and they all had up/down controls. Andrew, if your 1254 is a 1254-01 then it is 1971, all other versions were 1972 Iain
-
1 pointMy 1254 got up and down controls and it's the same age as your tractor I think. Mine a '71 I think. In fact when I ordered the new controls for the 1254, Bolens1000 off GTT wanted confirmation of the year which suggests that there may have been a change around in the early 70s. I just looked at my 850 (made in 1965) and that got the push/ pull levers. Be interested to know what you find out Iain.
-
1 pointVery nice tractor, I like that. Iain
-
1 pointYou have plenty of nice ones to choose from! Thanks Iain, such a good little tractor and so reliable. Tom
-
1 pointSo would I, it will be interesting to see if anymore come about in the future.. Tom
-
1 pointNice tractor, im missing my wheel horse, I don't think my dad would notice if I took one of his
-
1 pointJust finished scanning these photos and had a quick read at the latest posts on the skimmer thread. There is only that one photo of the skimmer, the rest have been taken at different rallys and show other Ransomes MGs. From the look of some of the photos they were taken quite a while ago, in among the photos I found a brochure for the 1992 Great Dorset Steam Fair which would back this up. I did not know when I was bidding on the piece of Ransomes literature that these photos would be included, the seller just added them in. I had sort of figured that since all the other photos were likely from down round the south that the photo of the skimmer would be from the same general area. Here's the pics, anyone recognise any of the machines? Rob
-
1 pointI think I will, I'm waiting for another one to pop up.. I think I may be waiting a while! I'm still yet to see another with the same hitch as yours and mine, very weird, Tom
-
1 point

Cub Cadet 70 restoration
diggerjames reacted to Cub Cadet for a post in a topic
Cheers James -
1 pointNice find. I spotted that on EBay l a week or so ago.
-
1 pointYes, it was on eBay, it probably better than when it left the factory Harry
-
1 point
Cub Cadet 70 restoration
Cub Cadet reacted to diggerjames for a post in a topic
Nice work buddy it's coming on a treat nice work the switch -
1 pointhi nice tractor is that the one of ebay i bet thats better than when it left the factory cheers Nick
-
1 point
my new massey
harryt reacted to diggerjames for a post in a topic
That's nice great find -
1 point

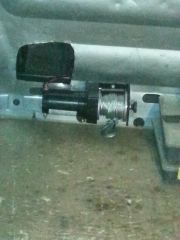
From the album: Bolens tractors
Remote control winch for collecting tractors -
1 pointLooking good!
-
1 pointYes the Husky spelt wrong with an e
-
1 pointIain was lucky to get it on Friday Andrew, as Chris was helping with the loading. As you know anything red finish's up in a red Sprinter van. Iain's Sprinter was white and was easier to find in the semi darkness which saved the day.
-
1 pointGone but not forgotten.
-
1 point

Lancaster chain saw
pmackellow reacted to factory for a post in a topic
Here is a advert from 1973 found online that has two O&R powered Lancaster chainsaws, the 20SLA Automatic that Lee has and the 15SLA Mini Automatic that I have. Also attached are some pictures of my smaller Lancaster 15SLA Mini Automatic with the 13B engine. The air filter is different to the standard ones fitted to O&R's, also the instructions aren't quite right as the chain oiler is automatic. David -
1 point

Project Horse Gut....Nigel and Ians joint project
diggerjames reacted to Ian for a post in a topic
A great service it is too It was good to catch up again, have to make your next visit a bit longer though... I know you was pushed for time Monday.. Cool isn't it... Kinda rolls off the tongue as well Thanks Chris, she does look much better with the decals fitted Ta muchly James A couple of "before and after" photo's, I know which "look" I prefer -
1 pointLove the makers company name.
-
1 pointThanks Lads, she looks even better now I had an early morning visit from this chap who arrived with some decals.. It was good to catch up with you again Mark and thanks for the great decals Before you all ask there is a reason, but your going to have to wait to find out
-
1 pointgot it of the bench today, jobs next week is fit fuel tap pour petrol in fit decals.
-
1 pointAlso missing, what a surprise, was the belt guard and it's mounting bracket. I estimated the size and shape from photo's and made one up from alloy sheet and a cat food bowl. Not an exact copy but better than the nothing that was there before. The slotted plate, which fits just behind the guard was also made from alloy. Lots of other small parts were either bought or made including the steering wheel center. Most where not recorded or had photo's taken. The decals were made by my son. Difficult to know what exactly was originally fitted as various photo's showed different arrangements so a guess was made.
-
1 point
-
1 pointBeen busy today cleaning up the chassis and painting, here's some pictures. I'm pleased with the result after a coat of etch primer, it feels like I'm getting somewhere now To help fill the rust pits I'm brushing on red oxide primer. My new toy arrived last week so hopefully it should speed up the restoration and hopefully I will be able to achieve a good clean surface so I can use etch primer.
-
1 pointA few bits and piece's this time. As previously said the tow bar / plate was damaged and cracked. Could have been welded up but a new tow bar was made along with a smaller one for the front of the tractor. These were bolted on. The fuel tank retaining bracket was another missing part. A new one was made up from plate with rubber buffers. Copied as near as possible from photo's. Five of the ten wheel bolts were missing. Again nothing found this side of the pond, and a silly price at the other side. Plenty of 7/16th unf but nothing UNC. If there was I couldn't find any. The heads of standard 7/16th bolts were too thin to machine a cone so these were modified by drilling and tapping old 3/8 unf wheel nuts, from John's place, then fixed to the bolt using lock tight then pinning with dowels. The heads then filed down to match the surviving originals. Would have been quicker to weld, but that's the way I went. Even the seat bracket had been welded up. The seat was in very poor condition. The pan could have been welded up but the padding was too far gone. A Honda seat was obtained from one of John's friends and a modified mounting made up. No close up photo's of this. The last photo's for now are of the wings and fuel tank.
-
1 pointThe engine, when the tin covers were removed, looked a mess. Corrosion and rust everywhere. The outlet of the exhaust box non existent and the internal baffles rattling around. As it appeared to run OK it was decided to just do the minimum to it for now. All the parts which were easily removable, without disturbing too much, were unbolted, cleaned and painted. The corrosion was cleaned from the cylinder heads and crankcase mainly with various size wire brushes. A long and laborious job. The next photo's show the engine during cleaning with some of the bits still to be removed. The exhaust was a big problem. Couldn't find a replacement anywhere for a long time. Then one came up on eBay, listed by a MoM member. The box looked the same but both pipes were of different shapes, length's and distance apart. It was thought this was an almost new unit and had been removed from a different version of the Briggs flat twin. No photo's of the box as it was. The box fitted the mounting bracket perfectly and was the same size as the old, but there was no easy way to connect the pipes to the stubs on the cylinders even using flexible pipe and various other ways I tried. After much head scratching and splinter picking I wondered if I could use the pipes from the old exhaust, which were in fair condition, fitted to the new box. These were cut from the box leaving the internal part of the pipe attached. The pipes were cut from the new box and with a bit of fiddling the old pipes were made to slide in. Another lucky find in my junk pile were parts of a tent frame, or something similar. The stepped plug in ends were found to be a perfect fit to repair the rusted ends of the old pipes where they fitted over the cylinder stubs. Hope this all makes sense. Anyway, more photo's which should hopefully make things clear. After all the bits were ready and fitted to the engine they were tack welded together, by a mate who is miles better at welding than I am, then removed and fully welded up. A quick coat of paint finished the job.
-
1 pointThanks Ian. Glad you like. Should have said that before painting, odd gaps in the wood were filled and then the lot sealed with resin which will hopefully keep any damp at bay. The metal hood had various ripples, especially at the front end where it was bolted to the plastic grill. I got most of these out and a bit of filler helped. Not perfect but miles better than it was. A few of the fixing studs had broken loose from the plastic. These were re fixed with Araldite. A small sheet of diamond metal gauze from B & Q was JUST enough with careful cutting to complete the grill along with a pair of lamps from eBay. In hindsight, I could have made the grill from plastic. Next time maybe. When the lower grill was made the engine was not mounted so measurements were taken from the front mounting holes, engine and chassis, the front and underside of the cylinder head cowling etc to make sure that there was clearance. All well and good, until later. A replacement grill mounting bracket was made, constantly checking for correct positioning, height and did it look right on the dash. Yes, it did. Jumping ahead a little, the engine was bolted in, the cyl head cowlings fitted, still good. Until I went to fit the engine side cowling. No clearance between the front of this and the side plate of the lower grill. Bother and other such naughty words. No only was there no clearance but the grill / hood assembly needed to be moved forward by about 3/4". Couldn't work out why at first then the penny dropped. My previous measurements had overlooked that the grill side plate was set back and to the side of the engine cyl cowling. Hope this makes sense. So off came the grill and hood again. The grill was moved forward on the mount and things started looking good again. Even though there was 3/4" difference the hood catches still engaged and a bit more of the dash top showing wasn't too obvious. It was quite a while after this that I found the reason for my mistake. All the photos I had used for reference etc were of tractors fitted with Kohler or Onan engines. I finally came across a photo showing one with a Briggs engine and could see that the left lower grill side plate was NARROWER than the right. The side cowling on the Briggs has almost square corners, the others rounded ends so no need for a shorter end plate. At least that's my reckoning. Probably why the eBay sellers were unsure if their grills would fit. This last photo, from a US forum, shows an Onan engine with the more rounded cowling.
-
1 pointNow, what to do about the grill assembly, especially the non existent lower section. A few popped up in the US, top and bottom units but all were listed for SS16 tractors. Again most with various damage and high cost with the usual lottery win postage problem. I did contact two sellers asking if the lower SS16 section would fit a GT16. After supplying engine number and other details the reply from both was "Can't be certain". At the time I couldn't see why as both the SS16 and GT16 grills looked similar on various photo's. I wondered if there was a difference with the mounting bolt or hinge pivot positions, neither of which would have mattered due to the non existence of either on my tractor. I now have a good idea why both sellers were unsure, more of this later in the build. So, what now. After studying lots of photo's, both of complete tractors and upper and lower grill sections, it was decided to make my own lower half and repair the damaged top section. Working from a good dead on side view photo found on a US forum and from my damaged top section, I was able to work out the size, width, height, depth and angle of the side panels etc of the lower section. Not to the nearest thou, but close enough to compare with the photo's. Could I make a pattern and mould one in glass fiber as I had done with model boat hulls.? Too much bother compared with a boat hull so that idea was thrown out. If I was to make a pattern why not use the pattern as the finished article. So that's the way I went. Mainly softwood and birch ply glued and screwed together. I started off by repairing the hinge mounting bar of the top grill section bolted and bonded onto the remains of the original. There was just enough left at each end which also gave the correct angle for the new wood mount. Seen in the first photo with the roughed out lower section. The following photo's show various stages of the lower section build. This seemed to take forever with constant checking both on and off the chassis, including cutting out approx 1/2" from the center of the base as the side panels were not quite at the correct angle. The next few photo's are of the almost finished assembly with modified cabinet hinges. These "Might be useful one day" hinges were cut to suit, re drilled and had the fixed pins reduced slightly in diameter so that they could be removed enabling the top section to be lifted off leaving the lower attached to the chassis. Similar to the original units. As said, it took ages getting things to look like the original. Constant assembly and dis assembly, especially with the hinges to get the gap correct between both sections. There are also various angles on the lower section inner faces, not easily seen on the photos. These were determined from the angles of the top section. More to follow. I'm out of breath from all this talking.
-
1 pointLots of small boring jobs done then it was decided to tackle the badly damaged dash tower. Nothing available this side of the pond and the very few which popped up in the US were very pricey plus horrendous postage costs and were all also damaged to some extent. Speaking of nothing available in the UK, I have not seen or heard of any other of these larger Sears / Roper tractors. Various RT 8 and 10's but nothing larger. I expect they will start popping up now. Both sides of the dash were held together with alloy plates and enormous pop rivits. As I had a stock of plastic sheet "Plasticard" in various thicknesses left over from my radio controlled model boat building days, it was decided to use this for the repair. A lot of the lower sides were cut off so that a simple butt joint could be made using the first bonded on sheet to give extra support. As I was not sure if the glue I had was compatible with the moulded dash, ( found out later it was ) the first plasticard sheet was bonded on with araldite after roughing up both surfaces. The other sheets, to build up the side thickness and the shape at the corners were glued together using normal plasticard glue. Lots of cutting, filing and sanding and the dash finished up looking a lot healthier. There were a lot of cracks around the various switch, lever etc holes which were also reinforced. Finally it was trial fitted and after making sure it was sitting at the correct angle it was marked and drilled for the mounting bolts. This last photo, lots of reflections, is after painting and the moulded lettering gone over with white paint. A fiddly job.
-
1 pointAfter most of the main components had been removed work started on cleaning up the chassis. Lots of crud, rust and dead wildlife which seemed to take forever. Some area's were difficult to reach due to various welded on brackets etc. The front axle and steering parts were removed after these photo's were taken. After painting the underside. Countless other operations, not all recorded, before joining up the chassis sections and transmission. This was a potential finger trapping job but luckily they survived. Very fiddly getting some of the nuts and bolts into position due to almost nil clearance between the inside of the chassis and the transmission. I can imagine when built, the frame would have been assembled first, upside down, then the transmission unit dropped in. Not practical for me with no overhead lifting gear or extra hands. I had lots of room in my garage then. Not now due to one of my son's moving back home, as they do, bringing loads of stuff with him, plus I have collected numerous "will be used one day" bits and pieces myself.