
Leaderboard
Popular Content
Showing content with the highest reputation since 06/29/2025 in Posts
-
3 points

Derby Tiller Power Hoe 13B 400
Mike in NC and 2 others reacted to MrJ451 for a post in a topic
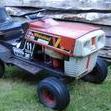
Hi everyone - new member here, and very grateful that I found this forum! I found this Derby Tiller Power Hoe in my father's garage, but when I asked him about it, he didn't even remember having it (he's 84.) Obviously hasn't been used in several decades, and was probably only used a few times. The man has saved every manual, from every piece of equipment he's ever owned whether he still has it or not (ask me about the last 3 lawn mowers he had. Doesn't own one now, but he's still got the manuals for the others.) But this one is no where to be found! I've read through the O&R and AEP manuals in the pinned thread and found some similarities of course, but it's the differences that I need the experts help with. I've removed the air filter - foam was intact (until I removed it.) I have new foam to replace it. The sparkplug has been changed. The cord pulls and retracts smoothly, without catching/sticking. The red button on the carb springs back without issue, but it won't prime - the fuel lines are cracked. (I had a fuel leak into the bucket.) It was stored with fuel in the tank as evidenced by the smell when I opened it. I have not removed the cap that is attached to the fuel line. I would have, but it's stuck and I didn't want to break anything...else. There doesn't seem to be a fuel vent like on many of the other motors. UNLESS that's what the tiny cylinder is that's attached to the fuel line, right before the carb. Obviously I want to replace the fuel lines, but I haven't been able to find dimensions to go with the part numbers (38-11?) The line going from one side of the tank to the other is the one with the leak that I've found. And I have no idea what that little cylinder is - or where to get a replacement if necessary. The numbers stamped on the metal plate of the cylinder cover (2nd to last pic) are 13 - B - 400, 8070907 And there's no On-Off switch, so is that tab circled in yellow in the last pic my Kill-Switch? (Spark Plug Short-out Spring) Any help is greatly appreciated and I can take more photos if necessary! Thank you! -
2 points
Chip-a-saw
JUST O&R and one other reacted to Fshimek for a post in a topic
Also, just picked up this “Ranger”. I can’t find much info on this one. Any ideas on the manufacturer? -
2 points
Chip-a-saw
JUST O&R and one other reacted to Fshimek for a post in a topic
Here’s a couple of pics from when I got it. In a few pieces now. Getting things cleaned up. -
2 points

Derby Tiller Power Hoe 13B 400
Mike in NC and one other reacted to Wallfish for a post in a topic
That thing looks to be a great condition. The diaphragm in the carb will need to be changed. When they get stiff it won't prime or pump fuel. And clean the carb. You can follow the pinned carb tutorial. Shoot me a PM for a diaphragm. Check for spark. If no spark you will need to remove the flywheel then the points cover to clean the contacts on the points. Obviously clean the tank too Yes that's the engine shut down -
2 points

Bits for my next Project
Cub Cadet and one other reacted to Anglo Traction for a post in a topic
Long time, no post!. Apologies for my absence, had to mothball this to deal with other things. Determined to get back to it, and now the weather has released it's wintery/rainy grip, I've been busy making square brass nuts threaded 3/16" whitworth to secure the 3/4" thick mahogony planks. Finally made a decision on the last drive chain layout. Went for direct drive to the pump. 9 toothed gear on the pump side, so at 2,500 rpm at the engine, 500 rpm at the reduction gear output, gives me 550rpm pump speed. The tech data for the pump with the full cam fitted which I have, is 80 litres per minute at 1500rpm.So this set up will run at 29.3 litres per minute, a comfortable rate for my needs. it meant I had to offset the pump, but not a problem really, and the outlet (elbowed) side will clear the edge of the frame when in use. Here's how it turned out:- Hoping to give it a once-over to check everything is fuel tight, and will get it running without the pump on. I need to 'run it in', as it has a rebored cylinder and new rings to bed in. I'll need to:- Waterproof the Spark Plug and Lead on the head area with a cover, which will also act as an engine cut out. Make Chain Cover for the final drive and oil drip collection tray below it. Waterproof the Air Intake/choke (not urgent). I've made a pulling handle, but need some wood to make a grip for it. So I'm nearly at the completion point at last!. Regards. -
2 points
-
2 points
1978 Westwood Gazelle
Norman Wilkins and one other reacted to WestwoodGazelle for a post in a topic
Hi all! Been a while, but I have done some work on my 1978 Westwood Gazelle. I have owned it since 2015 but there's been a few years it wasn't running and I did not have time to do anything with it or sort it. My goal is to get it running, and I would like to fit an underslung exhaust with a rear exit. It's in pretty good shape overall, would be fun to have it running again! -
1 pointThe piece of spring steel arrived yesterday. I will let you know how I make out with it. Thank You..!!
-
1 point
My Wife's Newest Addition (Duster/Fogger)
Mike in NC reacted to Wallfish for a post in a topic
The 20A engine is bigger than the Compact engines are but I'm not sure if the size of the fogger part itself is different. -
1 point
My Wife's Newest Addition (Duster/Fogger)
Mike in NC reacted to Wallfish for a post in a topic
Very Nice Find ! Not very many of those pop up for sale I have one with a 20A engine but not one of those smaller ones. -
1 point
Derby Tiller Power Hoe 13B 400
Mike in NC reacted to MrJ451 for a post in a topic
Here's the photo @Wallfish Spark works fine. When I started cleaning the tank, paint flaked off, so I'm removing the rest and it'll get a new pain job. Found replacement fuel lines, and I'm adding a fuel filter for good measure. I'm leaving that small cylinder before the carburetor attached since I'm not sure what it is. I'll post pics when I'm finished. -
1 point
Little Petro mini bike
Mike in NC reacted to Wallfish for a post in a topic
Courtesy of 10242130 Here is a Brochure picture of a Little Petro minibike.It was made in the early to mid 60's by Odom Manufacturing.This is the same company that made the Petro Powered Products Drill that is on this site along with quite a few other Ohllson & Rice powered tools.Jim Odom also Produced the Comet C Saw for Comet.I will be putting pictures of my Little Petro bikes on this site soon,I need to crop them all as the file size's are too big . Only about 12 of these bikes have been located to date,quite a rare bike. This particular Brochure shows the bike with a TAS engine,but early on,they used the Olhsson & Rice. With O&R -
1 pointThat information kinda mirrors the O&R engines Screw from the back early engines Screw on from the front middle year engines Then the screw on starters about 1970
-
1 point

Little Petro mini bike
Mike in NC reacted to Tom C for a post in a topic
Thanks, yes this is starting to add up. I believe the first digit in the engine number is the year made? so the P5 1959, 1960, and 1961. then the P7 starts in 1962 first with the early fine finned fan starter cover same as P5 screwed from the back. then the P7 about ‘66-67 with the course or heavier finned starter cover screwed from the front. then later P7 about 1970 with the screw on pull start assembly. then 1975 they went to the T23 engines. then about 1980 they came back to the S22 engines.these look more similar to the Old P7’s -
1 point
Bits for my next Project
Cub Cadet reacted to Anglo Traction for a post in a topic
With all the hose clamps finished, they were checked for tightness and then several coats of Rylard Incralac Lacquer for protection- Settled for a quick way to resolve the prevention of water (rain) ingress. Soldered a plated brass hood to the original Air intake filter body- -
1 pointNot that large one pictured. The smaller discs should be attached to the diaphragms. I use a product called "Seal-All" because it stands up to gas.
-
1 point
Ford chainsaw restoration o&r
Wallfish reacted to garrettjames for a post in a topic
I bought this for $20 in a bin on market place completely disassembled. So far I have been able to put it back together for the most part. I have realized I am missing the angled airfilter, the 2 shields that go around the cylinder head and the correct chain. I was able to source the right chrome handle off ebay. I was also able to re bend the recoil ends to there original shape off some pictures I found on here. -
1 point
Bits for my next Project
Cub Cadet reacted to Anglo Traction for a post in a topic
Getting close to finishing this. Here's a few images of this project - -
1 point
Bits for my next Project
Cub Cadet reacted to Anglo Traction for a post in a topic
Have been laid up for 2 weeks with a pretty severe virus that's been going around. Nearly back to normal and have been trying to catch up on a few jobs. Having now acquired decent hose for 1 inch fittings, I drew up the wide hose clamp design and searched my stock for brass. Had enough for three clamps- Pickup end, pump inlet and outlet. the delivery outlet will need some thought. Plates cut and drilled:- Had some hard thinking about how to form them, but sorted it:- Found some 5/16" dia brass for the toggles in my brass scrap box (float arm from a cistern valve). Finished these now, but need more brass 3/16" whitworth screws:- A need for a towing handle was satisfied by salvaging a crank handle from an old Conservatory roof light. Had to dismantle and reshape it to my needs and make a new wooden handle grip, but all brass fits well with the project 36" in length (92cms):- This end needed all the work:- All these parts will be heavily lacquered for protection. Solved the waterproofing of the Carb inlet, so will follow with an update later. Regards. -
1 point
Auto Union GG400
Twinsport reacted to Anglo Traction for a post in a topic
Meget pæn Steen. Thanks for posting images. -
1 point

Auto Union GG400
Anglo Traction reacted to Twinsport for a post in a topic
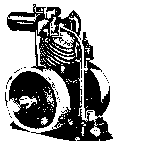
Another post from Denmark Previously I showed you my WW2 Zündapp KS600 generating set and now I'm back. It's time to present my Auto Union GG400 generating set, nicknamed "Panzerwürfel" - Würfel being a cube. Most of these sets (and mine too) supplies 12V and 16V, depending of if you need it to supply power to the radios or if you are charging the batteries. All german armed vehicles had one on board, allowing them to be parked in the battlefield with power to the radios without the main engine running. It's a very compact unit but still features electric start per push button, when connected to a battery. Mine as an early model, which were less robust and prone to cracking the engine mount and mine were defective as well. Dating is easy, as the crank is dated (I just love the effectiveness of the germans). Like much of my stuff I have absolutely no use for it, but it is so nice to have . Enjoy! /Steen -
1 pointThumb and fingers.
-
1 pointHold the spring down with your thumb at the holder opening and pic out the holder with something sharp. Release the thumb pressure slowly so the spring unwinds slowly
-
1 pointMaybe it's ground a negative wire to the case and the positive post ??? 2 posts are 12v. Do you have a multi meter if it's not in the manual how to achieve the 6v? I breezed through it but didn't see anything. Wish @factory David was still active. He always seemed to have the answers for stuff like this.
-
1 pointYes. Anything to hold the rope as long as it gets locked on the spool
-
1 pointThe wire needs to be bent in such a way to feed both ends of the wire through the holes from inside of the spool out. The factory pieces resemble 1/2 a paper clip and the wire is kind of soft
-
1 pointWith a little bit of fuel in the tank, connect a piece of fuel line to the nipple and blow into it. The one that bubbles the fuel is carb line.
-
1 pointThe shape of tank. The line from one side to the other allows air to escape out the top. Otherwise the opposite side from the fill neck would just remain an air bubble on the top without it. So that line allows it to fill all the space so the tank holds more fuel
-
1 pointYou can get the 2 sections off without removing that hole plug cover
-
1 point
Westwood W11 Mark 1
meadowfield reacted to Norman Wilkins for a post in a topic
Update : Have now got this machine running and driving, carb needed a good clean, and the ignition coil was dead so replaced. Drives very well for a 48 year old ! Steering is a bit loose so next job is to have a look at the fascinating 'chain and gear' set up to see if there is any adjustment. Then a proper clean of all the metalwork and treat with Owatrol oil to preserve the original patina. Only thing I will paint is the deck to return to the correct colour but will use a matt finish so it isnt too obvious. Real pleased with this machine and so glad to save it from scrap. -
1 pointJust realized I never added any photos on here of the TAS pump I picked up awhile back.
-
1 point
Newest Addition to my Wife's collection
Wallfish reacted to Mike in NC for a post in a topic
I think she is up to 21 or 22 now. -
1 pointI never checked if the dc was working. When I put the 2 probles of the meter in the plug socket and put it on continuity it beeped indication of a short.
-
1 pointThat old epoxy is always cracked and brittle so moving the wires can expose the copper wire and cause a "short". Maybe use a meter to confirm the windings are not shorted to each other. Have someone look at this wiring pic for you. It's an open generator with the wiring
-
1 pointI've received them shipped both ways. Full unit in a large box and partially disassembled to fit in a smaller box. Never shipped one of those but i have broken down large tools and shipped in a smaller box. I
-
1 pointNo slack at all. the "epoxy" or whatever it is holds and isolates the winding wires. You can pick it out carefully and solder the wire back but be sure to cover it again. Something like liquid electrical tape should work.
-
1 point
O&R Powered Halicki Skate Board 1960's (aka Toby Cart)
Mike in NC reacted to BabaBooey for a post in a topic
Hi All, This is my 1st post as I am new to this forum & hope the knowledge within will provide answers to my ?'s. A friend who grew up in California recently gave me this Toby Cart he used as a kid. It was produced by the Halicki company in Gardena California, sometime in the 60's. The motor is an Ohlsson & Rice, J II .85, the carb, & gas tank are missing so I am on the hunt for both. I have gone thru the motor & all is good to go! This is meant as a display piece so there is no panic or urgency to grab parts. You won't catch me or anyone I care for trying it out! Would the carb be the same as the J I & J III? if so what source if any? where could I get a steel tank? There is not much info available about "Toby Cart" on the internet period. This is what I've researched so far & hope I have it correct. Toby Halicki moved to California when he was 15 & started pumping gas, within 2 years he owned his own body shop & eventually ended up with his own wrecking yard, he started building hot rods & custom cars, fixing wrecks etc, he took real estate classes & ended up buying commercial properties, later he was tapped to do stunt driving in movies & eventually caught the acting bug. He took acting class & ending up writing a script (1974) to a movie titled "Gone in 60 Seconds". The movie was not that successful in N America but Europe loved it & he made millions. Unfortunately Toby died while filming Gone in 60 #2 (1989) on location in Buffalo, a stunt went wrong & he was hurt by a downed telephone pole. An avid collector, Toby also owned one of the worlds largest toy & automobile collections. Thanks for looking & feel free to correct or add info. Sincerely, Don M Ont Canada -
1 point
1978 Westwood Gazelle
Norman Wilkins reacted to WestwoodGazelle for a post in a topic
The Gazelle is finally up and running! -
1 pointI just use my fingers. Wind a bunch of wraps then pull on it so it tightens up the coil then pinch it tight again and repeat as many times as it takes. The factory new spring retainer is a piece of steel shaped like a C which keeps it tight in a package and makes then easy to install. You can make one out of a 1/8" sliver of 2 inch pipe. I think even PVC pipe would work. Wind the spring by hand, then let it uncoil into the C shaped retainer. That way it can easily be placed into the recoil housing. Then the retainer is removed while holding the spring down in the housing with your thumb. Let it uncoil slowly in the housing until it's tight
-
1 pointSorry, I did post a pic of the pieces. You should have a 3 piece muffler now so the piece in the center is the spacer and they can be stacked as many as you want
-
1 pointThere's one cap that has the face with the little holes and the rest are the spacers with bent tab holes at the bottom. You can stack as many as you want but you'll need to make a threaded rod piece for whatever length you stack them to retain it. You can typically find longer screws at the hardware store and just bend the end like the one that;s on there now. Pretty sure the thread size is #6
-
1 pointTiny Tiger Generator Operating Instructions Models 5001-1 & 5001-2-1.pdf
-
1 point
Newest Addition to my Wife's collection
Wallfish reacted to Mike in NC for a post in a topic
I will have to check it out and see if it says on it what it is. Thanks for the information. We went to Rough & Tumble two weeks ago and she got a couple more O&R's I will make a new post for them. -
1 point
Newest Addition to my Wife's collection
Mike in NC reacted to CNew for a post in a topic
Very cool, great addition to the collection. I was just thinking the other day that things have been a little quiet on here for O&R finds. I’m certainly not having a lot of luck finding any these days. Glad you landed that little generator! -
1 point
Newest Addition to my Wife's collection
Mike in NC reacted to Wallfish for a post in a topic
That's a nice find. Cool little generators It's either a Dyna-Mite or a Life sav r -
1 point
Westwood
Norman Wilkins reacted to SuperDumDum for a post in a topic
I don't think this will answer your questions, but I thought I would add this for anyone interested in the history of this machine. In the early 1970's I worked for a company, Garden Mechanisation in High Wycombe. This was the lawnmower sales and service company owned by Gerry Hazlewood, who subsequently went on to form Westwood Engineering. At some point, Westwood had purchased a stock of Dynamark Tractors from the US (I think). These had been shipped to High Wycombe in bulk and stored at the rear of the Garden Mech location on the A40 east of High Wycombe. Problems were; these were not initially sold in any quantity and also their storage location was at the bottom of the yard alongside the River Wye (the Buckinghamshire, not Herefordshire Wye). The river Wye routinely floods in winter, meaning these units were frequently waterlogged for extended periods. As a somewhat junior engineer, I was often tasked with unpacking one of these from their soggy cardboard boxes and trying to get them to function again as tractors. On most occasions I managed it, and these went on to be sold to some unsuspecting customer. Please accept my belated apologies for the condition of your mower, if it was one of mine. -
1 point

Westwood Gazelle
Norman Wilkins reacted to meadowfield for a post in a topic
fab stuff, so can we say mk1 had flat footrests and central gear select before moving to column change and sloping footrests? I note the main dash decal stayed the same for quite a while, but the ignition, lights and warning decals changed a few times? -
1 point
Little Petro mini bike
Wallfish reacted to H Killackey for a post in a topic
It was media blasted. Im not sure with what exactly - and It's a TAS P-7 Here's my resto-mod today. You can scroll up above to my April 2018 post and see the before picture. The chain guard mold will be made this summer 2019 - then copies. I will later in the year make the seat mold and copies -
1 point
Little Petro mini bike
Wallfish reacted to krackermeal55 for a post in a topic
I must be a lucky guy, cause I've still got mine!!! And, just recently discovered it's history, and Rarity!! Resto has already started. -
1 point

One of the first Westwood Gazelles
Norman Wilkins reacted to Alan for a post in a topic
A very similar one dragged out of it's burial ground yesterday. Same gear lever arrangement, footrests, exhaust, hood. 8 hp engine on this one. The front and rear wheels are the same diameter although with different tires. Turned on it's side to remove the remains of the cutting deck. The exhaust can be clearly seen. Track rod broken.