
Leaderboard
Popular Content
Showing content with the highest reputation on 01/31/2015 in all areas
-
4 points

Project "Why Not"
rotoscytheben and 3 others reacted to Ian for a post in a topic
Thanks Mark. Were never too old to learn Chris Thanks Richard.. It's all guess work really An update for you chaps.. Both front wheels are now re centered and fully welded up... Here's the second wheel. And now onto something new for me.. Making a front end that is not only strong, handles and steers well, but also has brakes.. As you will of seen in my last update I toyed with the brakes idea, yesterday was the day to see if I could make it work.. But rather than cutting and turning steel I made a fake brake disc from scrap ally just to see what could be made to fit.. The disc is 5" diameter and 4mm thick.. Time to dig out a bit of history.. One of the twin caliper mounting plates.. And the "Stig Double pumper" both of which were part of my 6X6's ill fated brake steer system.. It's a tight, but a Qwakasaki Gpz305 caliper will just about fit in the wheel rim.. Even better is I can get the steering pivot points rather close to the wheel, the bottom one might even fit inside the wheel which will make for better steering If you think of this wheel as the left side with the caliper at the rear inside and the ruler being the pivot point you will get the idea.. So now I know my brake idea can be made to fit I need a way of mounting the brake disc to the inside of the wheel hub... Lot's of measuring and scribbling later, a plan... Off cut's of steel are always handy to have about the place The start of the first wheel hub brake adapter thingy.... And this Gent's brings the build up to date.. -
2 points
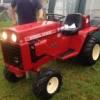
Ransomes turf Trac / steiner 4x4 utility tractor
wurzel and one other reacted to diggerjames for a post in a topic
Hi all I've recently purchased a ransomes Turf Trac which is made by steiner it's an American machine it's 4x4 hydrostatic I don't no much about these but they seem massive In the states , I'm picking it up tomorrow ! Hopefully more pics to follow and information ! -
2 points

Computer Desk
Triumph66 and one other reacted to rboski for a post in a topic
Wasn't sure whether to post this under wood or metal since it's a little bit of both, but this seemed like right place to stick it. Nothing too fancy, just a basic computer desk I made awhile back. The top is two layers of 3/4" particle board glued and screwed together with a couple coats of mahogany Polyshades. I cut a rough kidney bean like shape and then routed all the edges with a round over bit. The legs are galvanized chain link fence posts cut to size and connected using Kee Klamp fittings. I've used these materials to build several desks in the past. It's only plywood so if your space changes you can modify the top or just make a new one. The pipe and fittings never go bad so you can just reconfigure as needed. It's not a fine piece of furniture, but it's perfect for its intended use and it's strong enough to support a tractor. Well maybe not a D series. If interested the fittings can be found here, http://www.simplifiedbuilding.com. They have a gallery with some other interesting ideas and uses for the fittings. -Rich -
1 point

Three More Wheelhorse's
Ian reacted to the showman for a post in a topic
Went to see a good friend today, but made a mistake and went in the van, so came home loaded -
1 point

Who's Going Where? 2015
Vinnetrow reacted to Charlie Smith for a post in a topic
Hello Guys! I thought I'd start this topic off not only for me but for everyone else as well.... I was just wondering what shows are you guys exhibiting at this year..? maybe it will give others ideas of where to go as well -
1 point

Raider 16 4x4 articulated -aka project bendy
Cub Cadet reacted to meadowfield for a post in a topic
Today's update... Beside the new headlight unit, I have braved the cold to just about finish the wiring. Which whilst it's my strongpoint, I get zero enjoyment from! Wired the lower dash panel and used a PC style connector so it's removable. Tested it.... It works! Plus I now have switch on and off able lights -
1 pointMethinks you already have.
-
1 pointHydraulics fitted with back plate, also get the seat on. I've fitted a 3 way valve just incase I need to tap off the hydraulic feed for a dozer blade or similar...... Also purchased another Mg6!! That's 5 I've got now.
-
1 pointhttp://www.bloomberg.com/graphics/2015-atm-bombers/
-
1 point

Project "Why Not"
Ian reacted to Anglo Traction for a post in a topic
Some Fab Fabbing work from a fine 'Fabber' Ian . Great work and progress . -
1 point

Raider 16 4x4 articulated -aka project bendy
diggerjames reacted to nigel for a post in a topic
there is for a shot glass -
1 pointMade the spacers from 316 stainless as that's I had available. Fitted them up tonight.
-
1 point
Project "Why Not"
Ian reacted to the showman for a post in a topic
Fantastic Ian, very interesting as always, I'm not to old to learn after all -
1 point
Project "Why Not"
Ian reacted to meadowfield for a post in a topic
awesome! -
1 point
Yellow Mower Challenge!
S1g reacted to Anglo Traction for a post in a topic
Long time since I visited the forum (last year!!). Hope all are ok etc. I'm adapting to a few shortfalls in physical health (thanks Ian/Norm for your concern). Still looking forward to the chance of spending time down in the Workshop when weather warms up. Have been able to do a few little fiddly bits recently though. Back in Post number #34 on page 2 of this 'Topic', I had a few jobs to finish on the Carb. A new Strangler (choke) Rod has been made up from 1/8" stainless steel and a 'Lift Knob' formed on the top. I also added a fibre washer and spring to prevent vibration wear and seal from dirt etc The 2 Filter Body retaining screws also made.- Made up a new Throttle Cable, turning up some new nipples now that I've fixed the required length and route, the Villiers Throttle Lever also fully refurbed, but had to replace the Chromed Top Screw. Original Cable Ties (2) shown just in top left of next pic will be re used-. Other little tinkering bits I'm managing to do are Fuel Tap(s). The Fuel Tap on this mower is the Lever turn type (bottom in next pic). I thought I'd add a bronze Mesh screen filter (149 microns) like the one I made and fitted to the (1954) Ewarts Tap (right in pic) I'm refurbishing , but may make a 'Drop In' one that sits inside the Tank Filler neck. The other (1964 chrome) Ewarts Tap on the left of pic is finished and from the Seagull Outboard and needed a new Brass Plunger made before fitting a new Cork on it-. Here's hoping we have a good Spring 'n' Summer . Lots to do, Places to go, People to see. -
1 pointNext is the other half of the crank, reed valve and induction sector. *Something I missed documenting is there is also a seal inside the reed valve part. Just past the bearing race. It's the same exact seal as the induction part seal The thin paper gasket which goes onto the reed valve is difficult to get on without breaking it. I found that soaking it in the same fuel mix to run these engines softens it up enough to get it on. Next is the induction sector with gasket was installed. Use screws to hold it in place. This is a good time to install a new points push rod seal too.
-
1 point
Yellow Mower Challenge!
Triumph66 reacted to Anglo Traction for a post in a topic
Made some progress, but not as far as I would have liked, so here's an update and few pics as well. Just to go back to what the Clutch linkage looked like at the start with the corrosion and the iffy cable routing etc., we had something that looked like this (pics should enlarge if clicked on) - So as seen/mentioned in an earlier update, I was not happy with the corrosion after a clean up, so I reproduced new parts to correct spec and added a few improvements, many parts are now back to an unworn condition, together with the addition of a bronze bushing for the Rod, a stainless Cable Clip made/fitted to the top of the Clutch Fork, keeping it clear of moving parts and now looks like this- The sheared stud/nut on the Clutch lever bracket, which used to look like this and shows the old iffy Throttle Cable routing- All refurbished and repaired, but a re-route of the throttle cable is required and now looks like this- Handlebars etc. finished and assembled, also shows replacement 'Barrel' style Grips. Lowering the Handlebars to the operating angle will give me the length and best route for the Cable- I'll probably have to dismantle,then remove the Cylinder because it appears the blades will fowl the Bottom Blade adjusters . It could be that the finished Cylinder diameter is greater than the 6. 1/8" diameter I specified, and so will not allow the adjuster plates to move far enough back away from the knives- Add this problem to some Auction site purchase(s) received this week not being 'as described' , my progress is to be desired. Never mind, it will take as long as it takes. Hopefully another update next week.


