Leaderboard
Popular Content
Showing content with the highest reputation on 11/23/2016 in all areas
-
4 pointsMorning all, after a short break from MadTrax to build the camera panning jig thingy I'm back on the case now.. With the frame painted it's time to start on the smaller parts, starting with these nice crusty A arms.. After thinking for a while I decided the best way to clean the crud off was to use one of these....... Well, use a Hoover as dust extraction for my blasting cabinet Unfortunately, due to the cabinet beings so small and bad arthritis in my shoulders the pain got too much after just a min's use, so I had to clean the A arms up the old fashioned way with a wire cup brush on the grinder! The very shot ball joints in the upper A arms came out without to much of a fight.. The lower ball joints however refuse to come out despite plenty of WD40 and huge amounts of pressure in the vice.. I think I'm going to have to grind the base of the ball joints away and try and bash them up through the A arm rather than down as normally would be done.. I'm sure my 12 ton hydraulic press is going to some in handy Four (mostly) cleaned up A arms waiting a few mods.. With the A arms having quite a bit of rust pitting I don't 100% trust the strength of them especially as they will have to cope with a lot more power and forces.... So template time it was. Which turned into a couple of these.. One of which fit's in here.. I didn't like the look of the inside straight bit, so something had to be found I could draw around to give a nice gentle curve. You can also see the lip welded to the underside of the strengthening plate to er... Strengthen it Fully welded up and hit with some Red Oxide.... I think they should be strong enough now and will hardly notice after a coat or two of satin black And so onto the lower A arms.......
-
3 points

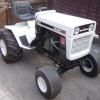
1960 Wheel Horse Suburban
Triumph66 and 2 others reacted to meadowfield for a post in a topic
here's an RJ58 heres an RJ35 -
2 points

Vintage Shooting Gallery
Anglo Traction and one other reacted to Thorn1979 for a post in a topic
It's going in here cos I don't know where else to post this I have started volunteering at a local Heritage Fairground. In season I was doing one day a week, running rides and generally making a nuisance of myself. Great fun. Every year they host an auction for vintage vehicles, steam engines, and assorted bits n bobs - I am sure some of you have been! We were pottering around the yard looking at auction lots and we saw this little thing languishing in a corner. We both fell for it a little bit. Well, it wasn't an auction lot, but the next time I was helping, I asked if I could take it home and restore it for them. In the end they got fed up of me pestering, and now we are halfway through bringing it back to life. Snags so far? Well the original motor (which was almost certainly pinched off something else - the whole thing has been cobbled together by a showman many moons ago) was 110v DC and very very slow, with its own gearbox. We have replaced it (after 5 years outside in the rain there was no saving it) but used a 240v lump, and managed to mount the gearbox - but the "new" motor is much faster. So how could we gear it down enough for the targets to slide past at a sensible rate? Well Martin had the genius idea of using mini-moto sprockets and chain. The belt was rotted clean through in at least one place, so we have retained as much as we could, chopped out and replaced the mankiest bits, and sent the targets off to a mate to vapour-blast them. The rollers at either end of the belt were in bits but Martin has pegged them back together, they look amazing. The angle-iron frame has been dismantled today and we are halfway through stripping it down ready to paint... I can't wait to see it all back together! -
2 points
1960 Wheel Horse Suburban
slf-uk and one other reacted to meadowfield for a post in a topic
rj's and burbans are indeed nicknamed nut roasters.... early RJ's were belt drive, later ones and suburbans were unidrive 3 speed transaxles. Fairly easy to spot the early ones due to the belt cover and simple front axle, the suburbans were cast axle. Anyone feel free to correct me - I may well have made all this up -
2 points

1960 Wheel Horse Suburban
Triumph66 and one other reacted to slf-uk for a post in a topic
I would love a Suburban or an RJ, it would make a great stable mate for my Bolens Ride-a-matic's. What is the difference between a RJ and a Suburban? is it just that pre-1960 the model's was called an RJ's or is it more complicated than that? It looks to me like these type of Wheelhorse should be called nut-roaster's I certainly would be concerned if the rod let go, so to speak Iain -
2 points
First snow of the year
S1g and one other reacted to meadowfield for a post in a topic
We had a bit last week, but this week it has stuck! heres a few pics out and about -
2 points

1960 Wheel Horse Suburban
nigel and one other reacted to Wallfish for a post in a topic
Found this instruction to be interesting. HIGHLY doubt many people are going to remove and replace the belt guard every hour to grease that idler pulley. This could possibly explain why so many belt guards are missing. -
1 pointThanks, it did make me jump a bit but I'm still here which is the main thing.
-
1 pointOuch!! Glad your ok mate, that must of been a hell of a fright!
-
1 point

1960 Wheel Horse Suburban
slf-uk reacted to the showman for a post in a topic
Rear fenders fitted when new -
1 point

New addition to the workshop
slf-uk reacted to Mister Mad Mower for a post in a topic
I got my scaffold winch from Netto , around 10 or so years ago .Every winter it goes in the boot of the car with a 18" length of 1" steel bar . It works a treat off one of the inverters ( 1200w ) and gives me enough pull to get out of trouble . Cut out the tow ball profile in the back plate with my little Cebora plasma cutter . It sits snuggly around the towing ball and the 1" bar is slid through the scaffold pole clamps to clamp the motor to the neck of the ball, quick and easy winch . Plus i can use it as intened if the need arises . -
1 point
B&S 170700 engine instructions
S1g reacted to Mister Mad Mower for a post in a topic
Been scratting around in the attic and came across the folder for my old Norlett 6000 tiller . In amongst the papers is a 1975 B&S 170700 / 170707 opperating instruction manual and to my surprise i noticed the section on the 110v plug in electric starter ? Never come across a mains powered starter before , TG for batteries . I will be converting the literature to PDF for upload within the next week or so . -
1 point

Mini stationary engine
Anglo Traction reacted to factory for a post in a topic
It's a Whitney Simplex gas engine made to the Bathe design, dates to around 1908 to 1910 and was made in London. Can you take a picture of the underside of the cylinder so we can see if the valve gear is still there. The value without the valve gear would be somewhere in the region of £400 to £450, with the valve gear about £750, but this depends on the mechanical condition, which is difficult to assess from photographs. There is a article on Bathe engines in the Stationary Engine Magazine, August & September 2016 issues. Here is a nice picture of the ad from 1908, £5 in 1908 is around £500 today. David -
1 point

What happens when boy racers are given their dads car keys....
S1g reacted to Anglo Traction for a post in a topic
That's one bad experience, glad you're ok . They should allow you to buy it back, saves them the cost of disposal etc. Would be a good thing to do, if either you get the repairs done, or salvage all that's good on it for upgrading a replacement. Get what you can out of them. -
1 pointNot garden equipment I know, but cute nonetheless so I thought I would share this with you all too... My half-sister's stepdad used to use this little treadle fretsaw as a boy. He made models with it and the model coronation coach and horses is still in their family. It languished in my sister's shed after he died, and she decided to pass it on to us because she knew we'd appreciate it. It was a bit rattly though - didn't need a lot of work, just a strip, clean, a fresh coat (or 3) of dark green paint and tightening everything up. You can get tiny treadle lathes by the same manufacturer. Can you imagine this being sold as a toy nowadays?! My hope eventually is to get Martin to make a little jig for it so that I can use it to cut mitres for picture framing.
-
1 pointI had one like this when I was a kid, no idea what happened to it or why I still have all my fingers Iain
-
1 pointVery pleased you are ok. I'm with Nigel on this one. It does not look too bad to put right, I have repaired much worse in my time. Iain
-
1 pointYou can normally buy it back at scrap money if you talk to the assessor unless they have changed the rules since I last did it
-
1 point

What happens when boy racers are given their dads car keys....
S1g reacted to expeatfarmer for a post in a topic
With a vehicle like your van I think you can ask your own insurance company to pursue a full claim against the other party and insist on a like for like replacement rather than a cash payout. -
1 pointYou were very lucky. I would have lumped the driver one when I got out. Had some stupid cow hit the rear of my landrover the other night on my way home as I was trying to pull out onto the main road. Luckly I just had a bent lamp guard which I can sort myself. Her car sure had front damage with my tow hitch taking the brunt of the bump. Need less to say she got a mouth full Landrover 1 --- Vauxhaul MPV crap 0
-
1 pointVery lucky there Gareth. Could have come though the windscreen.
-
1 pointSue the father in the small claims court for the sum needed to put you back in the position you were before his son demolished your van.
-
1 pointCrikey lucky escape there where did that happen
-
1 pointPleased your ok Gareth. Hope they throw the book at him. Though most likely slap his wrist and say naughty boy, while dad pays his fine.
-
1 pointBlimy you where lucky there gareth, van not so lucky
-
1 point
What happens when boy racers are given their dads car keys....
S1g reacted to expeatfarmer for a post in a topic
That was a lucky escape. -
1 point

1960 Wheel Horse Suburban
Anglo Traction reacted to Ian for a post in a topic
Evening all, a few photo's of Nigel's exhaust repairs.. Starting with a bit of pipe. A bit of beating... Taking shape. You can just about make out the "holes circles" in this photo.. Snip snip. Some welding and quite a bit of drill later.. The welds around the side still need a bit more grinding back in this photo. Old verses new.. I know which one looks better -
1 point
Honda MadTrax V Twin Quad.. Nearly Finished.. Woo Hoo
Anglo Traction reacted to Ian for a post in a topic
Evening all.. A bit of trimming, re-shaping and carefully grinding back the welds later and the tank fits again. One of those little milestones, the first squirt of paint on this project.. An even bigger milestone.. With the frame work finally done it was treated to a couple of coats of the red oxide stuff. The poor light in the workshop made it look like a very dark thin coat! But the biggest milestone yesterday was getting the frame in it's top coat, a very classy shade of satin black All I have left to do now is everything else, which is quite a bit -
1 pointMorning all, let's start this update with a very good reason to buy a decent Mig welder... As I've been going round welding up MT's frame there has been the odd weld or three to tidy up... This was gone with my old MigMate hobby welder, and even though I was welding from underneath it looks horrible and not very strong! But once it was all ground back and hit with my Murex TradesMig 165 it looked like this So there ya go boys and girls, bin the hobby Mig and get something more trade like but nothing new (Made in China) and cheap... My Murex is at least 20 years old and will outlast me I expect A heat shield has been made from some thick ally to stop the exhaust cans from melting the seat.. The rear mounts are just captive nuts welded onto the seat mounting plates.. The fronts were mounting brackets that I think used to hold the bodywork on.. Strong with a threaded hole.. That will do nicely Slowly the frame is getting weled and cleaned up.. Some more strength was added a the front where new tubes meet old... Yes the square plate is offset, but so are the lower tubes.. By this point I was starting to get bored with the "weld, grind, weld, clean off some rust, weld, grind, weld, grind" side of things, so I dug the fuel take out and bolted it in place.. Even with the bars, gauges etc bolted on you could see down inside the tank from the front which really bugged me.. So it had to be covered over but I still wanted some air to blow under the tank.. The last bit of my first (and very rubbish) mig welded came in handy once again, this time donating some louvers. Some cutting and welding later... Welded on the tank though a bit of trimming is needed.... The tank will fit in place as it should, you just can't get it on