Leaderboard

Popular Content
Showing content with the highest reputation on 10/29/2017 in all areas
-
3 points

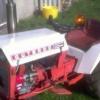
HALF a HORSE.
meadowfield and 2 others reacted to Alan for a post in a topic
After looking for a suitable steering wheel on the internet without success, one was made up. Lots of ready made wheels but too large, too small, near enough the correct diameter but with a rim much too thick for scale etc. A local metal fabricator advertised various scroll work items for gates, garden furniture and so on. A visit was made expecting them to have a ring rolling machine. "Never heard of one" was the reply from one staff member. He called another older person, same answer. When I asked how they made the scroll work they advertised, "We don't, we buy it in ready made from China". Mr Showman had previously mentioned that a friend might be able to roll a ring up. Within a few days I had a 7:1/2" ring x 3/8" section. The hub is a previously drilled cap screw with the spokes from flat strip jammed between two nuts after having a bend made at the inner ends. After trimming the spokes to length and clamping down Chris welded all the joints up. Thanks Chris. I keep thinking I ought to buy a welder but it probably wouldn't get much use. Grinding the welds down was easier than expected, especially around the hub, using a Dremel. A slot was cut in the cap screw head for a roll pin which together with a nut held the wheel onto the column. Two short pieces of tube were pressed / hammered over the nuts and all the joints blended in with filler. The last photo shows the pin resting on the head of the cap screw which is the column bush. This still needs a sleeve over it to finish off. Also a cap made for the wheel center. I should have made the spokes with a steeper angle but too late now. My great grandson, pictured above, liked it anyway. -
3 pointsTo get the drive from the Honda bike gearbox to the TB I had to find a way of turning the drive direction around by 90'd.. One of the steering UJ's fitted with the the splined section from the original CX/trike propshaft.. The shaft will run diagonally between the engine and TB with a nice meaty bearing to hold it in place. And via this double UJ thingy the drive will come out the side of the frame through another meaty bearing and put the drive in the same orientation as the TB input shaft.. Working out space for the TB to front drive shaft. Using a mixture of different shafts and UJ's there is plenty of space to run the front drive up the side of the engine. Hhhmm... Maybe not quite the same size where they need to be joined! A bit of lathe work later.. Ta-Daa Not fully fitted together in this photo as I don't know the exact length yet, but you get the idea Popping back around to the other side of MadTrax for a mo, the pulley (I will be using chain and sprockets) is about the right size to give me an idea how much space I need to create to fit a bearing in. I need to slice some of the frame out here, but I planned to do that anyway to get rid of the un-needed swing arm mount.. It's the only bit left that says "I've welded a few extra tubes to a bike frame" The bearings arrived Wednesday but I've not had a chance to do anything with them.. That's fun for tomorrow
-
2 points

HALF a HORSE.
Cub Cadet and one other reacted to Stormin for a post in a topic
Unfortunately a sign of the times. I bet Dibnah would have made you one. Proper blacksmith. Nice work anyway Alan. -
2 points

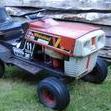
Bolens Tube Frame MacKissic Sprayer
Triumph66 and one other reacted to HeadExam for a post in a topic
It needs a little work and a lid, but I bought it for 100 US -
2 pointsWell spotted The off-set bits of the UJ's will be ground down to make them..er... Not off-set As I will be grinding off the bits where the clamping bolts go I will need another way of making sure the UJ's don't come off the shafts.. On the Quadzilla roll pins were used, so that would be the way to go I think.. The TB didn't officially have a mount around the input shaft I thought it might be wise to make one as a lot of forces will be going into the TB there.. A cardboard template taking shape, pencils being just the right size to screww into an M8 thread As I didn't have a big enough bit of strong plate to make the bracket from I had to make it in two parts. Two of the bolt holes on the TB didn't stick out as much as the other two, so to level things up a couple of spacers were added to the inside of the plate. Welds cleaned up. The chain driller hole is slowly getting filed round. By doing it a bit at a time it breaks the bordom/arm ache up into managable bite sized chunks Bolted back on with a few extras. The top right hand bolt bolts into a threaded tube thats welded to the strut tower. As any "tabs with captive nuts" type things would get in the way of reoving the TB, I had to come up with another mounting spot. Something like this.. It was also a good time to mark out a bolt hole. Off with the bracket them slice the top off the foot rest mount.. Drill it, weld a captive nut inside then weld it all back onto the frame... Top mounting point sorted
-
1 point

HALF a HORSE.
the showman reacted to Cub Cadet for a post in a topic
Fantastic job on the steering wheel! -
1 point

HALF a HORSE.
pmackellow reacted to the showman for a post in a topic
Happy to help, you just have to know the right people. -
1 pointSort of, we took a road trip to visit a nature preserve about an hour away.
-
1 point

Happy birthday Paul
pmackellow reacted to Triumph66 for a post in a topic
Happy belated birthday wishes Paul. -
1 pointThat's a good buy I think. Was it local to you?
-
1 point
1978 Westwood
WestwoodW8Gazelle reacted to WestwoodGazelle for a post in a topic
I will have to get you a picture of the chain and gear steering, it's pretty cool Haha! Owatrol is great because I hate the idea of things just slowly decaying, and whilst I like normal oil, it will always leave stuff a little sticky, so I find Owatrol perfect because it prevents rust but also dries. -
1 pointFantastic work chaps , George you look younger than i thought in your JCB overalls.
-
1 pointIf you're going to use those steering shafts for drive shafts, how about balance? Those clamping thingy's look a bit offset.
-
1 pointHave you not got any paint? I've some black I could let you have.
-
1 pointSomebody already did something about the tree, mother nature, now its up to you to put it out of its misery and into your woodshed. I would use my 116cc Homelite 2000 on it just to let the neighbours know I was around
-
1 pointHere in the USA if the neighbors tree and or parts fell onto or glanced off any part of your abode there would be a lawsuit filed and the neighbors insurance company would be sued by the lawfirm of Hupy and Abraham. William Shatner does tv commercials for them over here......... Do you have neck pain and headachs? That could get you a couple extra million.............. And get well soon buddy, glad you didn't fall and break a hip or your neck!!!!!!
-
1 point

A rude awakening.
Triumph66 reacted to expeatfarmer for a post in a topic
Sorry to see that Norman, heart rot in the tree aided and abetted by ivy starvation.Looks as if the whole tree should be taken down. -
1 point
HALF a HORSE.
pmackellow reacted to Stormin for a post in a topic
You can't beat starting 'em young, Alan. -
1 pointVarious ideas were tried out for the seat using bits and pieces lying around and then discarded. A visit to a local upholstery shop with measurements resulted in a lottery win quote. Back to head scratching mode. I had already spent hours looking for something suitable on the internet without luck, trying various search word combinations. Then I spotted some cheap-ish scooter ( Lambretta / Vespa ) back rests. Not exactly what I wanted but worth a try. A pair were bought and after initial, not sure thoughts, the end result was better than expected. The fill in piece behind the seat cushion, made from plastic, still needs finishing off with padding. The first mock up from ply. The alloy frame, ex green house, just cleared the top of the gearbox. Fixing brackets were bolted on. Sheet steel was bent up for the base and back rest. There were two short threaded studs already fitted which made mounting easy. A length of U shaped trim finished off the steel plate and a similar section was fitted to the fuel tank. I finally managed to get my Great grandson Henry to try the tractor for size. Even though he is only 7 : 1/2 months he loved it. Mummy said she had never seen him so excited, squealing and swinging the steering wheel. We had to hold him though as mummy refused to let me cable tie him on.
-
1 point
HALF a HORSE.
pmackellow reacted to Alan for a post in a topic
Thanks Ewan. You do a good job yourself. -
1 point
HALF a HORSE.
pmackellow reacted to Alan for a post in a topic
The fuel tank, non working, was bent up around a scrap wood former. The measurements were again supplied by my man with the tape, Iain, along with good side view photo's which showed the radius of each corner ! Although the base of the tank was wider than the top, all corners were the same radius. The original idea was to bend the alloy around the former then remove it which left the question, how to fix it all together. The obvious solution, apart from alloy welding, was to screw the panels to the wood which would be left in place hidden from sight. Odd bits of wood were dug out, cut to size, and screwed together after first using the ends to mark out and cut the alloy outer plates. These were bolted to the wood with countersunk BA bolts, the heads blended in with filler. The main panel was cut to size and after carefully lining up, was screwed to the underside of the former. Then it was bent around one face at a time, securing with screws before moving on to the next, and finishing on the underside. Where else. All the screw holes were countersunk, the screws again being blended in with filler. The filler neck was a short piece of alloy bar, screwed into place, and finished off with a cap from an oil can. Rubber edge trim was fitted after painting. -
1 point
HALF a HORSE.
pmackellow reacted to Alan for a post in a topic
About time you started a new project Chris. How about converting John's digger into something RED. You know you like it. -
1 point
HALF a HORSE.
pmackellow reacted to the showman for a post in a topic
Its taking shape Alan, i know where to come when I build the next special. -
1 pointNot many photo's of work on the hood. A slightly larger than required alloy sheet was cut and a shallow fold made on the center line. A board with a curved edge was clamped over the sheet, after carefully guesstimating where the side fold should start. Hope that makes sense. The sheet was then bent around the board forming one side of the hood. This was repeated for the other side resulting in a shape which was not far off the required result. What luck. A little tweaking with a rubber mallet and a length of round bar persuaded the front and rear of the curved folds to line up with the headlamp surround and dash. A lot of time was then spent trimming the oversize edges to get the best fit I could manage, followed by clamping to the headlamp surround and drilling for the pivot bolts.
-
1 pointThe footrests were another item I had a few attempts at before finishing up with something that looked right in comparison with the rest of the build. One pair looked too long and narrow, another try ended up with the fold overs not being deep enough. Fairly quick to mark out and make so not too much hair pulled out. Again, made from the scrap 1mm alloy panels. The first attempts found a use elsewhere after being cut up. How to make the fenders. ? Simply bending up on the brake press wasn't thought viable due to the curves at each end, although I now think it could have been done with a bit of NON press work included. Also the corners would need alloy welding etc. Another possibility was making a plug and moulding in fiber glass. I decided to make these using built up layers of plasticard sheet reinforced with alloy. I already had a good stock of this plasticard. This resulted in very strong fenders. The plastic, welded together with liquid polystyrene cement, was thick enough to sand the curves on ends and sides. The alloy inserts were a very tight fit after making a few short trial sections to get the bends in the correct place. Also bolted at the corners although they wouldn't come out easily. The top of each footrest slides into the slot at the front of the fenders and will be bolted in place when finished.